


Cabbage collars are a great way to prevent problematic cabbage root flies (Delia radicum/Hylemya brassicae) from damaging cole crop plantings. Although gardeners have been making cabbage collars for years to protect plants from this pest, these are a little different from the flat cabbage collars others use. Their shape affords an added layer of protection and it works like a charm.
What Are Cabbage Root Flies?
Adult cabbage root flies look a lot like bristly houseflies only slightly smaller. They’re about 1 centimeter long with bristly hairs all over their gray bodies. This European species is now found across much of North America and up into southern Canada.
Cabbage root flies overwinter in the soil as pupae. When spring arrives, they pupate into adults, feed on flower nectar, and go on to breed and lay eggs over the course of the next five to six weeks.
Also Read: 7 Health Benefits Of Cabbage
Female cabbage root flies lay eggs on or in the soil right next to the base of plants in the Brassicaceae family, including cabbage, broccoli, cauliflower, kohlrabi, Brussels sprouts, horseradish, and occasionally turnips and radish. The 1/8-inch-long, oval-shaped, white eggs hatch into tiny maggots a week or so later. The maggots feed on the roots and stems of infested plants for three to four weeks before pupating into adults. There are two to three generations of cabbage root flies each season.
Because there can be dozens of maggots feeding on a single plant, the plant’s health is quickly affected. Signs of infestation are wilting leaves even when the plant receives ample moisture. Sometimes the leaves have a bluish-purple tinge to them. Cabbage root maggot damage looks similar to some other disorders, including club root and cutworms, so the only way to confirm the culprit is to dig up a plant and check the roots and lower stem for the white, wriggly maggots.

How To Prevent Cabbage Root Maggots
Because female cabbage root flies lay their eggs on or right next to the base of host plants, shielding the soil around the base of the plant is key to preventing this pest from becoming problematic. This is best performed within a few days of planting out susceptible cole crops.
Typically I recommend covering cole crops with floating row cover to keep pests away, but in the case of cabbage root flies, covering them too early may actually trap newly emerged adult flies underneath the row cover, so instead I turn to making cabbage collars to protect my plants. I put a collar around each plant by late April because the first generation of adult flies typically starts to emerge in early May through June here in my Pennsylvania garden.
How to Make Cabbage Collars
What You’ll Need
- Cardboard, enough to create a 6- to 8-inch circle to go around each plant or recycled rounds of cardboard from frozen pizzas
- Scissors
- Box Cutter
- Stapler
Step 1

Cut the cardboard into a 6- to 8-inch circle, making one square for each susceptible plant in your garden. If you’re using recycled frozen pizza cardboard rounds, you’ll just have to cut them to a 6-to 8-inch diameter if necessary.
Step 2

Fold the circle in half to mark the center line, and then unfold it. Fold it in half in the other direction, and unfold it to mark the exact center of the circle. Use the scissors to cut down one of the lines from the outermost edge of the circle into the exact center.
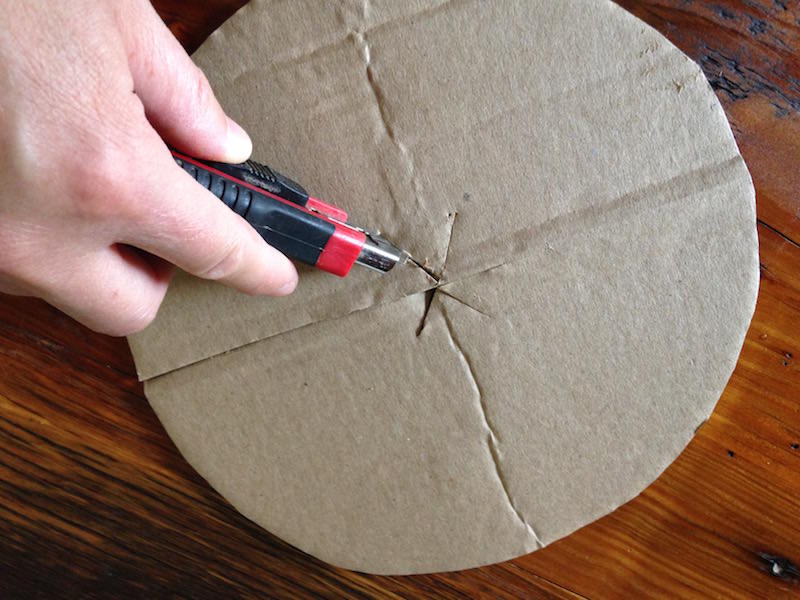
Step 3

Starting at the center point, use the box cutter to cut four 1- to 2-inch lines that radiate out from the center point. Try to space them equally.
Step 4
The final step in making cabbage collars is to bend the small flaps created in Step 3 upwards.
Step 5

Install the collar around the plant by slipping the cut line around the plant’s stem. Once in place, overlap the cut line slightly until the small flaps are positioned loosely around the plant stem. There should be enough space for the stem to expand, but not enough for the flies to gain access to the soil around the base of the plant.
Step 6

Once in place, staple the overlapped cut line of the circle closed in two or three places.
Tips For Using Cabbage Collars
- At the end of the growing season, the collars can be tossed onto the compost pile after pulling them out of the garden and discarding the staples.
- Unwaxed cardboard may warp slightly during the growing season. You can use waxed cardboard for a longer-lasting cabbage collar if you find this to be problematic.
- In gardens that have suffered from major cabbage root maggot damage in the past, you may find it helpful to treat the soil around the plants with beneficial nematodes (Steinernema feltiae) before putting the collars in position. These beneficial organisms patrol the soil all season long and seek out certain ground-dwelling pests, including cabbage root maggots.
This article about cabbage collars was written for Hobby Farms magazine. Click here to subscribe.
