A warm potato salad recipe, that can also be served cold, is a picnic staple. This picnic potato salad swaps hardboiled eggs for the jammy yolk of soft-cooked eggs and combines them with tender potatoes and crunchy bacon. It’s dotted with leafy greens and dill and tossed in a lemon mayonnaise-mustard dressing. It’s easily doubled when you need to serve a crowd.
Yield: 4
Ingredients
2 large eggs
3 slices thick-cut bacon, chopped
1 pound baby potatoes, halved or chopped into similar size pieces
1/2 cup diced green bell pepper, about half a medium pepper
1 tablespoon chopped fresh dill
2 tablespoons mayonnaise
1 teaspoon spicy brown mustard
1 teaspoon fresh lemon juice
1/2 teaspoon fine sea salt
1/4 teaspoon ground black pepper
handful of watercress leaves, about 1/4 cup
ground black pepper and dill sprigs for garnish
Preparation
Fill a medium saucepan with water, and bring to a boil over medium-high heat. Gently transfer the eggs to boiling water and cook at a low boil for 6 1/2 to 7 minutes. Remove the eggs from the cooking water, rinse with cold water and set aside.
Heat a large nonstick skillet to medium-high, and cook the bacon until the pieces are browned and crisp, about 7 minutes. Turn off the heat, and transfer the bacon to a bowl, leaving behind the bacon grease.
Place the potatoes in the warm grease, cut-sides down. Return the heat to medium-high. Cook until all sides are browned and the potatoes are tender, about 7 minutes. Transfer the potatoes to a medium bowl. Let cool for 5 minutes.
Add the bacon, green pepper and dill to the bowl. In a small dish, stir together the mayonnaise, mustard and lemon juice. Pour the dressing over the potatoes. Add the salt and pepper. Stir well to coat all ingredients with the dressing.
Peel the eggs, and halve each. Transfer the dressed potato salad to a serving dish. Top with watercress leaves. Arrange the egg halves over the potatoes. Garnish with black pepper and dill. Serve potato salad with soft-cooked eggs warm or at room temperature.
What chickens lay white eggs for your backyard flock? When many chicken keepers think of white layers, the Leghorn comes to mind, but the Leghorn isn’t the only white egg-producing breed discussed today. So, if you are wondering what chickens lay white eggs, here are eight popular breeds to pique your interest.
#1 Leghorn
With their excellent feed-to-egg ratio, Leghorns are the most popular egg-laying breed in the U.S. The White Leghorn is the primary white egg-producing breed used in commercial egg farms and a popular breed found in many backyard flocks. Leghorn hens produce 5 – 6 large white eggs weekly (280 – 300 eggs annually).
Leghorns are flighty, excellent foragers and active birds who, if given the opportunity, will sleep in the trees rather than the coop. However, this practice is not advised, as a Leghorn’s white feathering is easy for predators to spot.
The Leghorn comes in several striking colors: Black, Black-Tailed Red, Buff, Columbian, Dark Brown, Exchequer, Light Brown, Red, and White. It is also among only a few breeds available in single and rose-combed varieties.
#2 Andalusian
Also known as the Blue Andalusian, this breed will make a lovely addition to the coop. With their beautiful slate-blue coloring and excellent egg production, Andalusions are among the most popular white egg breeds for backyard flocks. Andalusian hens average 4 – 6 medium white eggs weekly (200 – 220 eggs annually).
Close-up of an Andalusian chicken strutting around a garden. Adobe Stock by lizcoughlan.
Andalusians are active, flighty birds that prefer little human interaction. This talkative and noisy breed does best when kept in small numbers.
Andalusians are recognized in one color, a striking laced blue. However, the breed’s color doesn’t breed true, resulting in black or splashed-colored offspring.
#3 Dorking
When many backyard flock enthusiasts consider what chickens lay white eggs, Dorking rarely comes to mind. While the breed is often considered a table bird, Dorking hens are fair producers, averaging 2 – 4 white eggs weekly (100 – 120 eggs annually).
What they lack in egg production, Dorkings make up for with their friendly, people-loving personalities. This breed is calm and one of the few white egg layers to go broody.
Silver Dorking special breed cockerel standing alone on the grass. Adobe Stock by marilyn barbone.
Dorkings come in several recognized colors: Red, Silver-Gray, and White, with the Silver-gray being the most popular of the three varieties.
#4 Houdan
Houdans are one of the most prolific ornamental breeds. With their unique crest, muffs, and beards, Houdans resemble more of a fancy show chicken than an egg producer. While the breed is excellent on the show table, hens of this breed are excellent egg-layers, averaging 3 – 5 medium-white eggs weekly (120 – 150 eggs annually).
Houdan chickens in the garden. Adobe Stock by Koos.
While they can be flighty, Houdan hens are often friendly and ideal family pets.
Houdans come in two color varieties, Mottled and White.
Did you know? Both the Houdan and Dorking breeds have five toes.
#5 Polish
With their cute crest and beautiful feather patterns, it’s hard not to fall in love with Polish hens. Sweet, calm, and quiet, these hens are known for their friendly disposition, making them a good choice for family pets. Hens are good layers, averaging 2 – 5 medium white eggs weekly (100 – 150 annually).
Buff Laced Polish chicken with crest of feathers. Adobe Stock by Sunshower Shots.
With their limited vision due to their feather crest, the Polish should never be allowed to free range.
Polish comes in various eye-catching colors: Black, Blue, Buff Laced, Golden, Gold Laced, Silver Laced, White, White Crested Black, and White Crested Blue.
#6 Ancona
Anconas are among the most prolific white egg-layers. Hens average 4 – 6 medium white eggs weekly (200-220 eggs annually).
Ancona hen with large red comb. Adobe Stock by jenngarcia.
While they excel in egg production, Ancona hens may not be suitable for many backyard flocks as they are flighty and aggressive. This breed wants no human interactions and prefers to spend its days free-ranging. Ancona hens do not tolerate confinement and are not suited for a suburban area.
The breed comes in one color: black with a beautiful beetle-green sheen and striking white speckles across the head and body.
#7 Hamburg
Hamburg chickens are among the most uniquely patterned chickens available today. With their spangled feathers, they could easily be known as the “polka-dotted breed.” Despite their ornamental look, Hamburg hens are good producers, averaging 3 – 5 medium white eggs weekly (120 – 150 eggs annually).
Hamburg Chicken. Courtesy Oregon Department of Agriculture/Flickr
A Hamburg hen’s personality is a little unpredictable as some strains of this breed have a nervous and high-strung personality, while others are friendly, talkative, and sociable.
This breed comes in six striking colors: Black, Gold Penciled, Gold Spangled, Silver Penciled, Silver Spangled, and White.
#8 Campine
The Campine (pronounced Campeen) is known for its matching plumage in hens and roosters. The roosters lack the long sickle, hackel, and neck feathers many roosters sport. Campine hens are nonsitters and respectable egg layers, averaging 3 – 5 medium white eggs weekly (140-200 eggs annually).
pinevalley/Thinkstock
Flighty and inquisitive, Campine hens may often be aloof until they warm up to you. If handled frequently, Campines make friendly and endearing flock members. While the breed is active and prefers free-ranging, keeping birds in confinement may be necessary for a friendly flock.
The Campine comes in two colors: Golden and Silver. Both color markings are the same, with the head and neck a solid gold/silver and lightly barred with black on the body feathers and tail.
Now that we have discussed what chickens lay white eggs, maybe you will consider some of these breeds for your flock. White egg layers may not be as popular as brown layers, but adding some of these delightful breeds to your flock will add color to your flock and egg basket.
This article about what chickens lay white eggs was written for Chickens magazine online. Click here to subscribe.
Preserved Feta with Oil and Herbs. Photo by Stephanie Thurow
Knowing how to store feta cheese can extend its use by date and infuse flavors that make feta a perfect addition to varied dishes. Ready to level up your next charcuterie board? Make a couple of variations of this homemade preserved herbed feta cheese and you’ll have your guests begging for more! It’s as simple and marinating feta cheese with oil, red wine vinegar and any herbs of your choice. The flavor combinations are endless.
This feta cheese stored in olive oil and herbs can be enjoyed over crackers, toasted baguette, mixed into pasta or crumbled into salads. Once the cheese is gone, the leftover oil can be used to make salad dressings, marinades or used as a drizzle for roasted or grilled veggies.
Feta Cheese with Herbs
Yield: 8 oz cheese
Ingredients
8 oz feta cheese
¼ cup red wine vinegar
1 cup extra virgin olive oil (as needed)
1 garlic clove, minced
Herbs and seasonings as desired.
Cut a brick of feta into bite-sized cubes and place cubes into a clean pint jar or other glass dish with a fitting lid. Be careful not to break or crumble the cheese while filling the jar.
Add garlic and herbs of choice over the cubed cheese.
Pour the red wine vinegar over the cheese. Next, add the olive oil, but just enough until the cheese is completely submerged in oil.
Gently shake the jar upside down to blend the oil and vinegar, being mindful not to break up the cubed feta.
Softly tap the bottom of the jar on the counter to rid any air bubbles that may be trapped between the feta and jar.
Wipe the rim of the jar with a damp paper towel to remove any food. Apply the canning lid and tightly screw on the ring.
How to store feta cheese is also a process of time. Infused cheese should be kept in the refrigerator for at least 48 hours before sampling. The longer the cheese infuses with the herbs, the more flavorful it will become.
Enjoy the preserved feta with oil and herbs within one month for the best flavor and texture. Be sure that the cheese stays submerged in the vinegar-oil mixture for best preservation.
Flavor combinations pictured include:
1 garlic clove minced with ¼ teaspoon dried oregano and 2 sprigs of fresh rosemary.
1 garlic clove minced with 1 tablespoon crushed red pepper flakes.
1 garlic clove minced with 1 tablespoon fresh minced parsley.
Other delicious flavor combinations:
Chopped garlic with dried oregano, dried basil, and dried thyme.
Lemon zest and fresh dill.
Mint and parsley.
Thyme, rosemary, and garlic.
How to Store Feta Cheese Notes
There is a debate on whether soft feta or hard feta in brick form make better-preserved feta cheese. My answer to that is: there is no wrong choice here when you know how to store feta cheese. Both offer delicious outcomes. However, if you want to make a more spreadable preserved herbed feta cheese for crackers or bread, you’d be better off with a softer option. If you intend to use the preserved feta in salads or in something you’d prefer it to stay firm in, then use that firmer option to preserve.
It’s worth using a decent quality olive oil when making preserved feta since it’s such a large part of the recipe.
This article about how to store feta cheese was written for Hobby Farms online.Click here to subscribe.
The Rex rabbit was first shown in Paris in 1924 and was brought to the United States in the same year. Known as the King of Rabbits, the Rex remains the most commonly used rabbit for pelts, due to its plush coat. The breed was developed in 1919 from a mutation found in a litter of wild rabbits. The mutation had no prominent guard hair, giving the rabbit a softer, denser coat.
Like most rabbit breeds, the rex is a fairly docile animal. According to PetMD.com, the average lifespan of a rex is 6 to 8 years, giving it a shorter lifespan than the average 7 to 10-year lifespan of most domestic rabbits.
Rex Rabbit Breed Standard
According to the American Rabbit Breeders Association (2018), the Rex rabbit should have a broad head set close to the shoulders, the eyes and ears should be alert and ears should be held upright. Hips should be well-rounded with a wide loin, rib and shoulders. Feet should be parallel, and not too long.
Fur should be between half to seven-eights of an inch. Sixteen different colors are recognized in show-quality rabbits.
The Rex is considered a medium-weight rabbit. Bucks should weigh between 7.5 to 9.5 pounds, does 8 to 10.5 pounds. While smaller than most common meat rabbit breeds, the Rex is often raised as a dual-purpose, meat and fur, animal.
Rex Rabbit Fur
While Rex are used for meat, show and as pets, the breed is primarily known and raised for the plush fur. Rabbits usually have a dual coat, the undercoat and the “guard hairs.” The distinct feel of a Rex coat is due to a mutation in which the guard hairs are missing. This leaves only the softer undercoat. It’s similar to goslings or ducklings before their feathers grow in – the down is always softer.
The quality of this coat can vary, depending on the rabbit’s genetics. In meat rabbits, a thick skin is considered a detriment because it ends up being part of the offal during butchering. However, for those interested in using the pelt, a thicker skin has been shown to be beneficial to the Rex, as the hide is less likely to tear and the fur less likely to fall out. The journal “Animal” published a 2023 study suggesting that Rex be processed in the winter, due to the significantly thinner and poorer quality coat the rabbits produced in the summer.
Rex Rabbits: Care
As with most rabbit breeds, Rex are curious, social animals. Many raise rabbits in a colony because of this. Stimuli and enough space to move around improve the quality of the rabbit’s life. Those raising for production may consider this a waste of resources, but a study of Rex rabbits in China showed that the quality of meat and fur improved when the rabbits were given access to stimulation, rather than just food and water. The study was done with two rabbits per cage, a practice recommended by the Rabbit Welfare Association and Fund (RWAF).
Suggested cage size varies, depending on your source. The Michigan State University website suggests 3 to 4 feet of cage space per rabbit, depending on their weight. However, the RWAF and other organizations suggest that, at the very least, rabbits should be able to hop three times from end to end and stand on their hind legs without hitting the top.
Several studies were presented at the 8th World Rabbit Congress in 2004 about the feeding of Rex rabbits. These studies showed that Rex rabbits require at least 12% crude fiber in their diet. Below that and the rabbits had diarrhea and significantly lower weight gain. At 14% crude fiber, the efficiency of feed versus growth weight decreased, suggesting that feed should be around 12% crude fiber.
Research was also done on the protein levels for pregnant and lactating rabbits. Does fed a minimum of 17.5% protein showed higher numbers of kits in a litter, heavier young at birth and a better survival rate in the kits. Lactating mothers who were continued on this feed had kits with a faster weight development, with the best fur density.
This story about the rex rabbit was written for Hobby Farms magazine online. Click here to subscribe.
A tree and log scale stick is a must-have tool if you’re interested in harvesting lumber from woodlands on your farm. Small, lightweight, and relatively inexpensive, this tool will help you estimate the amount of usable lumber (in board feet) that any given tree might yield.
What is a tree and log scale stick?
A tree and log scale stick is long, narrow, and covered with numbers and marks to gauge the diameters and heights of trees. At first glance, it resembles a large ruler. They can be purchased from many places, or it’s straightforward to make your own so long as you get the ruler markings in the correct places.
The following instructions provide an overview that will apply to many models, but if your stick requires different distances for use, follow the instructions for your specific stick.
How to measure a tree’s diameter
On one section of the stick you’ll find narrowly spaced lines marked with numbers like 16, 18, 20, 22, etc. These are used to measure, in inches, a tree trunk’s diameter at breast height. Diameter at breast height is 4 1/2 feet above the ground, measured from the uphill side of the tree if it’s growing on a slope.
To measure the diameter, hold the stick horizontally against the tree trunk, exactly 25 inches from your face. Line up the left edge of the stick with the left side of the trunk. Now look at the right side of the trunk (don’t move or turn your head) and note which measuring line on your tree and log scale stick most closely lines up with the right edge of the trunk. If it says “26,” the diameter is 26 inches.
How to measure a tree’s height
On another section of the stick you’ll find widely spaced lines meant to measure how many log sections (typically 16-foot log sections) can be obtained from the trunk.
To count the log sections, walk 66 feet away from the tree, and hold your tree and log scale stick exactly vertical and exactly 25 inches from your face. Line up the bottom of the ruler with the bottom of the tree, but a little above the ground—wherever you would cut if felling the tree. Then use the measurement markings to count, from the ground up, how many log sections comprise the trunk before the trunk’s diameter grows to narrow to be useful or you encounter significant branching.
Calculating board feet from your measurements
Once you’ve taken diameter and height measurements, you can combine them to estimate how many board feet of lumber a given tree will offer.
Depending on your particular stick, simple guides may be printed right on the stick, telling you how many board feet of lumber a tree with X number of log sections and Y diameter at breast height will yield. But you can also research the Doyle, Scribner, and International 1/4-inch Log Rules to find easy-to-read data tables and even the underlying formulas for calculating board feet. The International 1/4-inch Log Rule is considered the most accurate, but the older Doyle and Scribner methods are still widely used in different parts of the United States.
Obviously, the estimates gleaned from a tree and log scale stick are just that—estimates. But an estimate is enough to give you an idea of how much lumber is in a stand of trees, and whether harvesting some of the lumber is a worthwhile project on your farm.
This article on how to use a tree and log scale stick was written for Hobby Farms online. Click here to subscribe.
Fresh ramps with roots for farmer market
Adobe Stock By Paul Pellegrino
A fermented ramps recipe can extend the ramp season so these fleeting delights can be enjoyed for months to come. If you’re not familiar with ramps, they taste like a cross between scallions and garlic. They can be eaten raw or cooked. All parts of the ramp can be eaten, even the leafy green end.
Native to the northern forests of America, ramps are typically found after the snow melts. They die off once the foliage in the forests grows so dense that the ramps no longer get sufficient sunlight. Therefore, ramps are only available in the early spring; by mid-May they become more difficult to find.
I’ve never foraged for wild ramps myself; I purchase them from the co-op. Little bundles of ramps comes with a high price tag, therefore this ramp recipe will yield a small batch to be savored.
This fermented ramp recipe is simple and straightforward. It is flavor packed and makes a great condiment to top chili, hot dogs, brats, eggs, or enjoy them stirred into salads, pastas, or any dish where you want a pop of garlicky onion flavor.
Fresh wild ramps
Fermented Wild Ramp Recipe
Yield: 1 cup fermented ramps
Ingredients
3 bundles of ramps – ¾ cup prepped (sliced)
1 bay leaf
1/8 tsp. whole black peppercorns
1 clove garlic, crushed
Brine: 1 tsp. coarse kosher salt, dissolved in 1/2 cup of water.
Instructions
The first step is to thoroughly clean the ramps. Ramps are notoriously pretty dirty, coming from the forest and all. I submerge them in a large pot of cold water and allow them to soak for a while, then I use my hand to agitate them, to encourage the dirt to fall off.
Use a paper towel to dry off the ramps and rub off any additional dirt or thin skin that is beginning to slough off.
Trim off the root ends and peel away the outer layer of the ramp. Trim off the leaf. Reserve the leaves to cook separately. Once you have your ramps cleaned and trimmed, give them another rinse off.
Cut the ramps into ¼” slices until you have ¾ cup.
In a clean 8-ounce canning jar, add the remainer of the ingredients. Tuck the bay leaf on the side of the jar so that it does not get crushed. Add in the sliced ramps.
Stir up the brine and pour it over the ramps until everything is completely submerged. Leave at least a half an inch of headspace from the brine to the rim of the jar. Add in a small jar weight if you have one, to help keep the floating pieces submerged. See notes section about jar weights.
Use a dampened paper towel to wipe off the rim of the jar, apply the canning lid and tightly screw on the jar ring.
Fermentation
This ramp recipe is a 5-day ferment. Ferment at room temperature, ideally between 60-75°F and keep out of direct sunlight. Check on the ferment daily to make sure the brine remains over the produce. This is a crucial step in all vegetable fermentation, as any produce above the brine is prone to mold and these little ramp pieces tend to float up.
If the produce is above the brine, use a clean utensil to push the produce back down below the brine. Burp the jar daily – unscrew the lid briefly and tighten it back on to allow any built-up gas to release (and avoid jar breakage).
After 5 days, taste test the ramps to see how the flavor is coming along. The ramps should have melded flavors with the other ingredients and have a sour, tangy taste. You can expect that the brine will have a pinkish hue. Transfer to the refrigerator once fermented to your liking, with the brine and all.
The fermented ramps will last nearly indefinitely however the texture and flavor will continue to change. Fermentation does not stop once refrigerated, it just slows way down. This ferment is best enjoyed within 6 months.
Ramps Recipe: Side Notes
If you do not have a glass jar weight, you can improvise by using an easily removable small food-grade glass dish that fits inside the jar. Or, if you have a smaller glass canning jar that can fit into the mouth of the jar you are fermenting with, you can use that to keep the produce pushed under the brine.
If you are unsure if your water is safe for fermentation, you can boil it and allow it to cool to room temperature before adding in the salt to make your brine.
You may use fine sea salt instead of coarse kosher salt if you prefer but consult a salt conversion chart when doing so. For more fermented recipes, follow Stephanie on Instagram and check out her cookbooks on food preservation.
How to keep mice away from the chicken coop is important whether you raise poultry for market or maintain a backyard flock, chicken coops are a magnet for mice and rats.
Mice will establish colonies within buildings and might never venture outside. In contrast, Rats often appear in the fall, when their external food sources are depleted by harvest. They emerge from the fields, where they live in burrows, to forage and feed around buildings.
Rodents are responsible for more than a quarter of all farm fires of unknown origin, but the main risk from infestations is feed contamination and disease exposure to both you and your flock. A rat can produce more than 40 droppings per day and a gallon or more of urine per year, while a single mouse can produce more than 80 droppings per day and more than a quart of urine per year. A variety of human and livestock diseases are spread through contact with rodent excrement, which include cryptosporidiosis, toxoplasmosis, leptospirosis, brucellosis and salmonellosis.
Rats can also become predatory, killing and feeding on adult chickens, but they can be especially hard on young chicks. As a professional wildlife control operator and hobby farmer for years, I’ve personally witnessed rat infestations that consumed hundreds of day-old chicks within a couple of nights. Because rodents are mainly nocturnal feeders, it’s easy to seriously underestimate their numbers and impact on your coop.
Here are a few steps for how to keep mice away from your chicken coop to help minimize a rodent problem around your chickens.
1. Clean the Coop
Keeping the area around the chickens’ coop tidy will help deter rodents, especially rats, by leaving them without a place to set up house. Make sure grass around your coop is always cut neatly, and remove any scrap lumber or brush piles that are near the area. Throw away empty feed bags or store away for future use—don’t let them pile up outside the door.
2. Build Barriers
Repair doors and floors to help restrict access to the coop. Total exclusion might not be practical for larger operations, but backyard chicken keepers will find benefits to it. Mice can squeeze through an opening the size of a person’s little finger. If possible, line the corners of small, elevated coops and chicken tractors, especially where walls and floors meet, with sheet metal or 1/4-inch mesh hardware cloth. It’s best if this is done from the outside to prevent rodents from chewing an entry point through the wood.
3. Store Feed Properly
Chicken feed should always be stored in a covered metal container. Heavy, industrial drums that have been thoroughly cleaned are best at keeping out rodents. Drums come in 30- and 55-gallon sizes and can often be purchased from farm-supply dealers. A simple metal trashcan works as an alternative if you don’t have access to drums. Make sure the container’s cover fits tight; otherwise, rats and mice will scale walls to jump into the container.
Also remove the chickens’ waterer from the area at night when they roost. Rodents often show up in droves in late summer, especially if it’s been hot and dry, looking for moisture. Be sure to replace with fresh water in the morning.
4. Set Snap Traps
If you find yourself with a rodent infestation, the best remedy is to physically remove them. Traditional snap traps can be very effective for both mice and rats; however, you will want to keep them out of reach of your chickens. Most hardware stores sell trap/poison containment boxes. These boxes typically hold a couple traps, protecting them from anything that can’t enter the small entrance hole.
Rodents naturally concentrate their travels against walls, so these boxes or stations should be placed in their natural line of travel. The entrance hole should be parallel and closest to the wall. Bait can be used, but isn’t absolutely necessary in this situation. Traditional baits, such as peanut butter or chocolate, will work fine.
Larger boxes and traps can be placed around the perimeter of the coop to catch rats looking for a meal. Rats are extremely wary of anything new in their territory and might avoid the boxes until they get used to them. In this case, the boxes should be installed a couple weeks before putting the traps in them to help overcome their natural wariness.
5. Set Colony Traps
Colony traps are multi-catch traps, meaning they can hold more than one mouse at a time. The small metal boxes have an entrance hole on either end that contains a one-way door, meaning mice enter and can’t get out. The nice part about them is they’re on duty 24/7 without maintenance, except removing trapped mice. Again, no bait is needed if placed against the wall in the normal travel route. All mice caught in a colony trap will be alive if you check them frequently, so you will need a plan for dealing with them. Mice are not at all wary of these devices and will enter them readily.
Colony traps for rats are like small cages. Again, the rats will hesitate entering them at first. My experience is once one finally goes in, they all go, but it might take days or even weeks.
6. Apply Rodenticides
Poisons are often a last resort for the chicken keeper and should be used with caution around your livestock or poultry. Always place poisons in containment boxes; in most areas, this is the only legal way to use them. Make sure the boxes are locked in some manner. Many of them snap shut and require a tool to open, while others need to be locked with a screw or similar fastener. This will keep them from opening and exposing the contents to non-target animals.
I prefer poison blocks over pellets, as the blocks can be fastened to the inside of the box and are more difficult for rodents to remove. Pellets can easily be removed from the boxes, which is hazardous to your flock.
When using any rodenticide, it’s important not to continually use the same one over and over, as rodents will eventually build up an immunity to the chemicals. If a rodent snacks on a poison block and gets a bellyache and then recovers, it is now immune to that particular cocktail, so it’s important to change it up frequently. It is also important to keep the boxes maintained—don’t run out of poison—and keep them well fed.
Be aware of secondary poisoning to domestic animals, such as cats and dogs, and in wildlife that might consume poisoned rodents. Secondary poisoning is rare, but it can happen.
7. Call a Professional
If you find yourself overwhelmed or simply just don’t want to deal with the mess of rodents, search the Yellow Pages or the Internet to find a professional in your area. PestWorld.org is a website operated by the National Pest Management Association that allows you to search for pest professionals in and near your zip code.
This article about how to keep mice away from the chicken coop was written for Chickens magazine. Click here to subscribe.
Duck predators come in many sizes, but one of the duck’s most deadly predators is the weasel. Learn how to protect your flock from an attack and discourage these persistent duck predators from visiting your backyard.
Getting to Know the Weasel’s Hunting Style
When comparing a list of duck predators, weasels may seem small and unlikely to inflict much damage compared to a fox or coyote. A small member of the mustelid family, weasels are ferocious predators that can destroy an entire flock in one visit.
While they prefer to do most of their hunting at night, weasels also hunt at dawn and dusk and even attack in daylight. Before attacking a duck, these tiny, blood-thirsty predators dance, twisting their bodies and hopping about to confuse their prey.
Once the flock is confused, the weasel will pounce on its target, wrapping its long body around the prey to immobilize it before inflicting a lethal bite to the back of the head or neck.
Calling Card
Weasels will often destroy an entire flock in a night. Deceased victims will frequently be placed in a neat pile with the blood sucked out and the head and neck bitten off.
Behaviors
Like many duck predators, weasels are primarily ground hunters. However, if hungry enough, they are strong climbers and will scale run walls and trees to gain access to the coop or run. Often inhabiting marshlands and ponds, weasels are excellent swimmers and may attack ducks floating on a pond or stream.
Like many other duck predators, weasels also excel at digging under and gnawing at fencing and can squeeze through small holes to gain entrance to the coop or run.
A Weasel’s Habitat
Weasels thrive in many environments, including woods, farmland, and marshes, where they often live close to humans without being seen. They frequently make their nests in tree roots but will also nest in small crevices in marshland or fields.
Why Ducks?
Did you know? Backyard ducks are more likely to be attacked by a weasel than chickens. When left to float on a pond or stream, many domestic waterfowl find themselves an easy target for savvy predators like the weasel.
A Duck’s Self-Defense
Despite the popular myth that domestic ducks can avoid a predator attack by flying away like their wild cousins, many backyard duck breeds cannot fly. Being grounded puts ducks at a disadvantage to predators. While ducks can’t protect themselves from predators, flock owners can take many steps to prevent their flocks from being attacked.
Stay Off the Pond
Yes, ducks love water, but your flock doesn’t need a pond to stay clean, healthy, or happy. Many backyard ducks prefer splashing in a kiddie pool or stock tank in the safety of the run.
While most weasels attack at night, some may prey on unsuspecting waterfowl during daylight. The best way to ensure these cunning hunters don’t kill your flock is to avoid the pond, no matter how calm and inviting the waters may look.
A Safe Coop and Run
Weasels are also among the smallest of the duck predators. With the ability to squeeze their tiny bodies through gaps as small as a quarter, chicken wire is no match for these fierce killers.
Protect your ducks from weasels by predator-proofing your coop and run. Cover the run sides and roof with a half-inch 19 gauge hardware cloth and attach predator skirts to deter digging predators. Leave no gap bigger than ½ inches in either your coop or run.
Coop floors should be constructed from cement or wood to prevent weasels from burrowing underground and gaining access to the coop.
Free Range Safely
Another way to prevent a weasel attack is allowing ducks to only free-range while directly supervised by an adult. Supervised free-ranging prevents many predators from trying to steal a duck.
Not only does supervising free-range time with your flock create a safer experience for your flock, but it’s also a great way to bond with your ducks.
Many duck owners prefer to free-range their flock. To do so safely, ducks should always be confined to the coop an hour before sunset and let out an hour after sunrise the next morning.
Deterring Weasels
Creating an unfriendly environment is one of the best ways to deter weasels on your property. Cleaning up weeds, brush, fallen trees, and spilled feed will reduce the chances of weasels wanting to take up residence in your backyard.
Weasels will often prey on rodents, so eliminating mice and rats on the property is also an excellent weasel deterrent.
Employing a few barn cats should help to keep weasel populations in check. Remember, feral and domestic cats can also prey on ducklings and ducks, so be sure to protect ducks from your feline friends.
Another weasel deterrent is to have a male dog mark around the perimeter of your coop and run. However, bobcat urine (available from feed stores and outdoor retailers) will also work if you don’t own a dog.
While weasels are among the most deadly duck predators, attacks can be prevented when ducks are housed in a secure coop and run. Going the extra mile and avoiding ponds and free-ranging will significantly reduce the chance of a weasel attack on your backyard flock.
This article about duck predators was written for Chickens magazine online. Click here to subscribe.
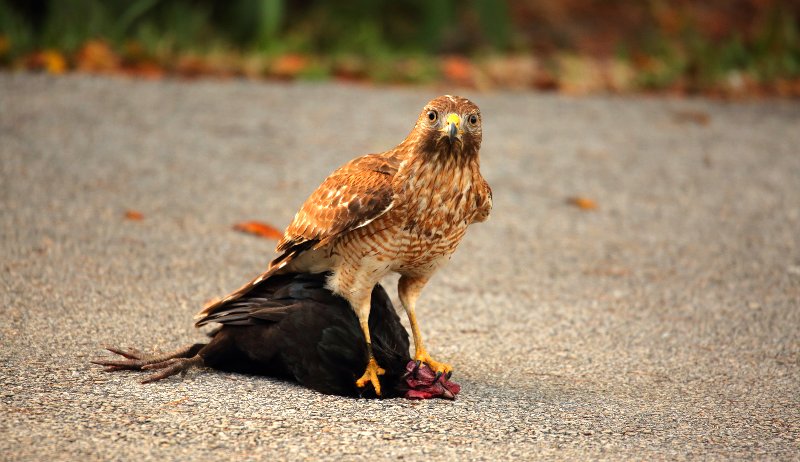
How to protect chickens from hawks is something every chicken owner should keep top of mind, especially if your flock free ranges. Predators are an ever-present threat to every poultry owner. We worry about raccoons and opossums climbing walls and fences to get to our birds, snakes and squirrels stealing eggs, foxes and coyotes carrying off our hens. We focus so much attention on these creeping, crawling, slinking, running creatures that often we overlook the dangers that literally overlook us: aerial predators.
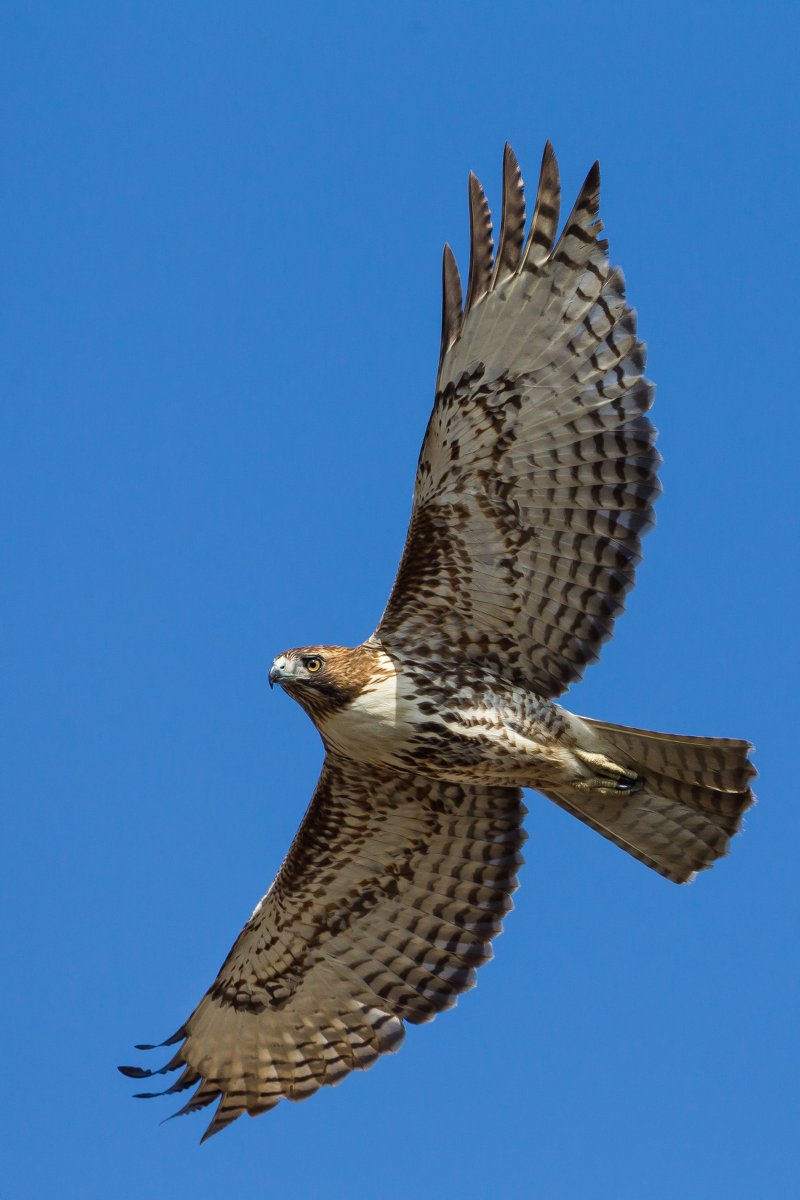
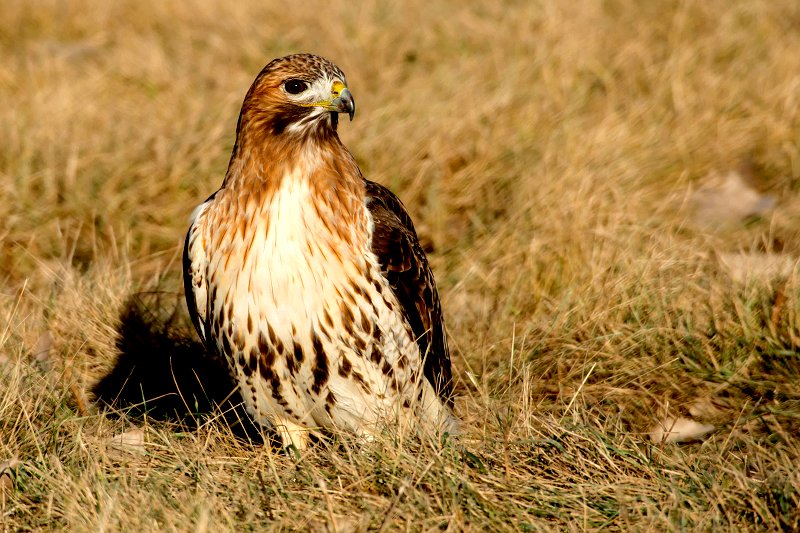
One huge group of aerial predators—owls—are mostly nocturnal and hunt when our birds are usually locked in their coops for the night (although some chicken keepers have reported having to chase owls away in the day). Hawks, though, prowl predominantly during daylight hours. With more than 15 species of hawk in North America, poultry keepers are bound to have at least one as a neighbor. Knowing how to protect chickens from hawks can ensure your birds don’t become fast food for these unwanted drop-in guests by following these suggestions to protect your flocks from hawks.
Shutterstock
1. Round Up Your Roamers
Free-range birds might have the world at their feet, but these chickens are the ones most easily targeted by hawks. Shelter and safety are difficult to find on the range, while nature provides plenty of places for predators to perch and observe. Protect your chickens by creating an enclosure, or run, connected to their coop. A chicken run provides plenty of room to roam but also keeps chickens safely corralled and closer at hand. Bonus: Collecting eggs is easier because you don’t have to search your entire property. If a permanent run or coop is not possible, consider building a moveable chicken tractor. This keeps your birds in one location but still lets them enjoy your pastureland under protection.
2. Cover Your Runs
Chicken wire is flimsy and so makes a poor fence for a chicken run—ground-based predators can rip right through it—it makes an excellent overhead cover for your birds. The sight of a protective layer between it and your layers is often enough of a deterrent for a hawk, especially if the netting used is orange, which hawks can easily see. Those raptors that attempt to dive through the chicken wire become entangled in it, giving your chickens time to retreat to safety. Any type of netting serves the same protective purpose when covering a run. For maximum protection, make sure the covering is securely fastened.
3. Shine Some Bling
Reflective, mirror-like surfaces have long proven effective in spooking aerial predators. The North American Bluebird Society and the Cornell Lab of Ornithology recommend these to minimize damage by birds, keeping them away from their intended target or from an area they view as easy pickings. Ready-made predator spookers can be found at Amazon and other online sources as well as at wild-bird supply stores, but it just takes materials such as old CDs or DVDs, reflective tape, or long strips of silvery Mylar to create your own. Install these high on your coop or along the top of your run’s fence line to create a shining deterrent to any curious hawks and other predatory birds.
Shutterstock
4. Hide the Food
Several species of hawk, including the sharp-skinned hawk and the Cooper’s hawk, target feeders, not for the food offered there but for the birds that congregate to eat. To keep your chooks from getting picked off during the course of dinner, relocate your feeders—and waterers—so that they are inside your coops and not out in the runs. If there is no place inside your henhouse where these can be sanitarily installed, consider building a feeding station in your run. A covered feeding station will keep your birds safe while they eat and also provide a place for them to hide should a hawk pass overhead.
5. Bring in the Boys
The traditional role of a rooster, other than to help create chicks, is to protect his flock of hens. At the first sign of danger, a rooster will call out to his girls, sending them scurrying to safety while he stands guard against the threat, real or perceived. At times I’ve looked out the window and seen a half-dozen roosters, standing stock still in front of their coops’ pop doors, their heads craned skyward—and not one hen in sight. Usually a turkey vulture has been the source of alarm, but once a red-tailed hawk perched on top of our Orpington coop. The cacophony that this intrusion caused could have woken the dead. By the time Jae and I raced outside, the hawk had already taken off, undoubtedly quite displeased by the din.
Not every city, town or homeowners association allows for roosters, so check your local bylaws and ordinances before adding a rooster to your flock. Allow for a 30-day quarantine away from your girls to ensure everyone remains healthy.
As much a nuisance as hawks are to poultry keepers, it is crucial to remember that they are protected by federal law. The Migratory Bird Act prohibits anyone—even a chicken owner whose flock has been decimated by these raptors—from injuring or killing hawks or otherwise causing then harm. If you’ve taken the measures suggested here without positive results, contact your local U.S. Fish and Wildlife Service office or your state’s department of agriculture to seek help in resolving your hawk situation.
This story about how to protect chickens from hawks was written for Chickens magazine. Click here to subscribe.
Body condition scoring (BCS), if you keep cows, whether for meat, milk, or breeding purposes, is a tool to measure how well your nutrition program meets the nutritional needs of your cow herd and should be at the top of your livestock management checklist.
Farmers and producers have been using the BCS system for more than 40 years to indicate the amount of energy (aka fat) a cow has stored in its body. A score—1 to 5 for dairy cattle and 1 to 9 for beef cattle—is assigned to the animal based on a visual and tactile assessment of six different areas on the cow’s body: brisket, ribs, back, hook bone, pin bones and tail head. This information is then used to help determine the cow’s nutritional status and potential needs.
“While the technique of measuring BCS is relatively similar [in dairy and beef cattle], a body-condition-score-5 beef cow is not the same as a body-condition-score-5 dairy cow,” says Brian Vander Ley, DVM, a clinical instructor in the University of Missouri’s Food Animal Medicine and Surgery department.
Normal BCS ranges for beef cattle are above 4 out of 9, while 2.5 out of 5 is normal for dairy cattle such as Jersey cows, Vander Ley says.
BCS & Calving
Body Condition Scoring is particularly used in conjunction with calving, when more energy is required of the cow for lactation. By ensuring your cow’s BCS remains in a stable range, you’ll be assured that cows will perform adequately at calving, the calves will receive adequate antibodies through colostrums and cows will be ready to cycle and rebreed early during the next breeding season.
“In both beef and dairy breeds, cows experience phases of production that require more energy than they can actually consume,” Vander Ley says. “During these times, fat stores are used to provide energy until dietary intake can meet their demands.” A good example is during peak milk production.
As you continue reading about how to use the BCS to care for your livestock, keep in mind BCS is not the only tool you should use to monitor your cows. Your cows should also be evaluated individually—what is normal for one cow might not hold true for another. Young cows have a greater nutrient requirement because they are raising their first calf and still trying to grow. They likely need to be managed and fed separately from mature cows. Mature cows that are always thin might be an indication that they don’t fit your production system.
Putting Body Condition Scoring to Use
The nitty-gritty of BCS is all about figuring out your animals’ feed requirements. For example, if your farm specializes in grass-fed beef, you can use BCS as a tool to make sure animals are getting the required amount of protein and fiber from the grasses they consume. This is especially helpful during winter grazing or times of drought.
“The main concern associated with grass-fed cattle is the quality of the grass,” Vander Ley says. “Late in the growing season, forage that has not been previously harvested, either by the cow or mechanical means, will decrease in quality. … Translation: Cattle can have full bellies but still be seriously lacking in nutrients.”
If you determine by using BCS assessments that your cattle have too much or too little body fat, you can work on developing a more suitable feeding program, keeping in mind that each cow in your herd might have different requirements.
“Performing a nutrient analysis on your hay is a good way to start. You cannot tell the quality of hay by just looking at it,” says Kendra Graham, livestock specialist with the University of Missouri Extension. “Second, know the nutrient requirements of your cattle. You need to know the average body weight to know this—a 1,000-pound cow does not have the same requirements as a 1,400-pound cow.”
You can consult an extension agent, livestock specialist or nutritionist to help evaluate your feeding program and help you make diet-change decisions. It’s important to make any changes gradually, as problems can occur if a cow gains or loses fat too quickly, Graham says.
In a dairy operation, you might use BCS to make sure cattle have sufficient fat reserves to produce enough milk.
“Thin cows do not have the necessary reserves to cope with increasing lactation. As a result, they are more likely to be immunosuppressed and have impaired ability to maintain a healthy udder environment,” Vander Ley says. This means you will get less milk.
On the other hand, a fat cow—one with a higher BCS—is less likely to eat well after calving, meaning it will call on its fat reserves to produce milk, he says. Rapid fat use can lead to problems, such as ketosis and fatty liver syndrome.
By using the BCS system to assess condition, you will be able to effectively communicate your concerns to a veterinarian or nutritionist and adjust feeding programs as necessary.
“BCS is a great tool to help us separate out problems that may be related to nutrition from those that are not,” Vander Ley says. “While being a bit subjective, BCS is far better as an indicator of condition than two different peoples’ opinions of “thin.”
Common Evaluation Mistakes
It might take some time to get comfortable with making a BCS assessment, but that’s OK. Working with your veterinarian or beef or dairy specialist to learn the evaluation techniques will not only give you a chance to learn the scoring system, it allows you to help identify problems with your animals before they become a concern. As you begin assessments on your own keep in mind three common mistakes farmers make in BCS assessments:
Body Condition Scoring Mistake No. 1: Reading the hair—not the fat.
It’s easy to mistake the bulk around the pins, hooks or ribs as fat when it’s actually the cow’s hair. To avoid this common mistake, the University of Nebraska-Lincoln BCS scoring guide recommends assessing the cow when it’s wet. “When possible, it’s good to lay hands on the animals to appreciate the amount of fat cover in higher-BCS animals and the lack of cover in lower-BCS animals,” Vander Ley adds.
BCS Mistake No. 2. Looking for fat in all the wrong places.
Often instead of reading fat around bones and ligaments, farmers will look at belly girth, says Graham.
“Animals with a full midsection or [that are] very pregnant are not necessarily in the proper condition,” she says. “Focusing on the backbone, pin bones and hip bones can help make a more reliable assessment.”
BCS Mistake No. 3. Excessive assessments.
Farmers can often be dramatic in their BCS assessments, describing an animal as much thinner or fatter than it actually is. “The deviation that is close to desirable may be a little more difficult to assess initially,” says Shane Gadberry, PhD, PAS, professor of animal sciences at the University of Arkansas.
For more information on assessing the condition of your herd, visit the following links: