Categories
Poultry

Warm Squash and Oatmeal for Chickens in Cold Weather

Warm squash and oatmeal for chickens make wonderful breakfasts to warm your birds from the inside out during cold weather.

As the days get shorter, we chicken keepers start heating the coop waterers. Our chickens are adapting to the changes in weather and temperature, and though they’re hardy animals, it doesn’t mean they’re always comfortable in the cold especially if some are molting late in the season. A warm meal can ease the shock and make the weather a bit more bearable.

Cooked Winter Squash

Pumpkin, like other winter squashes, is high in vitamin A, vitamin C and beta-carotene. It’s just as healthy for chickens as it is for us (when we don’t purée it into a custard full of sugar).

To cook a ripe pumpkin, break off the stem, stab a few holes around the top, and bake at 350°F for one hour. To contain the mess, put the pumpkin in a 9-by-13″ pan lined with aluminum foil. After an hour, turn the oven off and leave the pumpkin in the hot oven for 20 minutes or so, just to make sure it’s nice and soft. After the pumpkin cools enough to touch, slice it into quarters, let it cool a little more, and then serve it to the chickens.

If you try baking a fresher pie pumpkin or other winter squash, like butternut or spaghetti squash, you’ll find they’re very tough to cut into with a knife. In these cases, grab a drill and make two holes in the top of the squash using a 1/2-inch drill bit. This not only saves fingers, but it lets the steam escape the squash so it doesn’t explode all over the oven.

Some people feed their jack-o’-lantern pulp to their flocks when they’re carving pumpkins for Halloween, but I haven’t had success with this. My picky flock will only eat pumpkin seeds if they’re cooked. If you find your flock is like mine, and you can get to your jack-o’-lantern before it starts to decay, cut it up and steam the pumpkin flesh for your flock so it doesn’t go to waste. It’s a great supplement, low in calories and makes a small dent in feed costs.

Warm Oatmeal for Chickens

What I love about feeding warm oatmeal for chickens to my flock, especially on the coldest mornings, is that it’s cheap, it’s hydrating and I can mix in kitchen scraps to make it a little more exciting for the foragers.

I don’t bother cooking the oatmeal because then I have to wait for it to cool. Instead, I put about one cup of old-fashioned oats into a glass bowl, then simply add hot water from the tap. I let the oats soak for a few minutes and sometimes add a little more water.

I always stick my finger into the oatmeal to see if it’s warm enough. If not, I’ll microwave it for 30 seconds, but not more without checking the temperature. I don’t want to risk burning the chickens.

This article about warm squash and oatmeal for chickens was written for Chickens magazine. Click here to subscribe.

Categories
Farm & Garden

Halloween Pumpkins: 9 Uses After the Holiday

Halloween pumpkins can have lots of uses after the holiday is over. Instead of throwing away a porch-worth of jack-o’-lanterns, here are nine uses for them beyond Halloween.

Halloween Pumpkins 101

First, let’s discuss the pumpkin. Chances are that you bought or grew a large pumpkin to carve and decorate as a jack-o’-lantern. These pumpkins are a different variety than the type we normally use for pie. Pie pumpkins, sometimes called sugar pumpkins, are generally a smaller variety with dense and sweet flesh. They have fewer seeds and tend to be less stringy. Pumpkins made for jack-o’-lanterns, on the other hand, are larger pumpkins that have a thinner wall of flesh under the skin. They tend to be more stringy, have more seeds and contain more water than pie pumpkins. That said, you can still eat jack-o’-lantern pumpkins, though.

Here’s a list of uses for your jack-o’-lantern pumpkin after Halloween.

1. Save the Seeds for Eating

jack-o-lantern pumpkin seeds
Melissa Griffiths

Once you have a hole cut in the top of your pumpkin, scoop the seeds into a bowl. There’s no need to put them right in the trash. When you have scooped out all the seeds, fill the bowl with water and use your hands to separate the seeds from the stringy flesh. Place the seeds in a colander and spray or rinse them in water, using your hands as needed to remove any additional stringy flesh, until they are cleaned. Set them aside to dry. You can roast them in all sorts of way. My very favorite way to eat saved pumpkin seeds is to make honey roasted pumpkin seeds. They’re easy, healthy, full of fiber and excellent on salads!

2. Save the Seeds for Planting

jack-o-lantern pumpkin seeds
Joanne/Flickr

Treat the seeds the same way you did to prepare them for eating except don’t cook them. Once the seeds have been washed, lay them on a towel to dry. Pick out a nice selection of the largest blemish-free seeds. Let the seeds air-dry completely and then store them in a brown paper bag. After a month take a look at your seeds. This will have given your seeds time to fully dry. Discard any seeds that show signs of rot or mold. Label your seeds and store them in a dark, cool place until you are ready to plant them in the spring.

3. Cook With the Extra Jack-O’-Lantern Flesh

halloween pumpkins flesh used for cooking
Cascadian Farms/Flickr

While you are carving your jack-o’-lantern you might end up with some extra flesh. Once the slimy parts and seeds have been removed, you might want to remove some of the extra flesh to make carving easier. I like to use a sturdy spoon or even an ice-cream scooper to scrape some of it away. Keep the flesh in a bowl and rinse off any extra seeds or stringy parts. You can use the flesh by microwaving it, boiling it or roasting it until it is fork tender. Turn the cooked pumpkin flesh into pumpkin purée by running it through a food mill, blender or food processor, and then use it in your favorite pumpkin recipes.

Avoid using the flesh of a pumpkin that’s been sitting on your porch and is starting to turn black. This could be harmful to your health.

4. Pickle the Rind

Have you ever tried pickled pumpkin rind? Any pickle lover will tell you it is delicious. You can pickle the rind of a very recently carved pumpkin—one that shows no signs of rot or mold—or you can save the pieces that you carved, like the smile, eye and nose of your jack-o’-lantern that you no longer need.

To pickle the rind, use a vegetable peeler to remove the outer orange skin of the pumpkin. Cut the rind—this will be an inch-thick section right under the skin—into 2-inch squares. For each pound of pumpkin, use 2½ cup of sugar, 2 cups white vinegar and a 1-inch piece of fresh ginger. A cinnamon stick is good, too. Put the sugar, vinegar and spices in large pot, bring to a boil, add the pumpkin, and cook until the pumpkin is tender. Chill overnight before serving.

5. Compost It

halloween pumpkins in the compost
kitty meets goat/Flickr

Pumpkin is such a great addition to your compost pile. If you’re using a heap method to compost, just toss your pumpkins on the pile. If you are using a more delicate method, you might want to cut your old jack-o’-lanterns into smaller pieces before adding them to your pile.

6. Bury Your Jack-O’-Lantern Leftovers

If composting isn’t your thing but you have a garden, dig a hole, toss them in, and let nature take over. By simply burying your leftover jack-o’-lanterns you will easily amend your soil. When it comes time to till the soil in the spring, you won’t find many jack-o’-lantern leftovers. You may find a few volunteer plants later in the season, though, if there were any seeds left in the pumpkin!

7. Feed Your Livestock, Chickens or Worms

Livestock love pumpkins! So do chickens and worm farms. Did you know that pumpkins can be used as a natural dewormer? Here’s what Lisa Steele from Fresh Eggs Daily has to say about that, “The pumpkin seeds (as well as the seeds of other members of the cucurbitaceae family, such as winter, summer, zucchini and crookneck squash, gourds, cucumbers, cantaloupe, and watermelon) are coated with a substance called cucurbitacin that paralyzes the worms. The larger fruits and vegetables contain higher levels of cucurbitacin, while the smaller cucumber contains far less.”

8. Turn It Into a Planter

halloween pumpkins turned into planters
gardenworkscanada/Instagram

Keep your jack-o’-lantern around longer by turning it into a planter. After you’ve carved your pumpkin, dip it in a large bucket of vinegar solution: one part vinegar to four parts water. This will help slow the decay process. After Halloween put a layer of burlap or landscape cloth inside the jack-o’-lantern where you’ve carved the face—this will help to keep the soil from falling out. Fill the pumpkin with soil and add a fall plant. Mums are inexpensive this time of year and make a great choice. Plant the mum, or plant of your choice, and water well. Place the planted jack-o’-lantern on your porch with the carved part facing the house so you don’t see it as well.

9. Make a Pumpkin Bird Feeder

pumpkin jack-o-lantern bird feeder
Dreamy Whites Lifestyle/Instagram

This is a really fun craft project with kids or grandkids. You can simply fill up your old Halloween pumpkins with a layer of bird feed and put them somewhere you’ll be able to watch the birds come and go. You can get more creative by hanging pumpkins. You can also carve out a large section of the back of the pumpkins so that you can see more of what the birds are doing inside. The birds might eat a bit of the pumpkin, as well as the seeds.

Don’t stop there! There are all kind of ways you can use your Halloween pumpkins after Halloween. Let this list be your springboard, the possibilities are endless.

This article about Halloween pumpkins was written for Hobby Farms magazine. Click here to subscribe.

Categories
Farm & Garden

Fall Vegetable Garden: 11 Crops to Plant

A fall vegetable garden is the perfect place and time for getting your favorite root vegetables in the ground and seeding perennial staples. While you plan and tend to your fall garden, it’s also the time of year to leaf through catalogs and order seeds for early spring planting.

Why to Plant in a Fall Vegetable Garden

By taking advantage of autumn’s cooler temperatures and bouts of rain, you can extend your garden season quite a bit. Although North America offers a huge range of winter temperatures, in all but the coldest regions, it’s often possible to harvest crops right through December, January and February—that is, if you select the right ones. Some crops, such as members of the onion family, like a blanket of snow, and even tender crops such as spinach and lettuce, as well as many herbs, can handle sub-freezing temperatures, especially if you grow them under row covers or in cold frames.

If you’re working on a plan to put your summer growing space to bed and need some help determining which crops to include in the fall garden that can take you into the cooler months, here’s a quick guide for planting and transplanting.

1. Garlic

If you want to harvest big, juicy heads of garlic in July, you need to plant them in October. It’s important to order seed garlic—large heads of garlic that are free of sprouting inhibitors—from seed companies in late-summer to early fall, as supplies often run low. Separate the garlic bulbs into cloves, leaving the skin on, and plant each clove with the pointed side up and the blunt side down 1 to 2 inches deep in well-worked soil. Cloves should be spaced 4 to 6 inches apart in rows 1 foot apart.

Plant shallots for the fall garden using the same growing instructions.

2. Leeks

Other members of the allium family—onions, leeks, chives and shallots—all do well in the garden over the winter, as well. Leeks especially love the cold weather, so sow seeds directly in the fall vegetable garden or start seeds in peat pots in late summer for fall transplant. Space the plants 4 to 6 inches apart in rows 1 foot apart, and mound dirt around the stalk every couple of weeks to encourage the white end. (The part of the stalk that grows above ground will turn green.) You can harvest leeks when the base of the stalk reaches 1 to 2 inches in diameter.

3. Onions

Onion sets, or bulblets, are widely available in fall, and by planting as cold weather approaches, you may get fresh scallions over the winter. In the coldest regions, the sets may hibernate underground in winter, but they will pop up in the spring. Plant onions 1 to 2 inches deep in soil mixed with some compost—a pH of 6.0 to 6.5 is preferred. Avoid burying the neck of the plants too deeply to avoid rot, and provide consistent irrigation until the bulbs get bigger.

4. Chives

Chives can be seeded in the fall vegetable garden. You can also split existing clumps to transplant in the garden or pot up to bring inside for year-long use. Snip chives for use in cooking 30 days after transplanting or 60 days after seeding. If you cut the chives down 1 to 2 inches from the base, you should be able to get three to four harvests per year.

5. Strawberries

Young strawberry plants are typically sold for spring planting, but plenty of companies sell them in the fall, as well. With this seasonal jumpstart, you may be able to pick up a whole season of productivity. Many gardeners pinch off all the blossoms during the first season to allow the plants to put energy into root development; fall vegetable garden planting lets you leave the spring blossoms on and harvest a crop the first year.

6. Rhubarb

Late fall is a great time to split existing rhubarb crowns. If you don’t have plants of your own, seek out a friend who can share their wealth. Divide the crown into sections that contain one to three buds, and replant about 2 to 3 feet apart before the bulb dries out. Amend the soil with a 12-12-12 fertilizer, compost, bone meal or rock phosphate, and cover the area with mulch. Rhubarb takes a few years to get established, and fall planting lets the harvest begin a year earlier than otherwise.

7. Horseradish

Like rhubarb, horseradish can also be divided in the fall vegetable garden and will take a couple years of growth before you can harvest. It likes very cool temperatures for root growth and flavor development, so it’s an excellent choice for cooler climates. It’s also fairly drought-tolerant, but regular irrigation will help prevent woodiness.

8. Greens

Spinach, chard, kale and lettuce are must-haves in the fall garden. Plant seeds in late-summer to early fall for a quick crop of these greens—the cool weather sweetens them and prevents them from bolting. If you happen to get seeds in the ground too late, do not worry. Look for the sprouts to come up in spring.

9. Radishes

Radishes are famous for their speedy growth—as few as four weeks from planting to harvest for some varieties. Those planted from seed in the fall vegetable garden will provide a nice crop of rosy roots and edible greens after summer crops are through. The cool weather enhances their flavor, and you can sow them successively for a constant crop.

10. Cilantro

Lacy and delicate, cilantro is really pretty tough. It sprouts quickly from seed, producing edible leaves in a few weeks, followed by the seeds, known as coriander. If planted in late fall, cilantro seeds may stay dormant over winter and sprout quickly in spring. The plants will also frequently self-sow.

11. Parsley

Parsley is another great cool-weather crop for the fall vegetable garden. While growing it from seed can take forever, you can transplant clumps in fall that may stay productive much of the winter.

Protecting Your Fall Vegetable Garden Crop

It’s a good idea to protect fall-planted areas over the winter with a layer of straw to provide a layer of insulation and prevent frost heaving as soil freezes and thaws. Frost heaving is not as big a big concern with small seeds and seedlings as it is with crops like rhubarb and horseradish, which have larger roots. Don’t lay the straw down in a thick layer; rather, remove sections from the bale and fluff them up and sprinkle the loose material over the soil.

Avoid adding too much water and fertilizer to the soil in the fall. You don’t want too much tender growth too fast. Frail stems are susceptible to the cold.

This article about what to plant in the fall vegetable garden was written for Hobby Farms magazine. Click here to subscribe.

Categories
Recipes

Apple Tea: How to Make This Fall Recipe

Apple tea is perfect for celebrating cool fall temperatures and apple-picking season.

Below is a recipe from The Green Witch’s Guide to Magical Plants and Flowers, written by Chris Young and Susan Ottaviano.

Have you heard the term, “Green Witch” over the past few years? The definition of a green witch is someone who embraces nature and intentionally works toward living in harmony with the earth and humanity. Green witches believe that their “connection to the earth and the universe allows them to draw great power from creating love, health, peace, blessings and harmony in their world.”

Magical herbalism is the central practice of a green witch. The two Green Witches who authored this book seek to encourage readers to transform everyday flowers, fruits and plants from the garden into salts, herbal infusions, soaps, sachets, tinctures and more.

Enjoy the recipe below. I’d say this apple tea is definitely worth making again and again.

Apple Tea Recipe

Serves: 2

Ingredients

  • 2 green tea bags
  • 2 sticks of cinnamon
  • 3 whole cloves
  • 4 whole allspice berries
  • 1 cup unsweetened organic apple juice or apple cider
  • 1 green organic apple, sliced
  • Maple syrup or organic sugar, to taste

Instructions

In a saucepan, bring teo cups of water to a boil. Add tea bags, cinnamon, cloves and allspice to the pan. Remove from heat. Cover and let steep for three minutes.

Discard tea bags and spices. Stir in apple juice (or cider) and heat through.

Always remember that spoons are a kind of wand. You can use them while you cook to direct your energy and intentions to empower whatever you are preparing.

Serve tea with the green apple slices and sweetener of choice.

This recipe has been shared from The Green Witch’s Guide to Magical Plants and Flowers with permission from Skyhorse Publishing, Inc.

This article about a fall apple tea recipe was written for Hobby Farms magazine. Click here to subscribe.

Categories
Equipment

Tracked Vehicles: Can Your Farm Benefit From One?

Tracked vehicles can be a game changer in certain circumstances. Learn how your farm may benefit from the use of a vehicle with tracks instead of tires.

What are tracks?

Tracks go by a few different names. You might know them as caterpillar treads, and vehicles that have them are sometimes known as crawlers. Picture a military tank driving around on continuous bands of interconnected metal plates instead of tires—that’s an example of a tracked vehicle.

Many tracked vehicles have two tracks, one on each side. Some large agricultural tractors have four tracks, with two on each side. The length, width, and configuration of the tracks can vary depending on the vehicle and its purpose. Tracks can be made of metal, rubber, or a combination of both.

You don’t have to invest in a powerful agricultural tractor to gain the advantages of a tracked vehicle. A skid steer with tracks is a more affordable and practical option for small-scale farmers looking to benefit from tracks without breaking the bank. Also, some utility tractors are either designed to work with tracks or can be fitted with them. An example is the John Deere 40C, a version of the John Deere 40 that came with tracks instead of tires.

Advantages of tracks vs. tires

Tracks offer a big advantage over tires: improved flotation. What does this mean? It means the tracks spread the weight of the vehicle across a larger footprint and decrease the likelihood of the machine sinking into soft or wet ground. They “float” across the ground and won’t rut the soil as much as tires, especially if you opt for wide tracks that spread weight even more. With improved flotation, a tracked vehicle is less likely to get bogged down or stuck in wet ground. Traction in soft conditions can be much superior with tracks than tires.

Another advantage of tracks compared to tires is the fact tracks can’t go flat. Tracks can become damaged, true, but you don’t have to keep an eye on tire air pressure and won’t be interrupted by flat or punctured tires.

Tracked vehicles can also offer a smooth ride, since their large footprint evens out bumps and dips in the terrain. And they can be quite maneuverable, even turning in place by driving the tracks in opposite directions, much like a zero-turn mower. Most farm vehicles with tires don’t have this turn-in-place ability.

Disadvantages of tracks vs. tires

Of course, it’s hard to engineer perfection, and tracked vehicles have disadvantages too. Maintenance is a downside; the components of the tracks suffer a lot of strain while in operation, so you may find yourself replacing parts (like rollers, idlers, etc.) as they wear out. Maintaining proper track tension is another area requiring attention. And while specifics may vary, the track components also require grease and oil. Regularly cleaning the tracks can help prevent excess wear and mechanical issues, but that’s an extra chore, and not always an easy one.

Another disadvantage? Tracks can inflict damage to the terrain over which they drive. Tracked vehicles steer by driving their tracks at different speeds. This method of turning can be damaging to various types of ground, including lawns and grassy fields. Plus, metal tracks can damage pavement. Rubberized tracks can help alleviate these issues, but no solution is perfect.

Also, tracked vehicles tend to be more expensive than similar vehicles with tires.

Will your farm benefit from a tracked vehicle?

It comes down to this: if you need to tackle farming jobs over wet or soft ground, a tracked vehicle can allow you to power through conditions that would stop wheeled vehicles, either because they would get stuck or because they would cause too much rutting. And if you need to operate, say, a front-end loader in tight spots where maneuverability is critical, a small tracked vehicle like a skid steer might be perfect.

However, if you don’t see yourself in these circumstances—if your land is typically dry and firm and you don’t need to maneuver in tight spots—a vehicle with tires can alleviate the disadvantages of tracks and serve your needs just fine.

This article about tracked vehicles was written for Hobby Farms magazine. Click here to subscribe.

Categories
Poultry

How Much Does It Cost to Raise Chickens?

How much does it cost to raise chickens? While purchasing chicks is relatively inexpensive, the coop, run, feed, and other expenses quickly add up. Learn how much it costs to raise chickens before you get started.

What Do You Need to Get Started

All chickens need some basic essentials: a coop, run, feed, feeders, water fountains, perches, nesting boxes, and protection from predators are all essentials your chickens can’t live without.

The Coop

If you have ever Googled, “How much does it cost to raise chickens?” You have already learned that the coop is the largest expense. Coop prices vary depending on the size of the coop you acquire, whether you purchase an already-built coop, assemble one yourself, or construct a “coop” in an existing outbuilding.

Before purchasing or constructing a coop, consider what you want your future flock to look like. By planning ahead, you can prevent having to erect another coop in the future, saving you further expenses.

group of chickens at a feeder included in how much does it cost to raise chickens is the feeder, feed, birds and their shelter
Adobe Stock/thomaszobl

Pre-Built Chicken Coop Costs

Despite their cost, pre-built chicken coops are a popular option for starter flocks.  Assembled coops range in price from several hundred dollars to over six thousand dollars, depending on the coop size, whether there is an attached run, and the quality of the coop you are purchasing.

Bear in mind that for pre-built coop companies to cut costs, they may also be of lesser quality, so be sure to shop around for the safest coop, not just the cheapest.

DIY Coops

If you are handy at building things, DIY coops are an excellent way to cut costs. DIY coops also allow you to be creative and build the ideal coop to fit your needs. Construct a coop that is functional, human-accessible, predator-proof, and weather-proofed to keep your flock safe for the best chicken-raising experience.

When purchasing coop building supplies, avoid cheap materials such as chicken wire to create a safe home for the flock. The average cost of a DIY coop falls between three hundred and one thousand five hundred dollars.

Barn Coops

Constructing a coop in an existing barn or other outbuilding is the most budget-friendly option. Take care to only house chickens in an outbuilding with a wooden or cement floor. The estimated cost of constructing a coop in an outbuilding is between three and six hundred dollars. (Bear in mind that this cost does not include any repairs needed to make the outbuilding predator-proofed.)

Building the Run

Many chicken coops have runs attached to them, but constructing a run is necessary if you plan on housing your flock in a building without an attached run. Like the coop, the run should be safe from predators (including digging and ariel predators).

Chicken tractors are the most popular run options and generally cost between three hundred and four thousand dollars, depending on the size. Chicken tractors are often not completely predator-proof, which will add additional costs.

Coop Essentials

Coop essentials should not cost too much unless you plan to be extravagant. These essentials include nesting boxes, a perch, feeders, and water founts. To better learn how much does it cost to raise chickens, let’s look at the prices for these coop essentials.

The Perch

Untreated 2x4x8 boards (cut down to desired perch size) are really the best perching option, costing under five dollars per board. These boards make for better perches than old ladders, as the narrow side of the board is the ideal width for hens to easily grip the perch with their feet.

Nesting Boxes

Nesting box prices vary depending on whether you buy some from a manufacturer, build your own, or use some old storage containers. My flock uses plastic containers from Walmart, as they are budget-friendly and easy to clean up any accidental egg messes.

Nesting box prices vary from twenty dollars to several hundred, depending on your chosen style.

Feeders & Water Founts

Like all chicken care products, feeders and water fountain prices vary depending on style and size. However, for basic water founts and feeders for small backyard flocks, each feeder and water fount should cost approximately ten dollars.

Always have at least two feeders and two water founts in case one accidentally spills to ensure your flock has water and food at all times.

Feed Costs

Pellets, crumble, organic, natural, and non-organic are some of the choices to make before you can decide the estimated cost of feeding chickens. Estimate one fifty-pound bag of feed per month for every ten chickens (depending on the chickens’ age and the time of year).

  • Organic Feed Cost: $30.00-$40.00 per forty lbs. of feed
  • Non-Organic Feed Cost: $20.00-$25.00 per fifty lbs. of feed

Predator Protection

Predator protection costs vary depending on the condition of the coop/barn or existing outbuilding and run you have and the predators found in your area. Remember, predator-proofing is a life-long endeavor, not a once-and-done chore, leading to additional costs per year.

Chicken Costs

The average laying pullet (chick) costs about four dollars. For a flock of ten chickens, the estimated cost is forty dollars. Purchasing chicks through a feedstore will help cut costs, as you won’t need to pay for shipping.

How Much Does It Cost to Raise Chickens in Total?

How much does it cost to raise chickens in total depends on your specific wants and needs. However, the estimated startup costs for a flock of ten usually fall between one thousand three hundred dollars to over eight thousand dollars.

Additional costs should be considered when raising chickens for pets, including treats, supplements, and vet care.

How much does it cost to raise chickens depends on how you want to raise your flock and how important it is to protect them from predators. But for those drawn to raising their own food or pet chicken flock, the costs and effort are well worth the money and time.

This article about how much does it cost to raise chickens was written for Chickens magazine. Click here to subscribe.

Categories
Uncategorized

Growing Good Podcast #87: Entomologist Ron Bittner

This conversation with Ron Bittner will help you make the connection between crop pollination, water conservation and soil health in a way you probably haven’t before.

Learn about how Ron’s interest in insects—specifically the alfalfa leafcutting bee—has taken him around the US and all the way to Australia.

Hear about the beginnings of Ron’s small vineyard, which he operates with his wife, daughter and a small crew and why this location in Caldwell, Idaho, is ideal for growing wine grapes. Ron also talks about his farm’s certifications: Salmon Safe, Bee Friendly Farming and LIVE.

Ron’s involvement with the nonprofit Pollinator Partnership and continued research on pollinator populations in his area keep him involved with some of the 4,000 native bees in the US. Let his passion for pollinators get you excited about how to attract and protect these creatures on your own property. 

Links from this episode:

Hobby Farms Presents: Growing Good podcast episode with Sara Wittenburg

Pollinator Partnership website

iNaturalist citizen science app

Categories
Equipment

How Much Weight Can a Front-End Loader Lift?

How much weight can a front-end loader lift? The answer depends on many factors, including the size and strength of the loader, the type of load you’re lifting, and whether your machine is appropriately counterbalanced.

Whether you’re looking to lift a 300-pound log or 1,000 pounds of dirt, it’s wise to know the maximum lifting capabilities of your loader so you can tackle suitably-sized jobs safely and efficiently. Here are three tips for determining (and maximizing) the lifting capacity of your front-end loader:

#1 Check online or in the manual for weight lifting maximums.

You don’t have to guess how much a loader can lift, at least not entirely. You can find basic numbers by looking up the front-end loader’s specifications online or in a printed manual if you have one.

There are two key numbers to know. The first is how much weight the loader can lift to maximum height at the pivot pins. Let’s say it’s 1,250 pounds. You’re good to go lifting anything up to 1,250 pounds, right?

Wrong. The bucket of the front-end loader sits forward of the pivot pins, and this added distance creates leverage that reduces the lifting ability of your loader. The same goes when using other attachments, like forks. In all likelihood, the load you’re lifting is going to sit somewhat forward of the pins.

That’s where the second number comes into play. If your loader is rated to lift 1,000 pounds to maximum height at a point 20 inches forward of the pins, that’s a more realistic measure of your loader’s lifting capacity.

Understand that a small front-end loader may be fairly limited in its lifting capabilities. If the most it can lift to a maximum height 20 inches forward of the pins is 550 pounds, you’ll have to carry less with each load (if lifting dirt, compost, logs, etc.) and skip lifting solid objects weighing more than 550 pounds if they can’t be separated into smaller loads.

On the other hand, powerful tractors with large front-end loaders can be capable of lifting more than 6,000 pounds. When you have a front-end loader this strong (and a powerful tractor to match), you can tackle some mighty heavy-lifting projects without running up against the limitations of your loader.

#2 If you only need to lift a little, you can lift more.

Notice that the rated lifting capacity of your front-end loader refers to the amount it can lift to maximum height. If you don’t need to lift a heavy load as high up as possible, you can squeeze more lifting power out of your loader. For example, if you’re using a bale spear to lift a round bale, and you only need to lift the bale a few inches off the ground, you’ll be able to lift more weight than your loader is otherwise rated for.

#3 Counterbalancing is the key to safety and max performance.

When lifting heavy loads with a front-end loader, it’s critical to counterbalance the weight at the front of your tractor with ballast at the rear. Without weight at the rear, when you attempt to lift your load, you may find that the load stays stationary and the rear wheels of your tractor lift off the ground instead. Suffice to say, that’s a safety hazard.

Ballast helps you stay safe while getting the most out of your front-end loader. Wheel weights and liquid tire ballasts are two common options. You can also install suitcase weights on a bracket at the rear of your tractor, or mount a ballast box to the three-point hitch and fill it up with heavy materials like rocks, concrete blocks, or dirt. In a pinch, you use any three-point implement (like a plow or box blade) as rear ballast, though doing so can make your tractor less maneuverable, and you mustn’t forget about the implement an inadvertently damage it while focusing on your front-end loader.

By combining these tips and tricks with the rated lifting capacity of your front-end loader, you can stay safe while maximizing the amount of weight your front-end loader can lift.

This article about how much weight can a front-end loader lift was written for Hobby Farms magazine. Click here to subscribe. 

Categories
Poultry

Chicken Water: What Kind of Water Should Chickens Drink

Chicken water may seem like a basic topic. And, it is. Like all living things, our chickens need water to survive, thrive and produce healthy eggs. Clean water keeps hens’ reproductive systems working the way they should, and some chicken keepers, especially newbies, worry about water quality or if they’re properly watering their flock. To provide some clarity, here are four water sources for your chickens and what to think about when using them.

1. Tap Water

In urban areas with municipal water systems, we don’t usually need to worry about the water quality. City water sources are considered safe for consumption, but there are certainly differences in the taste and composition from city to city. Treated water isn’t all the same, but it is almost always safe. Growing up, I drank from Lake Huron. Today, my chickens and I drink from the Ohio River. I can tell you, the difference between the two is huge; in our current location, we face more hard-water issues.

Watering your flock from the outside spigot is comparable to the tap water inside your house. Although the tap inside is probably cleaner than the spigot outside, that’s certainly nothing to worry about. Sometimes I will clean my flocks’ waterer, fill it up from the spigot, and put it back in the coop, only to find them all drinking out of a mud puddle.

Safety Check: 4 Water Sources for Your Chickens - Photo by Rachel Hurd Anger (UrbanFarmOnline.com) #chickens #chickenkeeping

2. Well Water

About 15 percent of the U.S. relies on private wells, which aren’t regulated like municipal water sources. Wells can be polluted by natural and man-made contaminants, including microorganisms, like bacteria and viruses, heavy metals, and unsafe levels of naturally occurring fluoride. Chemicals or animal waste runoff from farms can also contaminate wells, especially if they’re shallow.

If you have well water, test it for safety. If you drink it yourself, consider it safe for your livestock, too. But, if you don’t drink your well water for reasons like heavy metal contamination, chemical pollutants or microorganisms, remember you are what you eat—and you are what your food eats, too. If you eat the eggs or meat of your chickens, don’t give them water you wouldn’t drink yourself.

3. Softened Water

Water softeners commonly use salt (sodium chloride)—the same stuff in your kitchen saltshaker—to replace the calcium and magnesium ions that make water hard. Hard water’s biggest caveat is scale buildup. It’s not unsafe to drink, but it can clog pipes, build up around faucets, and keep your soap from lathering in the shower. Water softeners installed where water enters the home can protect pipes, making the naturally hard water unavailable.

While water softeners use common table salt, the process of softening is only replacing calcium and magnesium ions with higher-charged sodium ones. Very little sodium ends up in the drinking water. Even for people on a sodium-restricted diet, the FDA says that the amount of sodium in an 8-ounce glass of water is so low that it still falls under its own definition of a very low-sodium food.

Consider that if you’re giving your chickens any kind of electrolyte products, that it contains more sodium than they will consume from softened water. Sodium is an essential electrolyte. If you’re sodium sensitive and use a water purification system that uses potassium chloride in lieu of sodium chloride, this is also safe for you and for your flock.

4. Backyard Hose

Dragging the hose to the waterer for rinsing and refills is often easier than lugging the waterer to the spigot. If you prefer the hose, consider buying one labeled safe for drinking. Most commercial hoses contain hormone disruptors, like phthalates and and bisphenol A (BPA), to keep the plastic soft. If you can’t replace your hose, let the water run for several minutes before giving any hose water to the chickens. This will rinse out many contaminants that could have leached into the water left sitting in the hose.

This story about chicken water was written for Chickens magazine. Click here to subscribe.

Categories
Poultry

Got a Missing Chicken? 5 Steps to Take

Got a missing chicken? For those who keep a backyard flock in an urban or suburban setting, a missing bird seems unthinkable. How could a chicken possibly get out of its tidy, contained coop-and-run combo or its fenced backyard?

For those of us who live in a rural residential or agricultural zone, however, discovering a member of our flock is missing at lock-up is not as uncommon as you’d think. Combine free-ranging with a chicken’s innate curiosity and you’ll have plenty of reasons why you might be short one chicken.

If this happens to you when you’re closing up your coop for the night, don’t panic. Take a deep breath. Then take on one or more of these five suggestions.

#1 Is Your Bird Having a Slumber Party?

If you raise multiple flocks of chickens, chances are your birds have not only noticed each other but have also communicated back and forth through clucks, warbles, crows and other vocalizations. Commonly, these calls keep each other informed of the status of their territory. This is especially true if you keep more than one rooster.

Occasionally, your birds’ chatter may actually be more neighborly. Chickens will sort out where each of them stands in the expanded poultry society comprised of all your flocks. If you discover that one of your hens is missing, check your other coops.

I’ve lost count of how many times we’ve found members our BBS Orpington flock peacefully snoozing on the perch in the Buff Orpington coop and Buffs on the Blue Orpington perch. If your birds are having a sleepover , there’s no need to disturb them (unless roosters are present and you breed separate varieties).

Just sort everyone back out when you release them in the morning.

#2 Your Missing Chicken Could Be a High Flyer

With few exceptions, chickens prefer their roosts several feet off the ground. According to Dr. Richard Fulton, a poultry science professor at Michigan State University, the inclination to roost up high originates from an instinct to stay out of reach of ground-based predators.

Most birds are content with the height of their henhouse perches. But others look for higher ground.

Our Dutch Bantam, Cutie, and our Golden Sebright, Dennis, always perched up in the rafters of their coop, well above the heads of the rest of their flock. Dennis went missing one evening, and I spent several hours searching the surrounding forests for that tiny bird.

I finally gave up and headed back to the house. Then I caught an orange gleam high up in one of our maples. Sure enough, there was Dennis, cozy as could be and snoozing away.

If your missing chicken is a bantam or a breed that flies well, such as Ameraucana, Lakenvelder or Fayoumi, get out your flashlight and search in the boughs of nearby trees. Chances are your lost chook is roosting on a low branch.

#3 Mamma Mia! (It Could Be Broodiness)

Even if our coops are equipped with nest boxes, sometimes a girl in Mama Hen mode wants more privacy than we provide. Instead of setting eggs within the safety of their henhouses, these ladies venture out to find brooding grounds of their own.

Ten years ago, our Easter Egger, Keynoter, went missing from release until lock-up every day for more than two weeks. I finally tailed her to the woods on the southeast corner of our property. Here I discovered her—and her clutch of 18 eggs—tucked out of sight beneath a fallen tree.

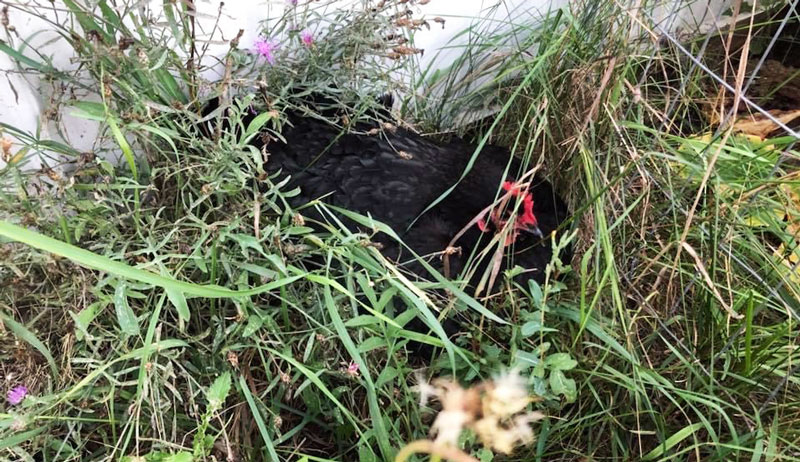
Our Black Orpington, Fitz, pulled a similar stunt four years ago, except she did not return at night. We’d given her up for dead… until the weekend we were weeding around our pole barn. There was Fitz, all fluffed up and growling at us from beneath our overgrown rhubarb, where she was brooding nine eggs.

We were fortunate that our hens weren’t overly adventurous. Mari, a local breeder I know, lost her award-winning Salmon Faverolle hen one summer evening a few years back. Her family searched everywhere for the sweet-tempered hen, to no avail.

About three weeks later, that Faverolle reappeared, trooping out of the forest and looking very worn, ratty and grumpy … with a troop of chicks accompanying her.

If your missing bird is a hen who has demonstrated a penchant for brooding, check under shrubs and bushes, beneath fallen trees and behind air-conditioning units.

Look inside old tires, too. That’s where we found Ebony Orpington and her egg-filled nest.

#4 A Missing Chicken Could Mean Predatory Danger

Unfortunately, sometimes our birds don’t leave of their own accord. Chicken predators exist pretty much anywhere chickens live, especially if you live in a suburban, rural or agricultural area.

While many predators leave behind vivid evidence of their visits, some grab and go with minimal disruption. If your hen seems to have vanished without a trace, chances are it was carried off by a bobcat, fox or coyote… or by a hawk or owl.

Each of these predators prefers to carry off their prey versus kill and eat it in situ.

Years ago, our Buff Orpington girl, Buttercup, disappeared without a trace. My husband, Jae, and I hadn’t mowed recently, however. I managed to track a trail of disturbed tall grass into the woods and right up to a fox’s den dug out under a fallen tree.

Sure enough, Buttercup’s legs were sticking out of the entrance. The fox was nowhere in sight, so we retrieved our poor girl and gave her a proper burial. If your chicken has seemingly disappeared, she may have been the victim of a predator.

#5 Don’t Give up If Your Chicken Goes Missing

If your headcount is off at lock-up or at any other time and you’ve already exhausted the steps outlined above, don’t give up hope just yet. Call your neighbors and ask them to keep an eye open for your missing bird.

(Our Henrietta once decided to relocate herself to the grassy backyard of neighbors about a half mile to the north.)

Carefully check your road for signs of a chicken unsuccessfully trying to cross a road. Inspect your garage, garden shed and any other structure on your property and on your neighbors’ property, too. If you belong to a local poultry group, put out the word—and share a photo, if you have one—that your chicken is missing.

The more people searching, the more chances you’ll find your bird.

This article about what to do about a missing chicken was written for Chickens magazine. Click here to subscribe.