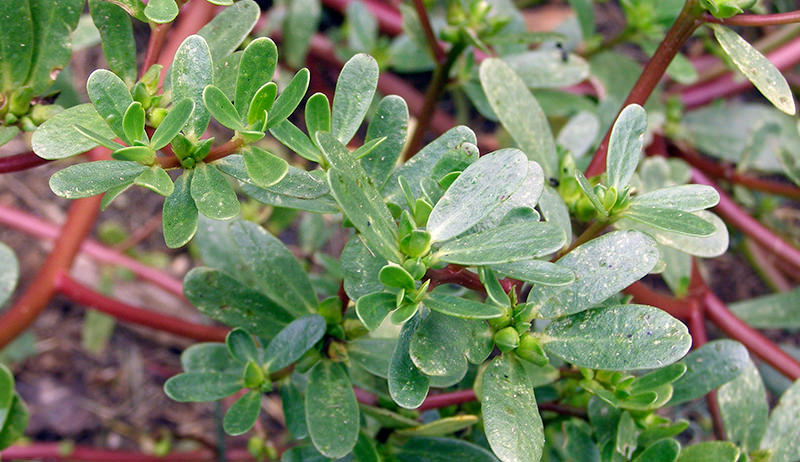
Purslane is often thought of as a weed, but this edible succulent is enjoying the attention of farmers and foodies alike. Unlike lettuce, spinach and other tender greens that readily bolt in pounding heat of summer, purslane thrives. It is also extremely nutritious, high in vitamin A, omega-3 fatty acids, calcium and other minerals. Or perhaps you just want to add another tasty addition to your microgreen production. Purslane can do that, too. This edible succulent is simply too good to overlook when it comes to planning the summer garden. And as you may have noticed when it has volunteered in your paths or around your yard, it practically grows itself.
Selecting Seed
The two types of purslane seed most common in seed catalogs are Gruner Red and Goldberg—though according to Wikipedia, there are over 40 different varieties in cultivation (do with that what you will). If looking for heirlooms or alternatives, you may also find seed under the verdolaga, it’s Spanish name.
Cultivated purslanes generally have larger leaves than wild purslane and grow upright, making harvesting easier. If you want to propagate your own variety, seed can be harvested from wild purslane once the plant has senesced, but the production may be more variable, yields lower and stems shorter. However, what you lack in convenience you may make up for in flavor.
1. Grow Purslane As Microgreens
Microgreens can be a nutritious treat, as well as an excellent market item—especially for chefs. To grow purslane as microgreens, use a perforated seedling tray. Cover the bottom with organic potting mix to at least 1/2-inch deep. Sprinkle seeds evenly but thickly overtop, and cover with a thin layer of soil mix. Place in sunny area at about 75 degrees F, and keep moist until germinated. Once germinated, a slightly cooler temperature between 60 and 70 degrees F, is optimal. Keep the soil moist, irrigate the sprouts from underneath to avoid splashing the plants. Cut the microgreens when the reach 2 to 4 inches.
2. Keep Soil Dry
Although soil fertility for purslane doesn’t have to be particularly high, as a succulent, purslane does enjoy a drier, well-drained soil. It is a fast grower, so it can often outcompete many other weeds, but a good preemptive flame-weeding or stale seed bedding is always recommended before direct seeding it into the ground.
As a member of the same family, purslane will share diseases with other succulents. It is also somewhat susceptible in my own experience to fungi if the season is too wet and planting too dense, as it actually prefers a dry climate.
–Tico–/Flickr
3. Grow Purslane In A Warm Spot
Purslane cannot tolerate cold and prefers germination temperatures of 70 degrees F or more. Wait to place in field until days are long and average temperatures are above 70 during the day and 50 at night, preferably warmer.
Purlsane can be started in seed containers or sown directly into beds. Seeds should be sown every 3/4 inch in rows 8 inches apart. Thin to roughly two or three per foot in row. If transplanting, sow in flats and transplant once first true leaves appear at roughly 8 inches apart.
4. Harvest Purslane In The Morning For Tartness
When harvesting purslane, take into consideration the malic acid content of the plant, which is higher in the morning than at night thus making it more tart. Some will prefer this while others may find they enjoy purslane harvested in the evening, when the flavor is milder.
5. Cool Immediately After Picking
Purslane is a delicate crop and should be cooled immediately after harvest. Warm temperatures after harvest will bring out the mucilaginous texture of the crop. Gardeners can either pick off stems continuously over several weeks or cut the whole plant. It will regrow if 2 inches or more of the plant is left on the stem, though it should get no more than three weeks of harvest if the flavor begins to decline and the plant shows signs of bolting. Store purslane in the crisper drawer of your refrigerator, and use within a week.
6. Seek Out Chefs
If looking to grow a lot of purslane, contact chefs beforehand. It will sell a bit at market, but it is a specialty crop and may need some other outlets to move it. Ask chefs at what size they would prefer it and how many pounds. And since it is a rarer green, consider selling at herb prices.
This article about growing purslane was written for Hobby Farms magazine. Click here to subscribe.
A DIY chick brooder for your new chicks is easy to build. A brooder box must perform the duties that the mother hen would perform for her babies. The chicks are literally under her wings of protection for six to eight weeks. They come out to eat and drink but periodically return for her warmth and quickly return when threatened.
At about 2 months of age, though, the new hatchlings are ready to join the flock. This homemade chick brooder box will do exactly that.
The task is to create an enclosure that is capable of keeping baby chicks secure and warm until they are feathered out to the point that they are independent. It’s still up to the chicken keeper to monitor feed, water and the heat source.
This particular homemade chick brooder, designed for about 10 chicks, will make the task that much easier.
The box isn’t weather-tight, so keep it in your garage. When the chicks become young pullets, move the box into the coop and let the older hens meet the new gals for about a week or 10 days before opening it up to let the groups commingle.
What Materials Are Needed for a DIY Chick Brooder
Building a DIY chick brooder isn’t particularly difficult, but it does require a few tools, some skill and patience, and a bit of time. Here are most of the materials you will need to get started:
one 4-by-8-foot sheet of oriented strand board (OSB) or plywood. (I like it to be about 3/8 or 7⁄16 inches thick to keep the weight down.)
five 8-foot-long 2-by-2s (pine or fir, which will be less expensive)
two 2-by-3-by-8-foot pieces of fir or pine lumber
~100 3⁄4-inch deck screws with a Phillips head
~25 3⁄4-inch pan-head screws
a few long screws (2 1/2 or 3 inches)
~10-by-2-feet of small-opening poultry netting or 1⁄2-inch wire mesh
a handful of Sheetrock nails (not more than 13⁄8 inches long)
wood glue
one small pair of hinges
one 8-foot and one 6-foot piece of 1-by-4 (to create the hinged top)
very thin strips of wood to screw down over the edges of the poultry netting. Use whatever is available in your area. This brooder was made with wood strips that measured 1 ½-inches wide and ¼-inch thick, cut to the length of the netting edge.
Here are most of the tools that you’ll likely need to build this brooder box.
a drill motor and bit set
a circular saw with a wood-cutting blade
a Philips screwdriver or bit for a power drill
a tape measure
a 4-foot straight edge and pencil
some kind of wire cutters
some sawhorses or other work surface
three or more 4-inch C-clamps
safety glasses
an awl or other pointed instrument
a medium-sized claw hammer
You should understand that if you have more efficient power tools or pneumatic staplers, your job will be that much easier. At certain stages, it’s also helpful to have an extra set of hands
Cutting the Board
The diagram below represents a single sheet of Oriented Strand Board (OSB, plywood) measuring 4-by-8 feet. The heavy lines represent the location of saw cuts.
Use OSB that measures about 7⁄16-inch thick to keep the weight to a minimum. You could make the bottom and sides wider, but it makes reaching in and across to catch chicks pretty difficult. As drawn, this will create a brooder that is 10 square feet, which is more than ample for 10 chicks—even more when they only a few days old.
Amonphan Comphanyo;BushAle/Shutterstock
Dispose of the narrow strip that is left over, or use it to create a low front below a strip of poultry netting. All corners will be reinforced with 2-by-2 lumber to provide a surface so screws can be used to make sheets meet securely. Use litter on the bottom of your brooder to a depth that covers these corner pieces.
Once you have your boards cut, use the captioned photos to walk you through the process. Take your time and enjoy this fun little homemade chick brooder plan.
Step-by-Step DIY Chick Brooder Instructions
Step 1: Tools & Materials
Start by laying out what you’re going to need. I like to use the smoother side of the oriented strand board (OSB) sheet for the inside of my brooder.
Use a wet/dry vacuum to clean the finished DIY brooder. If chicks soil or spill water, use a wide putty knife or small dustpan. Remember to keep the smooth side to the inside.
Step 2: Which Side of the Line
Make a mark 24 inches from one end of the OSB (or plywood) and then make a similar mark on the opposite edge. Using a straight edge, make a line completely across the 4-foot width. Using your circular saw, make the cut on the line.
Notice that I am cutting right along the edge of the line, leaving a full 24 inches. Perform this exact same task on the other end of the OSB, but make this cut at a 30-inch line. The piece that is 24-by-48 inches is the back of the brooder, and the 30-inch piece is the bottom.
The DIY brooder will still work if you’re off a little. You just might need to make some simple adjustments.
Bill Graves
Step 3: Add 7/16
After cutting and removing the 24-inch back and 30-inch bottom, cut a 48-inch piece of 2-by-2 lumber and place it along the back edge of the bottom, as shown here. Use about five 3⁄4-inch deck screws along the bottom and five more along the back.
For added strength, add a little wood glue to the joints. Once you have cut a 2-foot section and a second 2 1⁄2-foot section from the 8-foot piece of OSB, you should have a piece a little less than 42-by-48 inches.
(Note: 2-by-2 lumber actually measures 1 1⁄2-by-1 1⁄2. Don’t let that throw you off; suppliers just call it 2-by-2.)
Cut 30 7⁄16 out of the 42-inch piece, and then cut that piece in half down the middle. The idea is to create two pieces that measure 24-by-30 7⁄16. These two pieces will be the side ends of your DIY brooder box.
The sidebar (below) should make this more clear.
You should also notice in this photo that I have already added a piece of 2-by-2 that is about 28 1⁄2 inches directly behind the tape measure. All the corners will have this 2-by-2 or 2-by-3 screw backing.
In the image below, it’s easy to see the process. All inside seams are joined with screws and glue. It may be helpful to use C-clamps when tightening the screws, but once the screws are in place, you can loosen the clamps and move on to the next piece.
The corners aren’t put on in any particular order, so simply measure and cut each on as you go. Notice that I put a 2-by-3 across the top of the front span for a bit more support for the top.
Bill Graves
Step 5. Predrilling Close-Up
A small drill bit is used to drill the OSB and 2-by-2 backer. OSB is a rather hard material, but you can use a sharp awl and hammer to start the hole.
Just be careful to apply some pressure from the back if you’re going to hammer on the structure.
Step 6: Apply a Screw
A 3⁄4-inch deck screw is applied to the hole.
Step 7: Ready for Front
At this point, your DIY brooder box is nearly ready for the top and front. The narrow area at the bottom in front can be filled in (see step No. 8), or you can use poultry netting for the entire space.
All eight inside seams now have a 2-by-2 or a 2-by-3 screw backer. At this point, you’ll begin to see how truly rigid the box has become.
In this slightly elevated view, the narrow remaining strip of OSB has been used to fill in the front bottom. Because my poultry netting is only 24 inches wide, this is a much better option than trying to fill the entire space with wire.
Also, this image shows one spot where two very long screws are needed near the top. The top 2-by-3 on its side is installed to leave about a 12-inch gap.
That will make sense as you finish.
Bill Graves
Step 9: Sheet Rock Nails
I like to pull the wire tight with an awl or Sheetrock nail and/or use a screw. If using a screw, cut one side of the wire and wrap the wire around the screw head before using the screw bit to drive the screw in.
Once you’re happy with how tight the wire is, you can just drive in the nail. Make sure it doesn’t come out the back.
Step 10: Lid Corner
The lid corners were made, braced and hinged. I cut the 1-by-4 on a 45-degree angle and used metal braces with additional wood on the inside. You could also butt-splice the 1-by-4 and then create added strength with the thin strips that cover the wire.
Caution: If you use lid material that is less than 1-by-4, your 24-inch poultry netting will not be wide enough for the top.
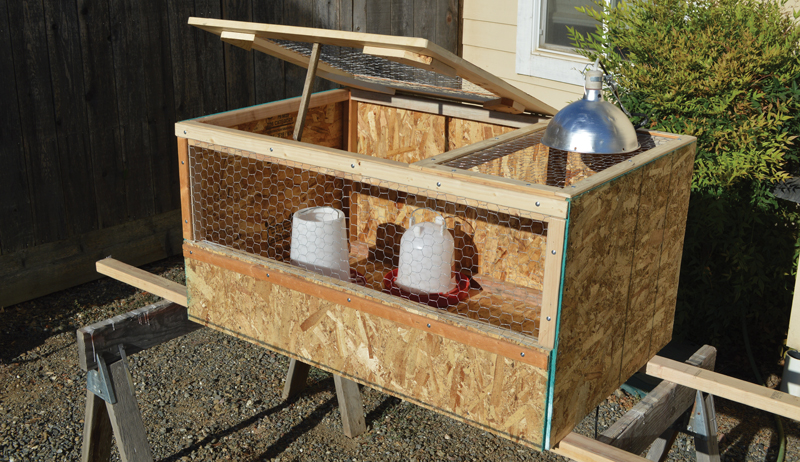
Step 11. Finished
The front and top are complete! The lid can be opened without removing the heat lamp, which is wired in place so it won’t move and become a fire hazard.
The main image for this story also illustrates the thin strips that were used to cover the edges of the poultry netting. I would likely use feeders and watering devices that are slightly smaller to give the chicks a bit more room.
Now your DIY brooder box is ready for some floor litter and baby chicks!
At about two months or even less, you can place the DIY brooder inside your henhouse to introduce the young chicks to the rest of your flock. Chicks won’t need a lamp at that age.
During introductions, put a layer of cardboard on top of the brooder so adult hens can’t hop up and poop through the top. Older hens should accept the new arrivals in a week or 10 days.
This article about building a DIY chick brooder box was written for Hobby Farms and Chickens magazines. Click here to subscribe.
With this DIY chicken run, you can allow your birds to free-range for part of the day while being safe from predators.
Many chicken keepers like to have the ability to allow their birds to free-range for part of the day so that they can utilize new areas. But you might still want to contain your chickens in a specific area so that you can protect them from predators and control where they range. There are a number of ways to create a portable chicken run, including the popular chicken tractor, but you can also make an easy-to-build, 4-by-4-foot chicken run that collapses into a small, lightweight package whenever you want to move it or store it.
In the instructions that follow, we’ll show you one way to create a simple collapsible homemade chicken run, but you can certainly make variations to this design to fit your flock, no matter the size; for instance, you could opt for a larger 8-by-8-foot design by essentially “doubling the recipe.”
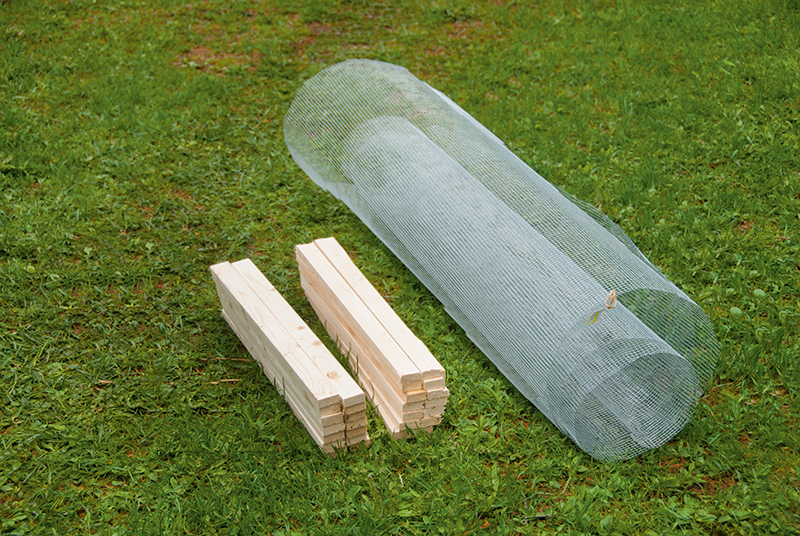
Materials For a DIY Chicken Run
All photos by Daniel Johnson
Wood & Cut List
• (16) 24½-inch 1-by-2s
• (16) 23-inch 1-by-2s
Hardware
• (8) 24-by-24-inch sections of ¼- or ½-inch hardware cloth
• (2) hook and eye latches
• (14) 2-inch hinges
• Box of 1½-inch nails
• Box of staples
Tools
• Circular saw or miter saw
• Staple gun or hammer
• Electric drill or screwdriver
• Framing square
• Metal snippers
• Wood glue
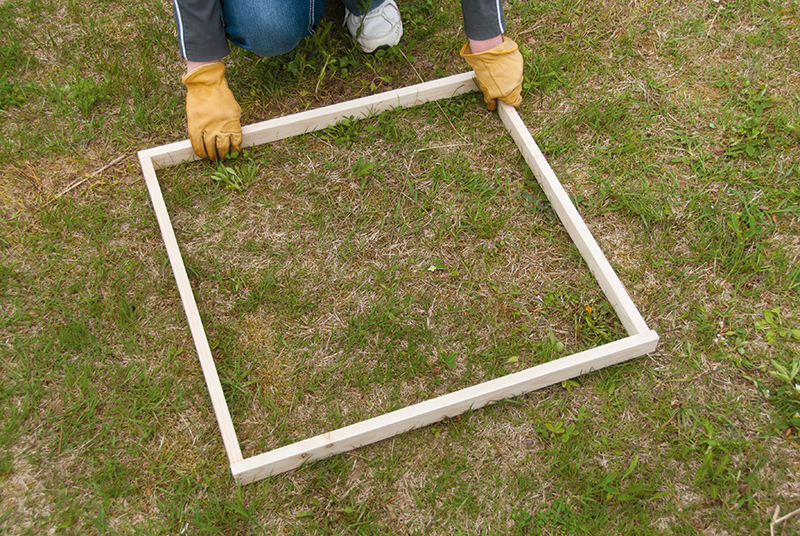
Step 1: Assemble Panel Frames
To begin, we’ll assemble the frames that will form the skeleton of the collapsible chicken run. We’ll need eight complete frames.
To build the first, take two of the 241⁄2-inch 1-by-2s and two of the 23-inch 1-by-2s and use them to create a square, with the shorter 23-inch 1-by-2 on the “inside,” and the longer 241⁄2-inch 1-by-2 on the “outside,” as shown in the photos. Use a framing square for precise corners.
Predrill nail holes with a small drill bit and then fasten with 11⁄2-inch nails. Use wood glue on each joint for a firmer bond. Repeat this seven more times to create a total of eight wooden squares. Set these aside.
Step 2: Cut Hardware Cloth
Now we’ll need to add the hardware cloth to each panel of the chicken run. Using your choice of 1⁄4- or 1⁄2-inch hardware cloth, carefully cut a total of eight 24-by-24-inch squares with wire snips.
Our supplier provides hardware cloth on rolls 4 feet wide, so it was a simple matter to purchase a 4-by-8-foot section to use for this project.
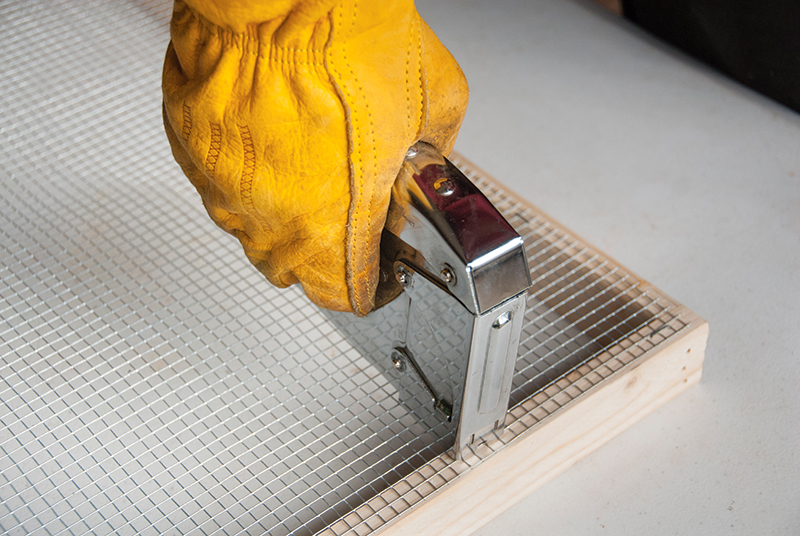
Step 3: Fasten Hardware Cloth
It’s time to attach the 24-by-24-inch sections of hardware cloth to each of the eight wooden panel frames of the chicken run. We used a manual staple gun for the job, but you could also use roofing nails to pin down the hardware cloth.
It’s important to keep the edges straight and properly aligned with the wooden frame. It’s also critical that you exercise extreme care when handling the wire. Safety glasses and gloves are a must!
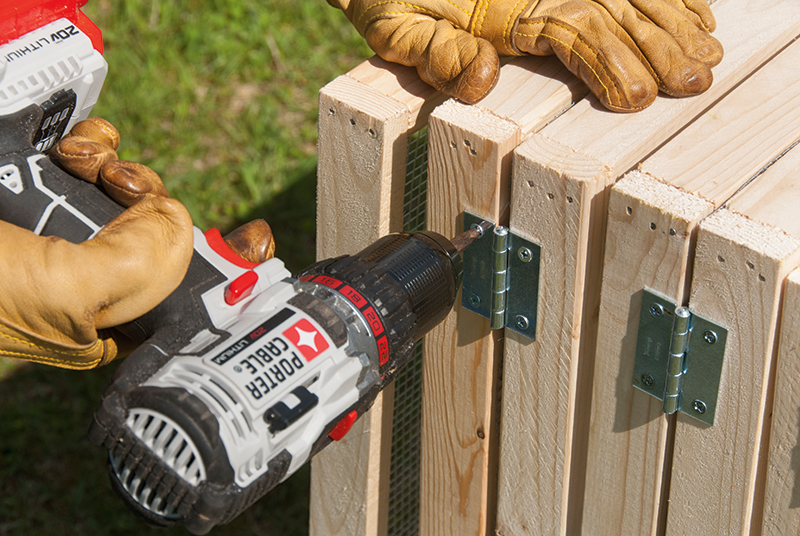
Step 4: Attach Hinges
At this point, we can begin to fasten the finished panels together to create the chicken run. This can be a tricky step to do properly, as the hinges and the frames must be assembled the correct way to allow the pen to expand and collapse properly. Use two 2-inch hinges on each joint, and screw them in with the electric drill or screwdriver. It can help to predrill the screw holes here as well. Here’s an easy way to make sure that the panels will assemble in the correct manner:
• Create four pairs of panels, each with the hardware cloth facing “out.”
• Place all four pairs (a total of eight panels) side by side
• Attach hinges to each of the four pairs (shown in the photo at left).
• Go around to the other side
• Now attach hinges to the six inner panels, leaving off the two panels on each end (shown in the photo below).
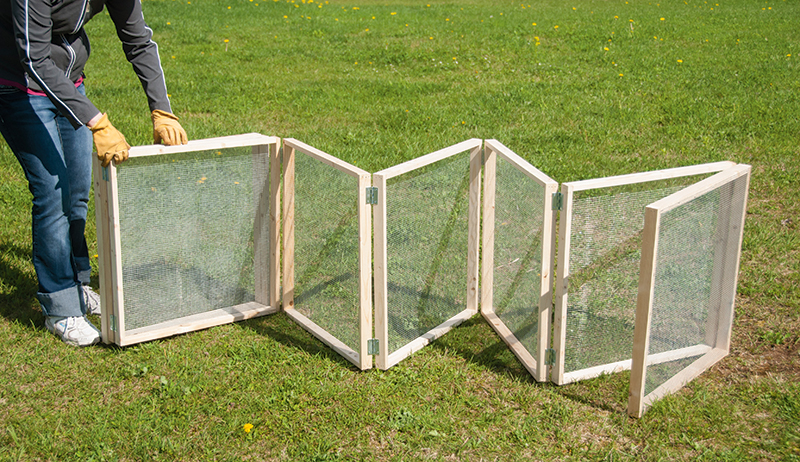
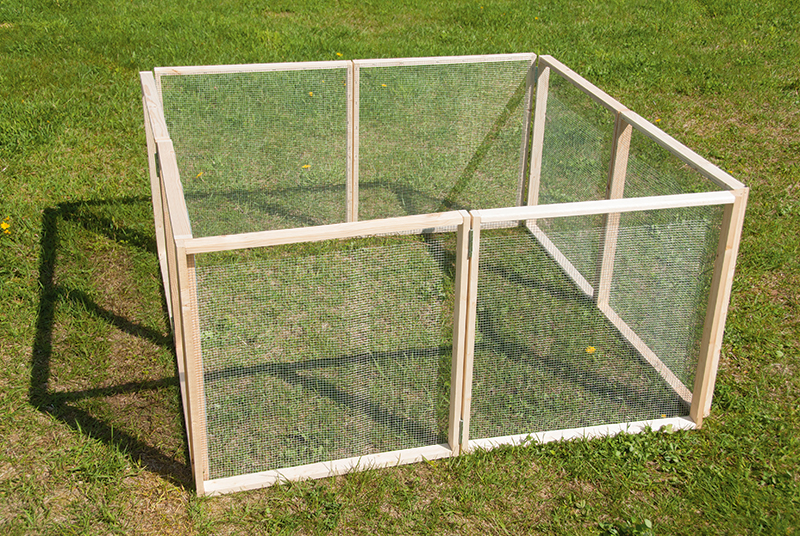
Step 5: Enjoy Your DIY Chicken Run!
When assembled correctly, the pen should easily collapse into a lightweight and portable package that can then be quickly unfolded into a 4-by-4-foot movable run for your chickens.
Use two hook-and-eye latches at the top and bottom to secure the opening and you’re all set to go.
Predator-Proofing Pointers for a Homemade Chicken Run
Keep your birds safe while free-ranging in your new pen with these proofing tips.
• Half-inch hardware cloth may be available in a stronger gauge than 1/2-inch, which can help keep out predators. Don’t use chicken wire for this project, as predators can easily get past chicken wire. Hardware cloth is essential.
• If you’d like to create a roof for the collapsible run, you’ll need to make one large 4-by-4-foot frame and cover this with hardware cloth. The corners should then be temporarily screwed down during the day when the chickens are using the pen and removed at night.
• You can also use 2-by-2s (or larger lumber) instead of 1-by-2s for the basic frame; this will be make the run stronger, although using wood of a larger size like this will make the run heavier and more cumbersome to move and handle.
• Because this homemade chicken run is lightweight and portable, it’s not a safe defense against digging or large predators. Your chickens should be kept in a digproof coop at night, and this pen should only be used during the day in a place where you can keep an eye on the chickens.
• Moving this pen around inside a larger area protected by an electric fence may help keep predators away.
This article about building a DIY chicken run was written for Chickens magazine. Click here to subscribe.
Ice melt products certainly work, but they’re not always ideal for farm use. Still, you can’t have slippery walkways and doorways causing unnecessary winter trouble for you and your livestock. Let’s briefly explore some safe and effective ice melt alternatives and solutions for farm safety.
The Problem
Ice buildup on the ground is often an issue around your farm property towards late winter. It’s easy for deep snow to pack down as people and animals traverse it, and this packed snow slowly turns to ice after a time. Also, the warming winter sun melts snow during the day, but then cold nights re-freeze the moisture back into ice. Before you know it, you have a recipe for slippery walkways, gates, doorways, driveways, trails and paths around the barnyard.
Prevention: Clear Snow Right Away
First off, try to put as much in your favor with some smart elbow grease. When it snows overnight, get out there and clear your farm paths, driveways, and walkways right away. If you can, try to remove the snow before other people or your animals have had a chance to walk around much. Every footstep and every tire tread that falls on fresh snow compacts that snow and forms a compressed layer that is just waiting to become ice. It’s not always possible, but the faster you can remove snow with snowblowers, plows, and good old hand shoveling, the less ice you’ll have later.
Try Sand as an Ice Melt Alternative
Despite your best efforts, ice still has a way of forming in later winter. Warm days and cold nights might be great for maple syrup production, but they make ice in the farmyard. Late winter can also bring ice storms, where rain freezes as it falls. When these conditions occur, you might consider a variety of commercially available ice melt products like rock salt, calcium chloride and potassium chloride
However, these products can be damaging to concrete surfaces, and they’re quite harsh on grass, creating dead spaces. They’re also not always safe around pets or livestock, who might try to consume large amounts because of the taste. Dogs and cats can get their feet irritated by the ice-melt products, and long-term exposure isn’t great for hooves, either.
Ice melt alternatives for farm use can be as simple as keeping sand on hand. While sand doesn’t melt ice in quite the same manner, on a warm day it will collect heat and melt into the ice. And in the meantime, sand gives you and your animals excellent traction to move around safely. Sand is easy to source, inexpensive, and simple enough to apply, so it makes a decent ice melt alternative. Then in the spring, you can simply sweep the sand harmlessly away.
Keep Some Hand Tools Around
You’ll also need some ice-scraping tools to help you clear the way.
· Rounded shovel for digging out deep sections of packed snow
· Spade (square shovel), for scraping
· Dedicated ice scraper, with a flat blade
· Snow shovel for removing the initial snowfall.
Prioritizing farm safety with the right ice melt alternatives will keep you and your animals protected. Be careful out there during late winter! Spring is just around the corner, so keep yourself and your animals safe from ice in the meantime.
This article about ice melt alternatives on the farm was written for Hobby Farms magazine. Click here to subscribe.
German and Roman chamomile differences are subtle but distinct. I have grown both at one time or another, and I like aspects of each. Right now I have a lot of the German and not much of the Roman and that’s just because of a harsh winter a couple years ago. The two plants are in the same family, but after that, they have very little in common despite containing similar chemicals and appearing to have similar flowers.
ethnobot/Flickr
German chamomile (Matricaria recutita) is a self-seeding annual in the Midwest. It grows from 6 inches to 2 feet tall. The leaves are ferny and delicate, and it has a typical aster flower, with a yellow disc in the middle surrounded by evenly spaced white florets. The flower smells like apples, and the essential oil derived from the yellow and white flowers of this plant is blue due to high levels of azulene.
Traditionally German chamomile has been used to calm, feed and soothe the nervous system and to support good digestion. You can use all parts of the plant in salads, though you might want to watch out for its bitter quality. They say that the longer you use chamomile on a daily basis, the more benefit it will give you. As a tonic, there are few reasons to avoid it, unless you happen to have an allergy to ragweed. Even then, there is only a very slight chance that someone might have a reaction, and it is most always a topical rash. I grow this type to harvest and dry for our medicinal preparations. It simply blooms more prolifically and makes my time picking worthwhile.
Melanie Shaw/Flickr
Roman chamomile (Chamaemelum nobile) is typically grown as a perennial, though it likes a warmer climate than I can give it here in Ohio. I’ve had it stay around for some winters—but not the really bitter ones. It is hardy to zone 5 and is a creeper, only growing to about 3 to 4 inches high. The leaves tend to be thicker and more substantial than those of German chamomile, and in my experience, so are the flowers.
This is the flower you want if you are putting together a chamomile “lawn” or wanting to plant in between your patio pavers. Most people that grow Roman chamomile in this way keep it cut short. Sadly, they miss out on all the companion planting benefits of this plant, as it attracts some great pollinators and beneficial insects. The flowers and the leaves of it also smell of apples, but while the essential oil of this plant is useful, it doesn’t contain high levels of azulene, so it’s a clear oil.
Roman chamomile has also been traditionally used for its calming and relaxing properties. It doesn’t bloom as much or as often as the German variety. It’s worth picking for a cup of tea for sure but I’m not sure I’d want to count on it to fill my herb jar.
This article about German and Roman Chamomile Differences was written for Hobby Farms magazine. Click here to subscribe.
Bales of hay may seem like a faded memory by late winter, but properly stored hay is crucial for ensuring a steady supply for your livestock. Summer’s hard work baling hay is long past, and with the finished hay safely under cover, it’s easy to put it out of your mind, other than the slow process of feeding. But maybe you shouldn’t get too lax—late winter is an excellent time to check on the safety of your hay stock and ensure your hay storage remains intact.
Storing Hay Can Invite Pests
During a recent cold snap, I didn’t access my main hay storage barn (half a mile away) for about ten days, instead feeding my animals on hay reserves that I stashed closer to home. When the weather finally warmed back up, I returned to the hay barn for a restock.
Surprise, surprise, during my absence an opportunistic rabbit had discovered a small crack in the barn wall and had apparently spent the entire cold snap enjoying my supply of square bales of hay. Not only did the rabbit leave many, many calling cards all over the barn floor, but he had also even climbed well up the stack of hay, depositing droppings as high as ten feet.
Luckily I caught this problem before it could become too bad. A brief repair sealed off the entrance, and I cleaned up the mess. But this rather humorous episode could’ve been more damaging if I hadn’t caught the problem quickly. If left unchecked, messes like this can easily ruin valuable bales of hay, making them unsuitable for animal feed. Making hay is far too much effort to be wrecked by wild critters!
What Animals Are Attracted to Bales of Hay?
Many different animals will try to move into a cozy hay storage barn. Squirrels, rabbits, mice, voles, and raccoons—all of them will try burrowing into bales of hay, while troublesome pigeons might roost above. The amount of damage caused by these critters can range from a minor nuisance to quite damaging. As already mentioned, rabbits can cause a costly mess, as can pigeons—sometimes ruining many bales of hay. Keeping an eye on any signs of occupancy gives you the chance to stop the issue before it gets out of hand—and it’s easy to miss in late winter if you aren’t paying attention.
Hay Storage Challenges in Late Winter
There are other things to keep an eye on in your hay storage barn. In regions with heavy snowfalls, it’s not uncommon for tiny leaks in the building—or even ventilation points—to become access points for wind-blown snow. A wintry blizzard with high winds can drive small amounts of snow into your barn and onto your bales of hay, where it will melt later in the season, possibly creating a mold issue. High winds can peel away roofing or siding, allowing snow to pile in. Checking on your barn after a snowfall ensures your bales of hay remain dry and mold-free before any melting snow seeps in and causes damage. The same goes for any round bales of hay stored outdoors—check plastic covers and other protection to make sure they’re still functioning properly deep into winter. Remember, the first few inches of a round bale—the most vulnerable to moisture—contain the most amount of hay.
Frost buildup is another reason to check your hay storage during late winter. If your hay storage shares a wall with livestock housing, or if there is any kind of heat source in an adjacent portion of the barn, frost can begin to form on the wall during very cold weather. Frost like this can soak precious amounts of hay.
Conclusion
The bottom line? Late winter is a good time to check on your valuable bales of hay and remedy issues before they become bigger problems. By maintaining proper hay storage and staying vigilant, you can ensure your livestock has access to high-quality feed throughout the season.
This article about checking bales of hay in late winter was written for Hobby Farms magazine. Click here to subscribe.
Mini cucumbers are perfect for small spaces and small bites when a large cucumber is just too much. Here are three varieties to consider growing.
What Makes Cucumbers Miniature vs. Full Size?
So, you might wonder, what exactly miniature cucumber varieties are. Well, these particular varieties are not just large cucumber varieties picked early in their development. Instead, they’re varieties whose fruits maintain a miniature stature, even when the fruits are mature.
Perfect for containers and small-space gardens, miniature cucumber varieties are among my favorite cucumbers to grow. They’re also a favorite of my son, who enjoys picking them straight from the vines and crunching away on these little garden snacks. They make great pickles, too, if you can manage to save some for the kitchen instead of eating them straight off the vine.
Mini cucumbers are just a few inches long at maturity, and most are only an inch or so wide. Some cultivars have smooth skin while others have skin that’s pimpled and spined. But regardless of their rind’s appearance, these tiny cukes are productive and delicious.
How to Grow Mini Cucumbers
Thankfully, there’s nothing special required to grow miniature cucumbers. Sow seeds outdoors in spring, after the danger of frost has passed; there’s no need to start the seeds indoors under grow lights unless you live in a gardening zone with an extremely short growing season. Seeds should be sown about an inch deep and eight to ten inches apart. Alternatively, you can plant the seeds of miniature cucumbers in containers, putting three to five seeds per 24-inch diameter pot.
The vines can be left to ramble across the ground, but you might find that trellising them or encouraging the vines to grow up a fence or arbor, makes for easier harvesting and blemish-free fruits.
Keep the vines well watered, especially when the fruit set begins. And don’t worry if the initial flowers don’t develop fruits; cucumbers produce separate male and female flowers on the same vine. The male flowers tend to be formed a few days to a few weeks before the female flowers arrive. This ensures there’s plenty of pollen around to pollinate the female flowers.
Keep the vines of your miniature cucumber varieties harvested on a regular basis because the more you harvest, the more fruits the vines will produce.
If you’d like to include a few miniature cucumber plants in your garden, here are some of the cultivars I recommend. All produce small-sized fruits on beautiful, lush vines.
1. Picolino Cucumber
This sweet little cuke starts producing just 45-50 days after planting the seeds. The fruits reach only 4 inches long and are packed with flavor. They produce early and keep on chugging along for many weeks. It’s also resistant to many viruses and other pathogens.
2. Excelsior Cucumber
This super-productive miniature cucumber bears so many fruits, our family can hardly keep up. Topping out at about 4 inches long, each fruit is dark green and evenly colored. Grow them up a trellis just to see the way the fruits hang off the vine; one is produced at nearly every leaf node!
3. Mini Munch
Quite possibly the cutest of the mini cucumbers, Mini Munch cucumbers are seedless and tasty. Best when picked between 3 and 4 inches long, the crispiness of this variety is superb. The vines are very vigorous and prolific.
This article about growing mini cucumbers was written for Hobby Farms magazine. Click here to subscribe.
Raising goats is easy and fun but also requires daily, monthly and even annual chores. If you are interested in raising goats for pleasure or purpose this is a must-read to understand what is involved with their care.
Raising Goats – Daily Chores
When raising goats, the daily chores may vary depending on the breeds you raise, the season and whether you have milk goats. But some chores need to be done routinely regardless of why you have goats.
Fresh Water
Goats need access to fresh water 24/7. This is especially important during the hot summer months and when does (female goats) are pregnant or lactating.
Water buckets should be emptied and rinsed thoroughly before refilling twice daily. This job is usually performed first thing in the morning and then again in the evening after the goats return to the barn for the night.
Grain Please
Goats require a little grain in the morning before you let them out to pasture. As a general rule of thumb, give each goat one-half cup to about a cup of grain daily. (More for lactating does and less for castrated males called wethers.)
Milking goats should be fed grain twice daily while the goat is being milked.
Hay Time
If raising goats for the first time, one of the things you will quickly discover is that goats need hay. Based on the season and whether or not your goats are allowed daily access to green pasture, will depend on how much hay should be fed.
Feed a little hay to goats daily before letting them out in the pasture to avoid overeating and causing bloat (a serious condition that can be fatal.). Feed goats their regular amount of hay upon returning to the barn in the evening.
During the cold winter months, or when goats are not allowed access to pasture, feed a generous amount of hay twice daily.
Dairy Equipment
Dairy equipment must be cleaned after every milking. This may sound extreme, but if raising goats for dairy purposes, it is a must to ensure milk is not contaminated with harmful bacteria.
After each use, all milk equipment must be rinsed in lukewarm water (not hot), scrubbed, rinsed, dipped in dairy acid cleaner and rinsed again.
Raising Goats – Monthly Tasks
Monthly tasks can be easy to forget, so it’s best to have a routine day or add it to your calendar so you don’t forget these important tasks.
Cleaning Day
If you are new to raising goats, it may surprise you how dirty their stalls can get in just one month. Cleaning out the stalls each month will not only cut down on the chances of your herd contracting external and internal parasites, but it will also help reduce dust, supporting a healthy respiratory system.
Take a Look Around
Goats are curious creatures that seem to thrive on adventure. However, those adventures may not always be in the goat’s best interest. Notorious for finding weak spots in the fence, butting open gates and doors, and even chewing on barn walls, goats have a knack for finding the weak spot in your carefully maintained barn and pasture.
When raising goats, you will quickly learn that to keep your herd safe and confined, you’ll need to stay on top of any weak spots in their housing. Check the perimeter of the pasture for weak spots in the fencing or torn fencing a goat could get caught on, and make any necessary repairs.
After the monthly stall cleaning, it’s also a good idea to look around for weak spots, double-check gate latches (both pasture and stalls), and look for any hardware (such as wire, nails, screws, etc.) that your goats could ingest or injure themselves on. Make repairs as needed, and be sure to remove any sharp objects to prevent injuries.
Hoof Trimming
Hoof trimming is another routine chore of raising goats. Hooves should be checked once a month to ensure they are staying healthy and not becoming overgrown. This is also a good time to check out the goat’s feet to ensure there are no sores or hoof rot.
Not all goats will need their hooves trimmed monthly, while others may require a trim every two weeks. Even if your goats are allowed access to pasture and do not require a monthly trim, be sure to check them anyway to avoid hooves from becoming overgrown and keep your goat in the habit of having their feet handled.
Raising Goats – Checkup Time
Goats can be prone to disease and parasites, so it’s a good idea to check them monthly for a routine checkup. Check each member of your herd’s coat for external parasites, ticks and thinning fur. Also, check each goat’s weight and mouth. If a goat is losing weight or seems injured or sick, call a vet right away.
Annual Checks
When raising goats, it’s easy to fall into the everyday humdrum and forget about all the annual to-do lists. But just because these jobs only need to be performed once a year doesn’t make them less important.
Vaccine Time
Just like cats and dogs are vaccinated against certain diseases, goats should be too. While there are several optional shots available for goats, there are two shots that all goat owners should consider.
Rabies Vaccine: Rabies is a concern for goat owners all across the U. S., but this disease is most prevalent in California, New York, North Carolina, Pennsylvania, Texas and Virginia. Vaccinating your goats against rabies is not a legal requirement, but if you live in an area prone to this disease, a vaccine may save your goat’s life. Rabies vaccines must be administered annually by a veterinarian.
Tetanus Shot: Tetanus is caused by a bacteria known as Clostridium tetini entering a goat’s bloodstream through a wound or cut in the goat’s flesh. Tetanus is a painful and often fatal disease. Baby goats should receive their first vaccine at five to six weeks of age. Vaccinate adult goats annually.
Breeding Time
Whether raising goats for milk or selling them as companion animals, breeding your herd is an annual job. Female goats are usually ready to breed in late August through early January.
Does go into heat every twenty-one days, so if you miss the first one, don’t sweat it. In another three weeks, your doe will be ready to breed again.
Storing Hay
If you have a barn or shed to store it in, stocking up on a year’s worth of hay will save you time and money and prevent the need to venture out on cold, snowy days to buy hay.
Purchase hay in the late summer/early fall for the best prices and freshest quality.
Raising goats may require a lot of work, but for those who are drawn to these delightful creatures, the results of a happy, thriving herd are well worth the effort.
Rooster care is often overlooked, as the hens are the ones laying all the eggs. But today we are going to turn our attention to the protector of the flock as we discuss aging rooster care, health concerns for roosters of all ages, and how you can help your rooster live his best life into his golden years.
How Long Do Roosters Live?
Unfortunately, chickens don’t live as long as many of us backyard chicken keepers wish they did. It’s hard to believe that in just a few short years from raising them as chicks, our flocks are entering their golden years. With the average lifespan of a laying hen between four and eight years (depending on the breed) and roosters averaging five to seven years, our flocks sadly age faster than we would like.
Top 5 Rooster Care Health Concerns
When researching rooster care, one of the most surprising bits of information you will probably learn is that roosters are more prone to some health concerns than hens are.
1. Low Testosterone Levels
As they age, roosters experience lowering testosterone levels. While most roosters will remain somewhat fertile their entire lives, having a backup rooster on hand may be a good idea if you want to breed.
There is no known treatment for this condition.
2. Kidney Failure
One of the most difficult parts of rooster care is ensuring they don’t receive too much calcium in their diet. Since the high amounts of calcium in layer feed are formatted to fit the dietary needs of a laying hen, not a rooster, preventing this condition can be tricky.
Hens need the layer feed to lay healthy eggs and most roosters refuse to eat separately from the rest of the flock, so there isn’t a lot you can do to remedy the situation. However, offering your rooster dandelion greens free choice is thought to support kidney health.
The combination of high calcium levels and a rooster’s low water intake can result in his kidneys failing later in life. Encouraging your rooster to drink more by providing a stress-free environment with multiple water sources will keep him hydrated and help improve kidney health. Refresh water twice daily for optimal results.
3. External Parasites
Performing routine monthly checkups to look for external parasites is an essential part of rooster care. Since they are so busy looking out for danger and tending to the needs of their ladies, roosters rarely have time to care for their own needs, including dustbathing and preening.
Their lack of self-care puts roosters at a disadvantage for contracting external parasites such as mites, lice and scaly leg mites. If left untreated, these parasites can cause harm to your rooster’s feathers and overall health. Parasites can also spread to the hens, so be sure to check them regularly too.
Prevent external parasite infestations by treating roosters routinely with an all-natural bug repellent made for chickens.
Also allow your boy(s) a spa day several times a month, where he can be away from the ladies to ensure he takes a dust bath. Roosters need some time to relax and recharge just like we humans, so give him the break he deserves.
4. Frostbite
Rooster care in winter in northern climates is especially tricky as they are more susceptible to frostbite than hens are.
Roosters often refuse to tuck their heads underneath their wings, so they always have an eye out for danger. This behavior can cause frostbite and, in severe cases, gangrene.
If a rooster’s frostbitten comb or wattles start to turn black or green, take it to a qualified veterinarian immediately for treatment. If you’re not lucky enough to have a vet who treats chickens in your area, humanely dispatch the rooster to prevent an agonizing death.
5. Spur Issues
Trimming and filing spurs is another routine part of rooster care. As roosters age, their spurs grow longer and become more tough to trim. Take care to trim and file the spurs regularly to ensure they don’t curl and grow into the back of the rooster’s legs.
2 Top Rooster Behavior Issues
1. Bullying
If housed with other roosters, older males are susceptible to being severely bullied. While this may seem cruel, younger, more fertile roosters will see the older males as a threat.
This threat is not just for the right to breed and be top bid, but also as a threat to flock security, as weaker flock members are more likely to attract the attention of predators.
Prevent your older males from being bullied by housing them separately from younger roosters.
2. Aggression
Some roosters will start to show aggressive tendencies as they age. If your rooster normally has a more aggressive personality, there is no need for concern.
However, if an old rooster suddenly begins to act aggressively (outside of ordinary spring breeding behavior), it may be a sign that something is wrong.
Cancer, organ failure, poor eyesight and even arthritis can trigger something in a rooster that makes him act aggressively toward humans and even his hens. If a rooster acts aggressively toward his flockmates, confine him to a safe area away from the rest of the flock to prevent injuries.
If your elderly rooster begins to show signs of aggression, do not rehome him. If possible, take him to a qualified vet to have him checked out. Depending on the diagnosis, treatment may not be possible and your vet may recommend euthanasia. Rooster care can also mean making some tough choices when deciding what is best for our feathered friends, so don’t be afraid to end his suffering if it’s in his best interest.
When a vet is not accessible, butchering the older rooster or giving him to someone who is willing to do the butchering is the best option to prevent needless suffering.
5 Tips for Healthy Rooster Care
Just like hens, rooster care should be based on preventive care versus treatment. Check out the tips below if you want to help your rooster live a longer, healthier life.
1. Protecting your rooster from a predator attack is hands down the best way to help your rooster live a long, happy life.
2. Avoid excessive amounts of stress by keeping only one rooster per flock.
3. Even though they may not be as fertile, older roosters still enjoy having a flock to look out for. Failing to provide older males with an adequate number of ladies could cause them to become depressed.
4. Supplement your rooster’s diet with herbs, prebiotics and probiotics, and rotational pasture (when possible) to keep his digestive tract and immune system healthy and strong.
5. Keep hen numbers manageable to prevent overbreeding (about five to ten females per rooster).
Rooster care is different than caring for a flock of all layers, but it isn’t difficult. With a proper diet, protection from predators, and some practical knowledge, you can help your favorite rooster live a long, healthy, happy life.
Ornamental decorative cabbage covered with a morning frost
Plucking a bright red, plump, and juicy tomato off the vine with the warm summer sun beating down on the back of your neck is the type of pleasant act most folks associate with gardening. There is no question that warm weather crops like sweet corn, tomatoes, peppers, and watermelon are some of our favorite and most recognizable types of produce that we love to harvest out of our gardens. However, the other half or more of the veggies we love to grow are known as cool-season crops.
What Are Cool Seasons Crops
Cool-season crops prefer to grow in temperatures less than 70°F. What? Yes, so many of the veggies we love to cook with and consume should be harvested out of the garden when many other warm-season crops are just getting going in the garden. The best thing about these cool-season crops is if you prepare, plan and plant at the correct time, you can produce two crops per year by planting in spring and again for the fall.
Preparing your planting projects is always important, but timing your seed purchasing, thorough garden cleanup, soil enhancement, and crop rotations are all critical preparations needed to pull off a successful multi-crop gardening system. Remember, gardening is meant to be fun and relaxing, not a chore. Do not bite off more than you can maintain. Start small and build up from there as things work well and fall into place. Cool-season planting means you will be outdoors in early spring, often during inclement weather. Be prepared to work quickly but efficiently.
Planning Your Garden
Once you have cleaned the garden fully and added ample amounts of aged manure or gobs of leaf compost all nicely blended in, then concentrate on starting seeds. Cool-season crops can be started indoors, or seeds can be directly sowed. Plan ahead. Most veggies will be started indoors about 4 weeks prior to when you will plant them out, with an additional 5-6 days for hardening off. Again, the temperature range for cool-season crops to perform well is between 40° and 70°F. Most cool-season veggie varieties can handle light frosts but do plan to have some floating row covers to slip over young plants if hard frosts threaten.
Planting Cool Season Crops
Root-type and leafy cool-season crops like beets, radish, turnips, lettuce, and spinach are best direct sowed into the garden. Note: I leave carrots out of this group. Although carrots have the ability to germinate at colder temperatures, they are painfully slow to do so, which I find more stressful than helpful. I wait for warmer weather to direct sow my carrot seeds. They and I are much happier that way.
These other root crops mentioned, beets, radish, and turnips must be thinned well after they form their second set of true leaves. If they are not adequately spaced, what happens? You get all leaves and no roots! You can still use the greens for culinary purposes, but that is not the main point with root crops. All leaves with no root can also happen if these are sowed too late and temperatures get too warm. Other cool-season crops like broccoli, cauliflower, cabbage, kale, kohlrabi, chard, Brussels sprouts, and even peas can be started indoors in Jiffy-7s, which are simple to use peat-based starter wafers that quickly absorb water to fully “inflate” in order to plant seeds into them. Top Tip: Before transplanting into the garden, with a utility knife, I carefully score (make an “X”) in the bottom of the mesh that holds the Jiffy together. This assures that all the roots will eventually grow freely out of that mesh bag.
Cool-weather can arrive sooner than we wish in the northeast and Midwest, but that means that all of these cool-season crops can be grown twice! In early spring and a repeat planting can be made starting in late summer for a fall harvest. Check your local weather stats for first average frost dates and count backward to know when to start more seeds indoors to plant out for your fall crops. In USDA zone 5, planting is typically started from Mid-August to September. Prepare, plan and re-plant.
Jung Seed Company has over 800 seed varieties available! View our color catalog online or browse our website for all of your gardening favorites. To receive info on new products, exclusive deals, and specials, be sure to sign up for our weekly email.