Categories
Equipment

Barn Door Seals: How to Prevent Leaky Barn Doors

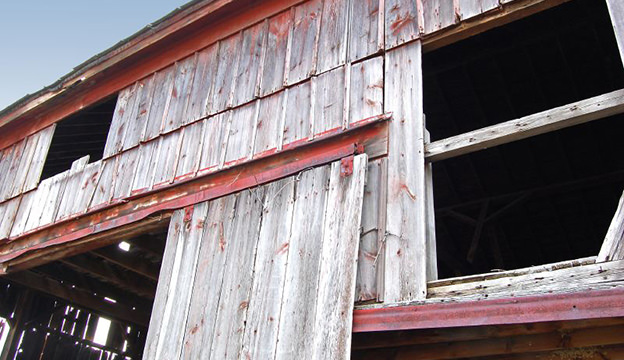
A leaky barn door seal can be a big problem. Barns keep hay and livestock dry but are little more than windbreaks in the winter unless you take precautions to seal them correctly. Sealing up those big sliding doors can go a long way toward making a barn more comfortable for you and your livestock. A good barn door seal, along with lights and a heat source, make it possible to work on equipment all winter long—and maybe even have office space on the coldest of days.

Why Barn Door Seals Are Important

Sliding barn doors, by their very nature, are difficult to seal tightly. Originally, they were meant to keep most of the wind and rain out of barns that are otherwise so drafty that a little wind through or around the door was no problem. In fact, the movement of air through the barn provided ventilation for the animals and helped finish drying the hay. However, there are many reasons to seal up the barn, including the doors, the No. 1 advantage being to make it harder for rodents and birds to get in. If part of the barn is heated, a tight barn will also help keep down the fuel cost.

Step-by-Step Project for Barn Door Seals

Sealing up the barn door requires two kinds of seals: compression seals on the ends and sliding seals along the top and bottom. Compression seals are the easiest to install and can be rubber or foam strips. The rubber strips, used for garage doors, are more durable but more expensive. Foam strips will need to be replaced every few years. The important thing is for the door to have a good, straight surface that mates tightly with the surface on the barn. Seals along the top and bottom must allow the door to slide easily.

1. Install a Top Rain Guard

If the barn door seal is not protected by the roof overhang, install aluminum flashing or inverted gutter to keep off moisture that can freeze on the track. Few things are more aggravating than trying to open an iced-over barn door. When installing the top shield, use good quality silicone calk to seal the area between the flashing and the barn so moisture doesn’t get in and rot the wood.

2. Install the Seal on the Barn Door’s Edge

barn door seal latch
Dave Boyt

Close the barn door and notice how tightness and uniformity of the gap. If it’s more than 1/4 inch or greater at the top or bottom, cut and attach a wood shim to close up the gap. Use a rot-resistant wood—either treated lumber or cedar—so that you won’t have to replace it later, and then install a rubber gasket. Garage-door gaskets are available at lumberyards and hardware stores, but some people use automotive heater hose for the gasket. Either way, you should be able to compress the gasket down its entire length when the barn door is closed.

3. Install the Top and Bottom Brushes

seal sliding barn doors
Dave Boyt

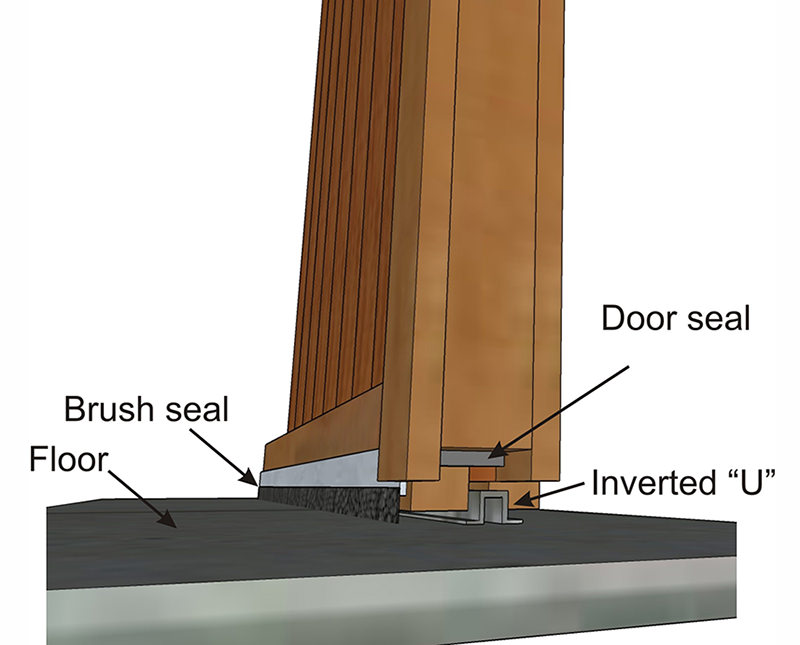
Barn door seals along the top and bottom are a little more complicated because they have to allow the door to slide easily. A simple brush-type seal attached to the top and bottom of the barn door may be all the seal you need for many applications. If you need a better seal, install a backing strip with a compression seal along the floor. An option for the bottom is an inverted “U” channel that engages the bottom of the door, keeps the door from blowing in or out when partially open, and acts as an air trap. Combined with the brush, it provides a good airtight seal.

Brush seals come in various sizes, so you’ll need to determine the appropriate length of bristles. With the door closed, measure the gap between the floor and the bottom of the door. Purchase twice the length of brush as the width of the door so that you can attach the brushes top and bottom. Screw the metal flange of the brush to the bottom of the door so that the brush deflects about 1/8 inch at the point of the greatest gap. Then do the same for the top of the door. The door should still slide open and closed easily with the brushes installed.

If you’re not worried about aesthetics and are on a tight budget, use strips of old carpeting instead of the brushes. Cut the strip about 2 inches wider than the widest gap between the door and the floor. Use a wood backing strip to attach the carpet to the door, and let the carpet bend where it meets the floor to form the seal.

4. Install Latches

barn door seal latch
Dave Boyt

You will need a good set of latches to pull the barn door tight against the seals. A toggle latch on both sides of the door will do the trick. If you have easy walk-in access, install the latches inside the barn. This will keep them from icing up and make the barn less accessible to anyone who might stop by and “borrow” a piece of equipment.

Close the door and place the latch so that it tightens just as the barn door seals come together. When you close the latch all the way, it should compress the seals to make an airtight connection. If the latch is adjustable, make sure it is set to the widest opening when you install it, then tighten it to seal the door when latched.

Other Ideas for Barn Door Seals

barn door seals on a sliding barn door
Dave Boyt
  • Sandbag Draft Guards: Most of the air coming in through a sliding door is usually from the bottom. If you don’t use the door often, consider piling sandbags against the bottom of the door to keep out the wind.
  • Door Insulation: If the door itself is drafty, such as the case with a board-and-batten door, staple a tarp or roofing felt to it on the inside. If the rest of the barn is insulated, you may even want to attach a layer of foam to the inside door and put a plywood cover over that. Closed-cell foam (e.g. “blueboard”) is best for this purpose.

  • Window Seals: The quick and easy fix for a drafty window is clear plastic held in place with cardboard strips stapled to the window frame. These are available at lumberyards and hardware stores. Of course, you’ll need to take them down in the spring when you want the windows open for ventilation.
  • Walk-Through Door: If you’re frequently moving smaller items, install a walk-through door and save the sliding door for when you need to move large equipment, supplies or crops. The smaller door should be well-sealed and easy to lock, but in the long-run will help prevent the inflow of cold air.

Problem Solving Drafts

If you still notice wind coming through your sliding barn door seals, relax—you just have a little more work to do. If there is even a slight gap between the edge of the door and the side of the barn, tighten the latch. You may even need to install a second latch above or below the first one to get a good seal along the length of the door. If you feel air coming through a corner, use some leftover brush material or carpeting. Fill small gaps on non-sliding surfaces with silicone caulk and larger areas with foam insulation, such as “Great Stuff.

This article about barn door seals was written for Hobby Farms magazine. Click here to subscribe.

Categories
Poultry

5 Benefits of Keeping Roosters in a Backyard Flock

Are there benefits of keeping roosters? You bet—but not everyone thinks of these automatically. If fresh eggs are your only goal in raising chickens—and that’s usually the case on small farms—you obviously don’t need a rooster. Because of this, some people don’t pursue the topic any further because roosters have a few disadvantages. Neighbors often dislike rooster noise, plus roosters can be territorial. In some urban or neighborhood settings, keeping a rooster may be against city ordinances, even if keeping a flock of hens is allowed.

But roosters do have their benefits—actually quite a few! So, if you’re already comfortable caring for a flock of hens, you just might be interested in upping your game and bringing a rooster into the mix. Here’s why:

1. Roosters Guard the Flock

Roosters naturally want to protect the hens and the chicks. It’s a deep instinct for them, and they take the job very seriously. A rooster is constantly on the lookout for predators or other threats, and he will vocally warn the hens of real or perceived dangers. He might also attempt to direct the flock toward safety, like a protective sheepdog. A rooster can also help by alerting you to unusual happenings or dangers around your rural property that you need to check out. Sometimes, the hens may seem more confident or relaxed with the protective presence of a rooster nearby.

2. Roosters Equal Live Chicks

Without a rooster, your hens lay unfertilized eggs. These eggs are great for cooking. But they’re not helpful if you’re actually interested in raising chicks “from scratch” and increasing the size of your flock with your own birds. Keeping a rooster with quality genetics that you value can be a fantastic way to naturally add chicks to your flock with little work on your end.

3. Roosters Can Be Umpires

Life in the flock tends to be calmer and more natural with a rooster around. Roosters have a knack for interrupting and stopping hen “squabbles” that might otherwise lead to pecking or bullying. Many chicken owners note that placing a rooster in the flock adds back in a missing component of the hierarchy that simply makes flock life better and more natural.

4. Watching Roosters Can Be Enjoyable

There is more to farming than strictly production, especially at the hobby level. Roosters are simply a joy and entertaining to watch, with their fun strutting and dancing behaviors, vivid plumage coloring (that you may not get with the hens), and impressive combs and wattles. They even bring small gifts to their hens. If you enjoy watching birds—and you probably do if you have chickens—you may enjoy having a rooster even more.

5. Roosters Bring a Sound of the Farm

Finally, crowing at dawn is not some pastoral cliché—a rooster will call with the sunrise. While some may find this annoying, it all depends on your point of view. The sound of a rooster as the first light of day hits your property can be a nice reminder that you’re living the rural life, with all of its tradition, charm, and satisfaction.

This article about the five benefits of keeping roosters in a backyard flock was written for Chickens and Hobby Farms magazines. Click here to subscribe.

Categories
Poultry

20 Facts About Ducks You May Not Know

Facts about ducks: Ducks love the water, make endearing pets, and produce nutritious eggs and meat, but there are still so many things we don’t know about them. Here are twenty facts about ducks that duck owners may not know.

Duck Egg Records

Some of the most fascinating facts about ducks include egg world records. So let’s learn about some famous world record holders.

#1 Khaki Campbell females are the most popular duck kept for egg production, with each female laying an average of three hundred eggs annually. A Khaki Campbell duck and a Black Australorp hen hold the record for the most eggs laid in a year. With each layer producing three hundred and sixty-four eggs in three hundred and sixty-five days.

khaki campbell duck
Erin Snyder

#2 The largest duck egg on record was laid by a Pekin duck in Ireland, named Queen Maeve. The egg was not double-yolked, but an egg inside an egg, and measured over eight inches in diameter and weighed half a pound.

Duck Egg Nutrion

Facts about duck eggs often include that ducks are prolific egg layers. But did you know that duck eggs contain a lot of nutrients?

#3 Duck eggs contain more vitamins A, B6, B12, E, selenium, folate, and protein than chicken eggs. However, they also contain more fat and three times the amount of cholesterol as a chicken egg.

Unique Breed

Our facts about ducks would not be complete without this truly unique breed with characteristics like no other domestic duck breed: the Muscovy duck.

#4 Muscovy ducks perch like chickens. Although there are other perching ducks, such as wood ducks, Muscovies are the only truly domestic ducks to exhibit this behavior.  This unique breed is also the only domestic duck not descended from the Mallard.

#5 Did you know that Muscovy ducks do not quack? Instead of quacking, Muscovies make a variety of noises, from hissing and puffing and croaking sounds to cooing to their eggs.

Strange, but True

While duck owners love their ducks, we can all agree that they have some unusual habits. These facts about ducks might be a little strange, and you probably don’t want to try them out at home!

#6 Did you ever wonder why the Nova Scotia Duck Tolling Retrievers were bred to be red? The reason is that ducks are attracted to the color of a fox, so the dogs were bred to resemble foxes. The trick worked as both domestic and wild ducks continue to be fascinated by foxes. These retrievers easily lure them out of the water to be caught by hunting and retrieving canines.

#7 Some ducks have actually been trained to pick pockets and steal from women’s purses.

Drake Fun Facts

No facts about ducks list would be complete without some fun facts about drakes. While they may not produce eggs, these special boys deserve a little recognition, too.

#8 Drakes make excellent pet ducks and get along well in all drake flocks called bachelor pads without the presence of female ducks.

#9 Drakes work hard to impress the ladies by performing courtship displays to win the hearts of the female ducks. From tucking their heads and necks in and dropping their wing feathers to reveal their wing speculums (the blue patch on the wings visible in Mallards and other gray ducks), to spraying water with their bills and letting out a whistle, a drake’s performance is quite impressive.

True Love

 #10 One of the most unknown facts about ducks is that some domestic duck pairs will mate for life. Even though they may breed with other members of the flock, the bonded pair will remain a couple for life.

Water Myth Busters

As a member of the waterfowl family, there are some misinformed facts about ducks and water.

#11 Did you know ducklings can drown even though they can swim and float? That’s right. Ducks have an oil gland at the base of their tails that produces the oil that makes them waterproof. When preening, adult ducks spread the oil over all their feathers to keep themselves dry and able to float. However, until they are fully feathered and their oil gland begins to work, ducklings can only stay afloat for small periods of time. To protect ducklings from drowning, only allow them to swim for several minutes at a time.

#12 If given the option of choosing between a pond or a kiddie pool, many domestic ducks will choose the kiddie pool, where they can safely see and feel the bottom with their webbed feet.

Pekin Facts

#13 The King of Ducks is well known and is the most popular duck in the world, with tens of millions of Pekins in the U.S. alone. This hardy breed is kept for eggs and meat and is the most popular breed kept as pets.

#14 Pekins were named after Peking, China (what is now known as Beiing), where their breed originated.

Old Duck

#15 The oldest living duck on record is Desi, a Mallard female in Britain. She was reported to be twenty years old when she died.

Just Being Ducky

Behaviors are some of the most interesting and informative facts about ducks. From their cute waddles and happy quacks, we can learn a lot about these amazing creatures just by watching their behaviors.

#16 Ducks often sleep with one eye open and one eye shut. This behavior allows the duck to rest half of its brain while the other half of its brain is awake and on the lookout for danger.

#17 As summer fades to autumn, many domestic ducks will begin to engage in the destructive behavior of ripping out grass and tunneling into the ground with their bills. If there is a water source nearby, the entire yard can quickly become a muddy mess. However, ducks aren’t just having fun; they are looking for tasty morsels under the ground surface, such as grubs and other bugs to eat.

More Myths Busted

Want to learn more about common duck myths? One of these facts about ducks was even tested on the popular TV show Mythbusters.

#18 Even though duck bills are thought to be gentle and not inflict damage, the truth is they can cause serious damage to each other and bite hard enough to leave a small bruise on your wrist or arm. Surprisingly, while they may be thought of as gentle, fighting drakes can even punch in the opposing drake’s eye.

#19 Domestic ducks can’t fly or migrate like their wild cousins.

#20 Female ducks quack so loudly that they actually echo. While it may be hard to hear, if you listen closely on a clear day, a female duck cutting loose will echo back.

Facts about ducks are both a fun and informative way to learn more about these delightful waterfowl. From behaviors to breed characteristics and delicious eggs, ducks continue to capture our hearts as we learn more about them.

This article about 20 facts about ducks was written for Chickens and Hobby Farms magazines. Click here to subscribe.

Categories
Poultry

Fatty Liver Disease in Chickens: Causes & Prevention

Fatty liver disease in chickens can sneak up on flock owners, as this disease attacks hens silently with no side effects until it’s usually too late. Like most backyard flock diseases, prevention is key. Here are the causes, prevention and more about this common disease. 

What is it?

Fatty liver disease in chickens, also called hepatic steatosis, Fatty Liver Hemorrhagic Syndrome (FLHS), is when fat accumulates around the liver and abdominal cavity, causing a liver rupture.

Causes

Fatty liver disease in chickens can be caused by genetics, breed, other preexisting diseases such as cage layer fatigue, obesity, and consuming moldy feed or toxins. However, the most prevalent cause is poor nutrition.

Symptoms

There are multiple symptoms of fatty liver disease in chickens, but it can still be hard to diagnose as chickens often exhibit the same symptoms for multiple diseases. If your chicken starts to exhibit these or other symptoms, take it to a licensed veterinarian for a diagnosis.

Symptoms include:

  • Overweight or obese hens
  • Pale or shrunken comb
  • Dandriff on comb
  • Lethargy
  • Abnormally long growth of beak or nails
  • Increased water consumption
  • Dull Feathers or changes in feather color
  • Loss of appetite
  • Not engaging in normal activities

Treatment

Sadly, by the time symptoms start, it is usually too late to save a chicken suffering from fatty liver disease. Often, if a vet does diagnose this medical condition, humane euthanasia is the best course of action to prevent suffering.

However, if the condition is caught early on, some veterinarians will work with poultry owners to reduce the effects of a chicken diagnosed with fatty liver disease.

Did You Know?

While fatty liver disease in chickens is a serious condition, there are some interesting facts that you may not know about this disease.

  • Fatty liver disease is more likely to occur in layers versus broilers.
  • Fatty liver disease is more likely to occur in white egg layers than brown egg layers.
  • While roosters can suffer from this disease, it is more likely to occur in hens.

Prevention

Before you trade in your flock of Leghorns for some Barred Plymouth Rocks, be sure to know that there are less extreme measures that you can take. While you can’t prevent all cases, starting with good nutrition and maintaining proper weight in the flock is a good starting point.

Reduce High Fat Treats

Put away the scratch and sunflower seeds and instead offer your flock some healthy treats such as broccoli, cabbage, cauliflower, strawberries, raspberries and oats.

Not only do the treats mentioned above contain low amounts of fat, they are also high in biotin (vitamin B7). Biotin helps keep the liver healthy and prevent fatty liver disease in chickens.

No Molds Allowed

Never feed moldy feed, treats, or table scraps to chickens, as levels of mold and toxins will increase your chickens’ chances of contracting this disease.

Add More Protein

Chickens fed a high-energy, low-protein diet (also known as HELP-formulated feed) are more likely to succumb to fatty liver disease. As a general rule of thumb, laying hens should be fed a diet with sixteen to eighteen percent protein.

The reason for this is that chickens naturally require more protein and fewer carbohydrates and fat in their diet. When a hen receives too much fat and carbohydrates, the fat begins to accumulate around the liver, causing damage to the organ.

Vitamins, Please!

Just like we take vitamins to keep our bodies healthy, our chickens’ bodies also need proper nutrition in the form of vitamins and minerals to keep them healthy.

These vitamins are included in quality layer feed, but if you want to ensure your flock is receiving enough vitamins, add a water-soluble, poultry-formulated probiotic with extra vitamins to your flock’s water every day.

Important vitamins for preventing fatty liver disease in chickens include B vitamins, vitamin C and E.

Lifestyle Changes

Yes, if you want to help prevent fatty liver disease in chickens, your flock may need to undergo some lifestyle changes. The good news is that if handled slowly, your flock will probably not even notice these changes and should adapt quickly.

Often, fatty liver disease in backyard flocks is caused by hens becoming overweight due to the amount of treats and table scraps flock owners hand out and even overeating their layer pellets.

So how do you help prevent your chickens from becoming overweight? Below are a few ideas.

  • Introduce timed feeding. Since most backyard flocks spend their days foraging in the run, a chicken tractor, or scratching in the garden, limiting your flock’s feed intake to thirty minutes twice a day will prevent your flock from overeating.
  • Reduce the treats. If your flock is used to having three handfuls of scratch every evening, reduce the amount to two handfuls, or replace the scratch with a healthier option such as peas, oat groats, or oatmeal flakes for a healthier treat.
  • If you don’t already, be sure to provide your flock with free-choice access to oyster shell, as low levels of calcium in the body can contribute to fatty liver disease in chickens.

Preventing fatty liver disease in chickens may not always be possible, but ensuring we provide our hens with proper nutrition and helping them maintain a healthy weight should help them live longer, healthier lives.

This article was written for Chickens and Hobby Farms magazines. Click here to subscribe.

Categories
Farm & Garden

How to Make a Bird Nesting Material Holder

Bird nesting material can be provided in a holder that you can make yourself. It’s a great way to help wildlife build shelters.

A few years ago, soon after brushing one of our dogs in the backyard on an early spring day, we noticed lots of chickadees and wrens gathering the discarded hair in their beaks and flying off to use it in their nest-building efforts. It was such fun to see their little beaks stuffed to the brim with the soft, fluffy hair! Every spring since then, I build a new bird nesting material holder, fill it with natural materials, and hang it in the garden. The birds go crazy tugging the materials out of it and heading off to weave it into their nests. I often have to refill it multiple times throughout the spring and summer.

Here’s the fun and attractive way I build a holder for bird-nest building materials each spring. Now that a few years have passed since I started, I have six of these bird nesting material holders in our yard.

What You’ll Need to Construct a Bird Nesting Material Holder

supplies gathered for a bird nesting materials holder
Jessica Walliser
  • 1 piece of chicken wire, about 18-20 inches square, either the decorative type from a craft store or regular chicken wire from the farm supply store
  • 2 wooden dowels, 12 inches long and .375 diameter
  • 1 piece aluminum hobby wire, approximately 12-18 inches long
  • 1 paddle of florist wire
  • 1 tin snips or wire cutter
  • a collection of the following natural bird-nest building materials: Spanish moss, reindeer moss, sheet moss, excelsior, jute twine pieces, cotton yarn or twine pieces, wool fibers, dog or cat hair, ornamental grass trimmings, white pine needles, coir fiber, cotton fiber or threads, dryer lint (do not include if you use a dryer sheet), natural raffia

Step-by-Step Directions

Step 1
cutting chicken wire for a bird nesting materials holder project
Jessica Walliser

To make a bird nesting materials holder, first lay the chicken wire out on a flat surface. Use the tin snips or wire cutter to cut it into a triangular shape. The long side should be about 18 to 20 inches wide; the short side should taper to a point. Save the pieces you cut off as you’ll use one of them in Step 5.

Step 2
forming a chicken wire funnel for bird nesting materials holder
Jessica Walliser

Roll the triangular piece of chicken wire into a funnel shape and use a few pieces of florist wire from the spool to fasten the ends together along the seam. Close off the small end of the funnel by bending it closed or using another piece of wire to fasten it shut.

Step 3
making a wire hanger for a bird nesting materials holder
Jessica Walliser

Use the piece of aluminum hobby wire to make a hanger for your bird-nest building materials holder by attaching one end to one side of the top opening of the chicken wire funnel and the other end on the opposite side of the opening. Make sure the funnel hangs straight before filling it.

Step 4
bird nesting materials gathered together on a wood surface
Jessica Walliser

Fill the funnel with the bird nesting materials. You can do it in separate layers of materials or mix all the materials together. If you have trouble getting the material all the way into the bottom of the funnel, use one of the dowels to push it down to the point.

Step 5
adding a chicken wire top to the nesting materials holder
Jessica Walliser

Cut a square or circle of chicken wire from leftover wire from Step 1. It should be slightly larger than the top opening of the funnel. Position it over the opening of the funnel to make a lid and wire it into place using the florist wire or simply by bending the cut wire ends of the lid over the top edge of the funnel.

Step 6
adding a landing perch to a diy bird nesting materials holder
Jessica Walliser

Push the two wooden dowels through one of the openings in the chicken wire about 6 to 8 inches from the top of the funnel until it comes out the opposite side. Make sure the dowel is level and then wire it into place on each side with small pieces of florist wire. Put the other dowel about 6 to 8 inches below the top one, again wiring it into place after making sure it’s level. Some birds will cling to the wire to pull the bird nesting materials from the funnel, but these dowels serve as perches for the species of birds who aren’t able to grab onto the wire.

Bird Nesting Material Holder: Finished Project

the finished project of a bird nesting materials holder
Jessica Walliser

Hang your holder of bird nesting materials out in the yard or garden, close to a bird feeder or nesting box, if possible. I hang mine in late February or early March here in Pennsylvania, as that’s typically when the birds begin to build their nests. I refill it as necessary and leave it in place until late summer since some birds have multiple broods per season and may need to build new nests.

If you enjoy seeing lots of birds in your garden, here are a few other DIY projects for the birds:

This article about making a DIY bird nesting material holder was written for Hobby Farms magazine. Click here to subscribe.

Categories
Farm & Garden

Small-Farm Equipment: Tillage And No-Till Options

Small farm equipment is unique to individual situations—you don’t necessarily need large tractors or implements. Check out these smaller no-till and traditional tillage implements to find what’s best for your property.

What is No-Till Farming?

No-till farming is defined by the Department of Soil Science at North Carolina State University as “the practice of leaving the soil undisturbed from harvest to planting except for nutrient injection. Planting or drilling is accomplished in a narrow seedbed or slot created by coulters, row cleaners, disk openers, in-row chisels, or rototillers. Weed control is accomplished primarily with herbicides.” No-till farming is taking agri-business by storm, yet it has small-farm applications, too.

The concept of no-till agriculture is nothing new; it’s been utilized since man first scratched the earth and dropped in seeds. The ancient Egyptians, the Sumerians, and the Incas of South America used sticks to poke holes in the ground and put seeds into unprepared soil by hand; they covered the seeds with their feet. That’s no-till agriculture at its simplest and it’s the way things were done for a very long time. The reason was simple: Without modern plows to turn and mix the soil, it was the most efficient way of planting crops.

A basic, animal- or human-drawn, wooden plow called an ard (or scratch-plow) was developed in Mesopotamia between 4000 and 6000 B.C. It’s still an important tool in parts of the world today. An ard consists of a frame holding a vertical, wooden spike that’s dragged through the topsoil to gouge a narrow furrow along the plowed path. The ard leaves a wide strip of undisturbed earth between the rows—exactly like today’s no-till implements.

Plowing Sophistication

Plowing became more sophisticated in the Middle Ages with the invention of the moldboard plow (featuring a metal cutting-blade called a coulter) and the harrow. Using a new-fangled harrow attached to the moldboard plow, man began turning dirt instead of making a groove in it.

Time passed and the plow became a symbol of modern agriculture. However, in the early decades of the 20th century, it became evident that large-scale tilling of the earth was contributing to widespread soil erosion. For instance, the Dust Bowl days of the 1930s were caused by a combination of environmental and manmade factors, including extensive plowing.

No-Till Equals Better Soil

According to the Pennsylvania Nutrient Management Program handbook, Better Soils With the No-Till System (download it at https://panutrientmgmt.cas.psu.edu/em_publications.htm), there are two broad categories of tillage systems used in the world today: conventional tillage, which leaves less than 30 percent crop residue cover after planting, and conservation tillage, which includes all tillage systems—including no-till—that leave more than 30 percent crop residue after planting. No-till is better for both the Earth and the farmer for numerous reasons:

  • When soil is tilled with machinery, carbon is released from the soil into the atmosphere, adding to emissions from the machinery itself. It also produces more airborne dust.
  • No-till crop residue helps rain and irrigation water infiltrate the soil, where it can be used; it also limits evaporation, thus conserving water for crop growth.
  • No-till soils support a greater number of beneficial insects and a higher microbe count.
  • Less tillage significantly reduces labor and related fuel costs.

However, no-till farming isn’t right for every farm and every application. In many cases, chemicals are used in lieu of cultivation; it takes considerable retraining and trial-and-error to convert to no-till farming; the cost of a no-till drill (the no-till implement used for planting) can be quite substantial; and it doesn’t work well in certain situations and some soils.

So, where does this leave you, a hobby farmer, if you’d like to incorporate conservation tillage into your farming? Before making decisions or buying equipment, discuss no-till as it applies to your farm and your needs with a representative of your local conservation district, your county extension agent or a no-till alliance in your region.

No-Till Small Farm Equipment Options

Should you decide no-till is right for your small farm equipment, investigate John Deere’s small-but-mighty no-till drill. John Deere’s Frontier No-Till Grain Drill BD1307 is a perfect size for hobby-farm agricultural applications. This versatile, 7’7” grain drill is easily adjustable for use in conventional, minimum-till and no-till applications. Features include 12 offset, dual-disk openers; a 23.5-bushel, large-capacity, dual seed box; infinitely adjustable seed meters; cast-iron seed boots; steel press wheels; a standard acre-meter; and a spring-loaded drive wheel. A swivel hitch for use on rolling terrain, a native grass attachment and a small seed box are available at extra cost.

If you already have a conventional drill you’d like to retrofit for no-till applications, Acra Plant’s Acradrill ADU Unit might be just what you need; it can be easily adapted to fit most three-point drills and air seeders. Features include VARIjust depth control and the long-lasting ACRATuff V-Slice Insert for precise seed placement; easily adjustable press wheels in two sizes to match existing soil conditions; self-cleaning, 11- and 15-notch, 15-inch discs to aggressively chew through crop residue; heavy-duty spring units to adjust down-pressure; and adjustable row widths down to 7 inches wide.

If you’re looking for a compact unit ideal for hobby-farm applications, consider Modern Habitat Solutions’ Firminators, a lineup of three-in-one implements that disc, seed and pack, and that can be use for both no-till and conventional applications. While the Firminator (and units like it) is marketed primarily as a wildlife food-plot implement, these multi-use tools plant pasture, large gardens and lawns with ease. The ATV/3 Point Combo Firminator can be pulled by a 500cc or larger ATV or a 20-hp or larger tractor. Ag-quality cultipackers, adjustable disc angles, disc blade scrapers, a center-ripper shank and the company’s exclusive Accu-seed system are a few of its stellar features.

Small Farm Equipment: Conventional Models

When no-till isn’t right for your needs, consider compact, conventional tillage implements you can pull with your small tractor or ATV instead of a big, gas- or diesel-guzzling farm tractor.

All-in-one Tillage Units

Schaffert Manufacturing’s new Schaffert Plot Planter is an all-in-one, conventional tillage implement available in 4- or 8-foot models. It features a 12-volt electric lift, a wavy coulter on front, a seed stirator and an optional, chain-link harrow.

Plotmaster offers two types of hobby-farm, all-in-one tillage implements: three units in the company’s Plotmaster series and three in its Frontier product line. Their 3-foot Hunter 300 and 4-foot Hunter 400 models can be pulled by 300cc or 500cc ATVs respectively. Both feature heavy-duty lift systems, “double gang” assemblies, Plotmaster’s patented Versa Seeder and a spring-loaded, built-in cultipacker with adjustable tension.

Individual Tillage Implements

When you’d rather not put all of your eggs in one basket, individual, small farm equipment implements are a logical choice. For most small-scale applications, you’ll need a plow or disc to break up earth before planting and a cultipacker (an implement that crushes dirt clods, removes air pockets and presses down small stones to form a smooth seedbed; it also firms soil around the seeds, ensuring shallow seed placement and proper seed-to-soil contact) to use before and after planting.

Kunz Engineering’s Model 543 43-inch wide, ATV-friendly Till-Ease chisel plow and cultivator combination is equipped with five, 13.5-inch cutting coulters, electric lift, rigid shanks for maximum penetration in hard ground situations, two weight racks, and shank receivers on both front and back for quick shank adjustments and easy shank removal (a seven-position drag harrow is available at extra cost). The company’s Model 2148 Till-Ease Cultipacker features agricultural-quality, 9.5-inch, cast-iron packer wheels; large, greasable bearings; and its flip-over design makes transportation to and from the field or food plot a breeze.

Tufline builds its rugged, 52-inch wide Bio Series ATV Flip Disc with eight, 16-inch cutting blades, 1-inch high-strength gang axles, a heavy angle iron and tube-steel main frame, and long-life, cast-iron friction bearings with grease fittings. It’s designed for 250 to 400cc ATVs.

Worksaver manufactures a trio of useful hobby-farm tillage implements: the 5-foot wide FOD-15, flip-over, single-gang disc with eight, 16-inch notched blades designed for 350cc or larger ATVs; their 5-foot wide FOH-5, 42-tooth, flip-over, five-bar spike-tooth harrow built for 250cc or larger ATVs; and the welded-steel FOC-48 flip-over cultipacker, designed for 350cc or larger ATVs.

Whether you investigate no-till or stick with conventional tillage for your small farm equipment, there are plenty of Earth-friendly solutions to choose from.

This article about small farm equipment was written for Hobby Farms magazine. Click here to subscribe.

Categories
Farm & Garden

Welded Wire Fence: How to Install Levelly On Uneven Land

Welded wire fence is often a first choice when it comes to protecting gardens and orchards from hungry deer. It’s more expensive than some other options. Plastic deer fence can be a workable alternative for enclosing large areas at a friendlier price point. But the durability and largely impenetrable defense it offers is highly appealing.

About Welded Wire

I’ve used a lot of welded wire through the years. I’ve enclosed my garden and protected individual fruit trees with it. And I’ve installed the fencing along the front of my orchard to provide an extra secure and tidy barrier across the previously wide-open entrance to the orchard field.

Along the way, I’ve come to realize welded wire fence has a significant quirk that can make tidy installation tricky. It doesn’t stretch. It doesn’t compress very well, either. This means welded wire struggles to adapt to the nuances of undulating ground.


Read more: Protect your fruit trees from deer with a simple fence!


The Trouble with Uneven Ground

Let me give you an example. My garden is planted on mostly flat ground. Installing welded wire is generally a breeze.

I can place the bottom of the fencing at ground level and roll out the wire without issue around most of the perimeter of the garden.

But at one corner of the garden, the ground slopes off meaningfully. Installing welded wire here is difficult. Since welded wire doesn’t stretch, it can’t easily change angles to travel uphill or downhill. If you try, the welded wire will compress inward or outward instead.

This can create a potentially significant bulge in the otherwise smooth wire fence.

Bulges are unsightly on a crisp and tidy fence. But they also make it harder to install the welded wire tightly to its supporting posts. Whenever possible, I avoid letting these bulges get started. This means installing the welded wire so it doesn’t have to travel along sloping ground.

Bypassing Bulges

There are several ways you can pull this off. If slopes are mild, you might consider leveling the ground along your fence line. Or you could use a spade to open a narrow channel through sections of high ground. Through these, you can run the bottom of the welded wire to keep it level.

On the other hand, you could install the fencing to match the highest point of elevation and maintain that level throughout. This is the approach I used successfully with my orchard fence.

It does leave gaps between the bottom of the fence and sections of lower ground. But I simply cut custom pieces to fit the gaps (sloping their bottoms as necessary). This gives a tidy appearance.


Read more: Follow these 4 steps to build an effective garden fence.


Consider Terracing

For steeper slopes, you could consider terracing the ground and cutting the fencing into short sections to match the widths of the terraces. This allows you to raise or drop the height of the welded wire fence in steps while keeping each individual section level and straight.

The results can be impressive, though terracing slopes is no small effort.

Tight (But Not So Tidy)

Another way to compensate for slopes (if the slopes are reasonably long and gentle)? Cut sections slightly longer than the length of each slope. Install them with their bottoms flush against the ground, overlapping as necessary to eliminate gaps at the cut points.

This isn’t the tidiest look (and the top of the fence will rise and fall with the changes in elevation). But it can make for a tighter fence than one with bulges.

Evaluate Your Route

Evaluating the route your fence will follow before you begin construction is a smart move. You can analyze the severity of the slopes, plan which solutions will work best, and (if possible) reroute to avoid the worst obstacles.

A combination of preplanning and mixing solutions can give you lots of options for installing a clean, sturdy and effective welded wire fence that will run straight and true without bulges or weak points.

This article about installing welded wire fence on uneven ground was written for Hobby Farms magazine. Click here to subscribe.

Categories
Poultry

What Are Easter Egger Chickens Versus Ameraucana Chickens?

Do you know the difference between Easter Egger chickens and Ameraucana chickens? If you plan to someday breed and sell your own chicks or if you plan to exhibit show poultry, you must be able to distinguish between an Easter Egger and a true Ameraucana. Unsure of the distinctions? Here are three quick A’s to help you differentiate between these two farmyard favorites.

easter egger chicks
Ana Hotaling

Easter Egger Chickens Ancestry

Unlike the Ameraucana, the Easter Egger chicken is not an actual breed. It is a hybrid chicken, the result of crossing a blue-egg-laying breed with another breed, usually a brown-egg layer. Like the Ameraucana and its close cousin, the Araucana, the Easter Egger possesses the gene for blue eggs. While the Ameraucana and the Araucana always lay sky-blue eggs, however, the Easter Egger lays eggs in an array of pastels, including green, pink and yellow (hence the name “Easter Egger”) thanks to its mixed heritage. Note: One Easter Egger hen will not lay a rainbow of egg colors but rather one color throughout her laying years.

buff easter egger chicken
Ana Hotaling

Appearance

Ameraucanas and Easter Egger chickens sport fluffy muffs and beards, both of which give these chickens their characteristic full-cheeked faces. Both birds have cold-hardy features such as pea combs and miniscule (or absent) wattles, small earlobes, and full hackles and tail feathers. Coloration, however, is where the two diverge. The American Poultry Association recognizes only eight varieties of Ameraucana: black, blue, wheaten, blue wheaten, white, silver, buff and brown red. The Easter Egger has limitless variations, with its mixed lineage coming through strongly in its feather coloration and patterning. Columbian Wyandotte parentage, for example, might yield an Easter Egger with dramatic white and black feathering, while a Buff Orpington pedigree might result in golden Easter Egger chicks. A Rhode Island Red bloodline might bring about a dark auburn bird.

The confusion between Easter Egger chickens and Ameraucanas can be further compounded when the mixed breed features purebred coloration. Not sure whether your chicken is a blue Easter Egger or a blue Ameraucana? Check its shanks. The Standard of Perfection defines the color shank for each recognized Ameraucana variety (for a blue Ameraucana, slate shanks and toes with white bottoms). An Easter Egger’s shanks are most commonly dark olive but can be any color, depending on its lineage.

easter eggers rooster in a fenced chicken yard
Ana Hotaling

Easter Egger Chicken Availability

A limited number of commercial hatcheries now offer purebred Ameraucana chicks, usually with a disclaimer that these babies are not meant for exhibition. The vast majority of purebred Ameraucanas are available only through private breeders. If you wish to raise your own flock of true Ameraucanas, consider consulting breeder directories such as those found online at the Ameraucana Breeders Club or the Ameraucana Alliance. Depending on the variety, expect to spend between $10 and $30—or more—per Ameraucana chick.

That price difference is the chief telltale sign that your feed store’s Ameraucanas are actually Easter Egger chickens. These hybrid baby chicks usually sell for $1 to $3 apiece and, unlike Ameraucanas, are practically ubiquitous. You’ll find Easter Egger chicks at feed shops, farm-supply stores, local farms and commercial hatcheries. Unfortunately, many of these places sell their Easter Egger chicks as Ameraucanas—or Americanas, Araucanas and even Acurananas. This mislabeling is typically not done out of malice but out of ignorance. As retail businesses, these shops and hatcheries focus on moving merchandise rather than discovering details regarding their product. The farmers selling “Ameraucana” chicks most likely originally purchased mislabeled chicks from hatcheries, farm-supply stores and feed shops.

Upon seeing the Americana sign on that stock tank, I fleetingly considered finding the shop owners and explaining the difference between Easter Eggers and Ameraucanas. I’ve tried every single spring for the past three years, though, once even providing a comparison chart. In the end, I decided that it’s more important for you to know the difference than it is for them.

This article about Easter Egger chickens was written for Hobby Farms magazine. Click here to subscribe.

Categories
Farm & Garden

Why You Should Freeze and Melt Maple Sap Before Boiling

Maple sap can be frozen and melted using an ancient technique based on working with weather and your own maple trees. My family loves tapping our single silver maple tree. Or I should say we love the process of turning that maple sap into delicious maple syrup and enjoying the end results. We’re able to get 6 to 9 pints each season, depending on the weather. 

We tap and collect from early to mid-March. We get a big fire roaring to boil the sap into syrup. This boiling process can take a lot of time—too much to accomplish in a night after work—so we tend to take weekends to boil it down. Which means a lot of sap to deal with all at once! 

But years ago, we stumbled across a process of freezing and melting the sap before boiling, and it has stuck with us ever since! 

Working with Nature 

Maple sap flows best when temperatures are below freezing at night and above freezing during the day. A nice sunny day in the upper 30s to 40s with nights in the upper 20s are perfect conditions. This method comes from our local Indigenous people and uses nature’s tendency to freeze at night during the peak of the maple run. 

After tapping and collecting sap into buckets, you simply freeze the sap, then let it thaw. You can mimic nature by banking snow around a bucket or by dropping a bucket of sap into a chest freezer overnight.

The sap that thaws and melts first contains most of the sugar. The remaining ice holds very little sugar.  

Maple Sap Process 

After sap has frozen, we transfer the frozen sap to a “draining bucket,” (another 5-gallon bucket with many holes drilled in the bottom) which fits inside a solid 5-gallon bucket. You can easily raise the draining bucket up on the edges to keep the melted sap separate. 

maple syrup sap freeze melt

We let it sit at room temperature until the first third has melted and drained through, usually the better part of a day. You can toss the remaining ice chunk. Place the melted and slightly condensed sap back to freeze and repeat the freeze-melt cycle. On the second round of melting keep the first half that melts.  

Tip: I use a wine corkscrew to screw into the frozen sap and lift it out of the bucket!

Typical raw sap contains 1 to 3 percent sugar. After two rounds of “freeze and melt,” the sap will contain between 5 to 16 percent sugar. This means a much shorter boil time.  

By using the freeze-and-melt method for two consecutive rounds, you retain around 80 percent of the sugar but reduce the volume of liquid to a mere 20 percent of what you started with. Considering the ratio of sap collected to maple syrup made is generally 40 (sap) to 1 (syrup), it is nice to have a jump start on the concentration process. 


Read more: What supplies do you need to tap a maple tree? Here are the basics.


Sweet Maple Sap Success 

I love this method because it allows us to collect and hold large amounts of sap, and we can always use a freezer (or the last of snow from shady areas) even as the weather warms. It also helps with those years when the sap flow starts but then stops for longer periods. You can’t let sap sit outside if it is over 40 degrees F for very long. You’ll know your sap has turned if it starts to look cloudy. 

Once we have collected the melted sap, we then start the regular boiling process on an open fire. And we still finish the syrup off inside on a stove.  

This is a great way to harness the power of nature’s natural cycles and cut down on the overall time (and firewood) needed to boil down sap into sugar.  

This article about how to freeze and melt maple sap was written for Hobby Farms magazine. Click here to subscribe.


Categories
Poultry

When to Move Chicks from the Brooder to the Coop

When to move chicks from the brooder to the coop is something every chicken-keeper should know, especially when you have chicks. It’s a question many ask as the brooder that seemed so immense is now full and the dust is pretty much everywhere. Yes, folks, your babies are just about ready for the coop.

While each breed’s young develops at a different rate, by the time the little ones are fully feathered—usually between six to nine weeks of age—it’s time to transition them to the outdoors.

Be aware, however, that knowing when to move chicks from the brooder to the coop doesn’t simply mean plunking the poor, confused babies into a huge, scary, unfamiliar coop and shutting the door. I personally know three chicken keepers who did this, then consulted with me as to why their once-loving chicks were so fearful, weak and sickly—or dead. To ensure that your young flock thrives in its new home, follow these four steps to transition success.

Provide an Accessible Coop Environment

chicken coop cleaning
Shutterstock

A coop for adult chickens is not necessarily equipped to receive younger birds. Perches installed at a height intended for a full-grown flock might be out of the reach of juveniles. The same might be true of hanging feeders and of watering systems featuring nipple drippers.

Before it’s time for you to know when to move chicks from the brooder to the coop, you should set up the coop and make all of these adjustable so that, as your birds grow into their maturity, the perch, feeder and waterer can be raised to heights more appropriate for them. If your coop is elevated, make certain that the ramp you install is at a gentle enough angle to allow the little chickens to reach their pop door.

Secure Your Run

when-can-chicks-go-outside
Josh Larios/Flickr

If your growing chicks will be contained within a chicken run, inspect the area thoroughly for potential safety issues. Use a hard rake and shovel to even out the ground, remove protruding roots and fill any holes made by burrowing animals. Carefully check the run’s human-access door, installing springs or other safeguards to ensure that it cannot slam shut on a curious little bird. Protect your young ones even further by installing quarter-inch hardware mesh to a minimum height of two feet from the ground along the entirety of the run’s fencing. The ultra-narrow openings in quarter-inch mesh prevent chicks from poking their heads through the fencing, or from being grabbed by something reaching in.

When to Move Chicks from the Brooder to the Coop Depends on Gentle Introductions

when-can-chicks-go-outside
Shutterstock

Having spent their entire lives in a cozy brooder, the members of your young flock might stress out when suddenly confronted with so much open space. Ease your birds into their new area slowly, starting with a one-hour test on a sunny afternoon. Bring out their feeder and waterer so they can drink and eat from something familiar. Step away when you sense that your reassuring presence is no longer needed, but stay nearby just in case.

Slowly increase their time in the run until they are happily spending four or five hours outside. At this point, open the coop pop door, allowing the young chickens to discover it on their own. Continue building up the flock’s time in the run and coop, but moving the feeder and waterer to their designated spots inside the coop. You might have to bring a chick or two over and dip their beaks into the water to spread the word that everything’s inside now. Eventually, your little birds will return to the brooder only to sleep, until the day that they all decide to roost on the perch inside their coop.

Tips for When to Move Chicks from the Brooder to the Coop

When to move chicks from the brooder to the coop depends on the outside temperature.
normanack/Flickr

You’ll be understandably nervous the first time you transport your chicks back to their brooder, only to find them settled in and snoozing inside their coop. Before you securely close the coop doors and run gate for that first night, take a head count to make sure everyone is inside, then leave your little ones on their own. Set your alarm clock for an early hour; your juveniles might be a little disoriented to wake up in a strange location, and your reassuring voice will help calm them as you open their pop door. They’ll peek out with uncertainty at first but, once they recognize their outdoor play area, they’ll eagerly dash out. Be there again as dusk approaches and they start heading in. Once again, your familiar voice as they head into their new quarters will reinforce that this is exactly what is expected of them.

This article about when to move chicks from the brooder to the coop was written for Chickens magazine. Click here to subscribe.