Taiwanese-American farmer Li Schmidt talks about growing Asian-heritage crops, growing crops for seeds, small-scale farming in Taiwan and preserving cultural foodways.
Hear about how Li started her Cultural Roots Nursery, in Northern California, in 2020, as a result of the pandemic rather than in spite of it. Most of Li’s customers are Asian American and have encouraged her to grow a broad range of plants from the diaspora community, leading to Li pursuing some creative seed sourcing in addition to looking to a handful of US-based seed companies. Learn how Li has figured out how to grow these mostly subtropical plants in the hot, dry climate of California’s Central Valley.
Check out a short list of Cultural Roots Nursery’s crops:
Bitter melon
Long beans
Taiwanese basil
Shiso
Bo Ju Hua chrysanthemum tea plant
Taro
Ginger
Goji berries
Tong Ho chrysanthemum greens
Li talks about traveling in Taiwan, visiting with farmers and chefs, and learning about the food system and farming there. Hear about the accessible small-scale crop processing and infrastructure there and how this interplays with the food culture there. Li gets into the importance of cultural foodways to her work and way of living.
Learn also about the California Farmer Justice Collaborative, which started out as a group formed to pass California’s Farmer Equity Act in 2017 and now focuses on farmer support and legislation. And Li tells us about the Cal Ag Roots storytelling project that she works on with the California Institute for Rural Studies, unearthing the historical roots of agriculture in California.
Listen to the end to hear Li’s favorite meal using the Asian-heritage foods that she grows.
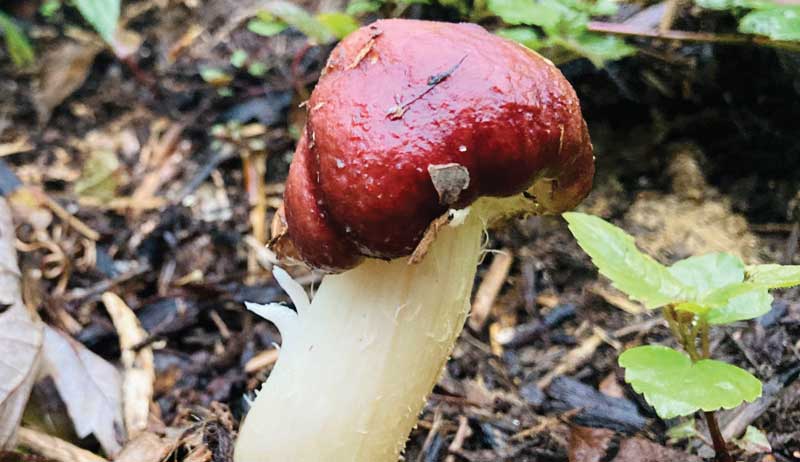
Turkey tail mushrooms look like turkey tails! Thankfully their lookalikes are not harmful, though they don’t have the benefits that we’re looking for in Trametes versicolor. “Versicolor” means many colors, and these mushrooms do come in many colors, always looking like a turkey’s tail.
You’ll want to check out these handy step-by-step instructions for identifying turkey tails from other species that look like them. When they are fresh, their colors are so bright, especially the reds and blues.
They can often be found quite dry, though they can also appear dry when they are, in fact, fresh. You’ll find turkey tail mushrooms on many kinds of wood (including your firewood piles), and, in the forest, large flushes are common on fallen limbs laying along the ground. You can even find turkey tail mushrooms in suburban backyards! They seem to be everywhere in the U.S. that mushrooms can grow.
Storage—With or Without Beetles
Turkey tail mushrooms store well in paper sacks. If your finds are somewhat aged, there may be beetles living inside. These bugs will start breaking them the mushrooms and, with only a few small holes or places where they have been chewed, you may not notice as you harvest. If you do notice, try to leave those for the beetles and hunt for a fresher flush.
If beetles have secretly gotten to them, you’ll know it eventually. They’ll make more and more little tiny holes and chewed places around the edges, and even send little beetles crawling out of your storage sacks.
I simply freeze them in that event. This will stop the beetles from eating the harvest all by themselves. The I double my amounts for brews with that batch, since they’ve been partially harvested already.
Preparing Turkey Tail Mushrooms
Many different mushrooms are praised and prized for their special compounds. Turkey tail is a fine substitute for harder-to-find species such as reishi and chagga, and the species is much more accessible here in the scrubby overgrazed woods of my Kentucky home.
I make a winter tea from turkey tails, and the process for fresh or dried is the same—a low, low, low simmer over hours (or overnight). Some of these most desirable compounds need heat and time, coupled with solubility in water, to break down the cell walls that protect them from being digested in our bodies. As we gain access to these polysaccharides via a long hot water bath, our bodies also gain access to their effects.
A tea made from turkey tail mushrooms might taste yummy or bland, depending on the season, freshness of the mushroom being harvested, and time spent brewing it. The flavor is subtle enough to blend easily into soups and meld with other tea ingredients.
At the first sign of any winter wellness imbalances, we brew up turkey tail tea in our household for everyone. jim mcdonald speaks of the effects of long-brewed turkey tail (along with reishi and other mushrooms) with a beautiful analogy about our immune system.
Some elements of our immune systems come to alarm quickly and actively, causing multiple byproducts in our systems. The immune system stimulation gained from mushrooms is not that—this tea is not for emergencies but, rather, more like a training or an exercise. It will remind your immune system how to function by sending certain beneficial messages.
jim pointed me to this scientific article making a case for turkey tail as an immune toner.
I blend the dried mushrooms in a spice grinder and grind to a powder, then mix it with seaweeds and other dried mushrooms (such as reishi, chicken of the woods, chagga, shiitake or oyster ) for medicinal soup broths.
As I say, turkey tail plays well with others. Enjoy it on its own or with other ingredients. It’s an excellent first mushroom to look for, but (as always) be sure you have a knowledgeable forager who has found and identified them before.
I like to hunt for turkey tail mushrooms around the time that I see other people hunting for wild turkeys. This kind of turkey, however, is much easier to catch!
Every year since 2016, I’ve taken the week before Thanksgiving Day to look back on a year of farming and count a few things I’m thankful for. Since we can never spend too much time counting our blessings, I’m keeping the trend rolling for an eighth straight year, sharing a handful of the farming-related successes I’m thankful for in 2023.
If you feel like joining in, please do so and share your lists with us online!
To kick things off, I’m thankful for…
Welded Wire to Keep Out Deer
It’s been a challenge to keep deer out of my orchard this year. One stubborn deer has learned how to nose underneath the black plastic fence that surrounds the orchard on three sides. And when I tried to pin down the bottom of the fence more securely, the deer learned how to break holes in the plastic and climb right through.
Fortunately, the fourth side of my orchard—the front side—is protected by an impenetrable barrier of wood and welded wire. There’s no pushing through or underneath welded wire, so I spent much of autumn adding welded wire to the other three sides of my orchard fence.
It’s a time-consuming project, but well worth the effort. I haven’t finished yet (there’s a lot of ground to cover), but by focusing on fence sections where deer were repeatedly entering and exiting, I’ve dramatically reduced instances of deer infiltrating my orchard. And for that, I’m very thankful.
Hoses for Watering Distant Garden Beds
My orchard is located about 600 feet away from the nearest water source, which makes getting large quantities of water to the orchard a bit tricky. A 35-gallon leg tank has taken good care of my trees for years (once they’re established, they don’t need much water), but my raised garden beds filled with corn and pumpkins are another matter entirely.
This year, I purchased enough garden hoses to span the 600 feet and deliver all the water I need to my orchard garden beds. Since the orchard is located downhill from the water source, water pressure is excellent, even over such a lengthy distance. With more water than in the past, my corn beds produced abundantly and my pumpkins enjoyed their best year ever. I only wish I’d invested in hoses sooner.
Planting New Fruit & Nut Tree Varieties
After a couple of quiet planting years, I added several new varieties of fruit and nut trees to my orchard. Two hazelnut trees. Gala, Fireside and SnowSweet apples. A Sweet Cherry Pie cherry. Plus more Hazen and Prairie Magic apple trees, which are two of my favorite varieties.
I purchased the Fireside apple in a hefty 25-gallon pot, and it was such a large tree it already had an apple—which tasted excellent, by the way. I won’t be surprised if it fruits again next year, and down the road I’m excited to enjoyed fruit and nuts from all these new varieties.
An Awesome Apple Tasting Party
My Fireside apple wasn’t the only tree that fruited this year. Many of the older trees in my orchard had their best years to date, so my apple harvest was memorable.
To celebrate, I invited family and friends to an apple tasting party in my orchard. We took a hay ride to the entrance, enjoyed a pleasant walk to visit each tree, and then settled down at a picnic table to rank the taste of a dozen different apple varieties. It made for a wonderful afternoon.
What farming experiences are you thankful for this year?
Two years ago, Chris and Chrissy added miniature zebus, which are meat and milk cows originally developed in India, to their Texas menagerie. Now a bull named Dutton, and two heifers named Hazel and Dixie, are part of their tribe.
“We wanted to be self-sustaining, and part of that involves milk to make cheese, yogurt and butter,” Chris says of himself and his wife. “We already have a garden, compost and chickens.”
“Mini zebus are parasite and disease resistant,” says Chrissy. “Our original intention was to breed and milk them. Zebus mature late. They usually don’t go into heat until 2.5 years old, which is the age ours are now.”
The zebu dates back to 6000 B.C. and are the world’s oldest naturally occurring miniature breed. Because of their Indian origins, they are heat oriented, which works well in Texas. They have fatty shoulder humps, large dewlaps and sometimes drooping ears. Their milk contains A2 protein, which is easier to digest for the lactose intolerant.
Carol Mowdy Bond
Zebus Are Trainable Cattle
“Neither of us knew about cattle,” Chrissy says. “So I trained them like dogs. Now I can tell them things, and give them hand signals, and they respond. I say ‘cookie’ and they come running. Their cookies are horse treats. We call them and clap our hands, and they’ll come to us.”
Zebus just need a roof and three walls for protection from wind and rain as they don’t like to be cold or wet. But due to their high coyote and bobcat population, Chris and Chrissy closed the cows in their barn starting the first night, using a bit of organic cattle maintenance feed grain as incentive to enter the barn.
“They know I come to the barn at night, and I’ll give them a little bit of grain,” Chris says. “So if it starts getting dark, and we haven’t taken them to the barn yet, they go in the barn and wait for us.”
Carol Mowdy Bond
“Yard Dogs”
The zebu minis enjoy plenty of forage for grazing, supplemental hay when needed and cow minerals. They have access to lots of water and land to roam. As well, to cut down on flies, the couple purchases Fly Predators, are a mixture of insect species that eat flies during the pupa stage. They also bring in a farrier for hoof maintenance, shots, deworming and other upkeep.
“They’re sometimes called ‘yard dogs,'” Chrissy says. “They’re pets like our dogs and cats. They’re a lot more fun than I thought they would be.”
Inquisitive and mischievous, Chris and Chrissy’s cows snoop through boxes in the garage, open packages of chicken feed, and pull other shenanigans.
“They’re chilled out and playful,” Chris says. “When a load of sand or dirt is delivered, they run up and down the piles, jump and kick, and get excited. You leave your car trunk open, and they’ll nose through that. The bull grabs the porch swing pillow and plays with it, knocking it around the front yard. The garbage can has turned into a game.”
And during inclement weather, the cows press their faces against the front porch glass door to look into the house. They also curl up on the porch rug.
“But people need to know there are risks,” Chris says. “You have to be responsible and smart, and learn your animal’s demeanor. You can get hurt by a bull, and a heifer as well.”
The couple bought their minis from H. Barrera Ranch near Houston, Texas. A third generation farmer, owner Homero Barrera sells mini zebus to a lot of hobby farmers. Thus far, his customers live in Washington, D.C., plus 17 states from Washington to California and Hawaii, and Florida to Massachusetts.
Carol Mowdy Bond
“They’re less intimidating for children, and easier to handle by yourself,” Barrera says. “They’re like goats. They’ll eat whatever, so you don’t need the best pasture. The more time you work with them, the more tame they usually become.
“At the pandemic’s onset, people moved to small acreages to become hobby farmers. You can put three mini cows where you could otherwise only keep one full-size cow. Some people buy them for agriculture exemptions. Plus, you make more money on small, registered cows than on full-size cows.”
Parents often start youngsters with mini zebus for 4-H, until they feel comfortable with full-size livestock. However, Barrera also has customers who buy his minis for pets. And all his buyers love the multi-colored, dappled look, which is similar to Appaloosa horses.
Registered with the American Miniature Zebu Association, Barrera’s pure, show-quality herd has produced 231 calves since 2016. His growing zebu sales, including repeat customers, come through social media, word of mouth and his website.
Barrera also has an Angus operation. And he has an embryo transfer program for his Brahman cattle. This year one of his Brahmans was the second highest-selling animal at a prestigious sale. Find Barrera at hbarreraranch.com.
You’re a shepherd, and you’ve recently embarked on the exciting journey of breeding season with your flock. As you bring your ewes and ram together in one pasture, it’s easy to wonder if you are meeting all of their nutritional needs.
I think it’s important to look at the specific nutritional requirements of sheep, a topic often overlooked in the hustle and bustle of daily shepherding. Your sheep can thrive on pasture, grain and clean water, but don’t underestimate the importance of vitamin and mineral supplementation.
For example, your ewes may be bred, but the fetuses are only growing a small amount during the first and second trimester. Ewes can be fed on pasture or a good quality grass hay. According to Purina Mills, ewes should be fed a sheep mineral and vitamin mix to complement the nutrient content of the forages fed.
Later in the gestation period, however, the ewes will need a substantial increase in their energy and protein requirements. The ram will also need top-drawer nutrition during breeding season, when they can actually lose up to 12 percent of their body weight!
Also, never forget that keeping clean, fresh water available to them all the time is really essential.
Minerals by the Book
The Merck Veterinary Manual provides valuable insights into the essential minerals your sheep need:
Salt (Sodium and Chlorine): Vital for overall strength, health, lactation and reproduction.
Calcium and Phosphorus: The amounts vary based on pasture composition, but supplementation is crucial.
Magnesium and Sulfur: Low magnesium can lead to “grass tetany,” and sulfur is essential for wool and hair growth.
Potassium: Critical for optimal growth, particularly among growing lambs.
Trace Minerals (Cobalt, Copper, Iodine, Iron, Manganese, Molybdenum, Zinc, Selenium): Often insufficient in forage alone, necessitating supplementation.
The reality of copper toxicity, however, highlights the importance of choosing a mineral mix specifically designed for sheep. While copper is necessary for sheep health, excess amounts can be harmful. Opting for a well-balanced mixture tailored for your flock minimizes the risk.
Delivery Method: Loose or Block?
Now we have to ask the question: Are loose minerals or mineral blocks better?
The Virginia Cooperative Extension recommends loose minerals. While mineral blocks resist weathering, they can be tough for sheep to access. The hardness designed to shed rainwater poses challenges for your flock, and there’s the added risk of broken teeth from gnawing.
The key is providing minerals in a form that allows sheep to consume them easily whenever they need to. After all, you really don’t want potential dental issues with your flock.
Here’s a pro tip: Store the pan of minerals in a covered place to shield it from rain or snow. Countless times, a bowl of watery minerals greeted me, untouched by the flock. Now, with the pans sheltered in the covered shed where the sheep bed down at night, they consistently find and consume them.
Buy Right
When purchasing sheep minerals, scrutinize the labels. The cheapest option is not always the right option and may not offer the necessary ingredients for your flock’s health. It’s an investment in your flock’s well-being, and skimping on quality can have long-term consequences.
Ensuring your flock receives the nutrients they need is the key to their growth, vitality and reproductive success. As a shepherd, you hold the well-being of your flock in your hands—make those hands knowledgeable and caring.
The most important gardening task in November is to clean up your garden, removing any dying, diseased, decaying plant matter and debris such as fallen or rotting fruits and vegetables. Compost what you can and discard the rest. This will ensure that your garden stays healthy and looks attractive, too.
You can leave flowering herbs and plants such as basil, dill and kale in your garden to feed wildlife, birds and insects in winter.
Disconnect Watering Pipes/ Turn Off Irrigation/ Empty Rain Barrels
Don’t forget to disconnect and drain your watering hoses in winter—otherwise you will risk pipes bursting during a freeze. Same goes for drip irrigation. Be sure to turn it off in winter before temperatures fall below freezing.
Empty all rain barrels and water fountains to prevent cracking and damage.
Add Compost or Organic Matter to Soil
If there’s one task that you absolutely must do in fall, it’s to add compost or organic matter to your soil, especially to your vegetable garden. Add 3 to 4 inches of homemade compost, mushroom compost or leaf mold (made with decaying leaves) on top of your soil.
This will not only prevent soil erosion and compaction but will be a source of food for earthworms and beneficial soil microbes in winter. The best part is that, as the compost further breaks down over the winter months, it releases nutrients into the soil, making it a rich and healthy environment to grow food in spring.
Clean Your Tools
November is also a good time to make sure your garden tools are in good condition before you store them away for winter. Disinfect them by simply washing with soap and warm water.
If they are rusted, soak them overnight in some distilled white vinegar. Scrub off the rust the next day using a steel wool pad, soap and water. Finally, wipe the blades with a soft cloth that has been dipped in some vegetable oil to restore their shine and improve their longevity.
Bring in Cold-Sensitive Plants
If you’re growing citrus or fruit trees such as lemons, kumquats or figs, it’s important to bring them indoors for winter as they will struggle when temperatures drop below 45 degrees F. Be sure to inspect plants for pests and diseases (especially on the underside of leaves). Hose down the plants with water and wipe leaves clean with a soft cloth before bringing it indoors.
Place plants in a greenhouse or warm sunny location, preferably with a humidifier in the room to help them get acclimated to the new environment.
As temperatures start to drop in November, you will notice that plants will struggle to grow and thrive, and this can make your garden look unsightly. It’s important to keep your growing clean and healthy, as decaying plant matter can harbor unwanted pests and diseases, and can become a hiding spot for predators like rats and snakes too.
What to Avoid Doing
Avoid pruning fruit trees in fall. The purpose of pruning is to help the plant redirect its energy into producing new growth and fruits. In winter growth slows down significantly and sometimes even stops temporarily (in below freezing conditions). Hence pruning won’t be as effective and can even harm the plant.
Instead, the best time to prune your fruit trees is in late winter, right before spring time, which will encourage it to grow again.
Horseradish root is very easy to grow but sometimes disregarded because, once you plant it, it tends to take over. It spreads pretty quickly and is difficult to get rid of. We planted about five horseradish crownsthat we were gifted from a friend years ago. It takes a couple years for the roots to establish and for it to be harvestable, but over the years I’ve been able to expand our growing areas to three spots.
With three horseradish gardens, I’m able to always harvest some from one or two gardens, while allowing for the other(s) to take the year off to mature.
I really enjoy fresh prepared horseradish. I love stirring it into sour cream to make a sauce for steak or prime rib, or I’ll mix it into mayo for a zippy sandwich spread. I also use prepared horseradish to make cocktail sauce for shrimp, and of course I mix it into my bloody Mary for an extra kick.
Before I grew it myself, I bought horseradish from a local farmer. When I started growing my own, my farmer friend gave me a great tip about harvesting. He told me to wait until the first frost to harvest because it makes the root even spicier. So now I wait until we’ve had at least one kill frost before I dig it up, but I don’t wait too long. Otherwise the ground begins to freeze, which makes an otherwise tedious task even more difficult.
If you don’t grow your own horseradish, you can likely find fresh root at a local co-op or grocery store. If you can’t find the root in whole form, you’ll probably be able to find the prepared horseradish condiment in the cooler section of your grocer.
I have a recipe for making freshly prepared horseradish in my cookbook WECK Small-Batch Preserving. It’s a more traditional way of preparing it, which uses salt and vinegar. But today I am sharing a recipe for fermented horseradish root.
Yield: 1 cup (8 ounce) jar
Ingredients
1 cup fresh horseradish root, cubed
1/2 tsp. coarse kosher salt
1/2 cup water
Preparation
Once you begin cutting into horseradish, the oils in the root become exposed to the air, and it will begin to burn your eyes. Keep that in mind as you decide where to make this recipe. Outside is the best option if you are able.
Wash, peel and cube horseradish. I find a potato peeler is the best tool for peeling.
Add cubed horseradish to a food processor and blend until finely chopped. Add salt and water, and blend again until you’ve reached a smooth consistency.
Transfer the blended horseradish to a clean canning jar. Use a spatula or spoon to push down all the pieces so that none are stuck to the side of the jar.
Wipe the rim of the jar and place on the canning lid. Tightly screw on the ring.
Fermentation
Ferment at room temperature, out of direct sunlight for at least one week. Once a day, remove the lid, stir the fermented horseradish and pat it back down and re-tighten on the lid.
Once the ferment has reached your ideal flavor, transfer the jar of fermented horseradish to the refrigerator. The spice of the ferment will dissipate within a couple weeks, therefore I try to use it up within two to three weeks. It will, however, safely stay edible in your refrigerator for months.
Notes
If you’d prefer to use vinegar, substitute the water for organic apple cider vinegar (with the mother). For more of a punch, allow the horseradish to be exposed to air for at least five minutes before adding the vinegar (if you go that route). As soon as the vinegar is added, it stabilizes the spice.
This recipe has been adapted from Stephanie Thurow’s WECK Small-Batch Preserving with permission from Skyhorse Publishing, Inc.
My farm garden shed is really starting to take shape! In a previous video, I installed the rafters and purlins, which really add a lot to the structure’s stability and overall frame. But my roof still isn’t ready for sheeting yet, as I still need to install the end rafters for the overhang on the east and west sides. And I need to put on the trim board across the front to block off the exterior against weather or would-be animal intruders.
First, I need to build a very basic soffit to prevent anything from flying in between the rafters. If you’re like me and working on an outbuilding project by yourself, you might be interested in the dead-simple woodworking jig solution I came up with, as shown in the video. It really helped me install the 6-foot-long pieces of lumber by myself, and the jig itself was extremely simple to build.
One important thing to keep in mind when installing the front-side trim is, you can’t just line it up with the rafters. As the rafters create a slope, you also need to account for this measurement. This is fairly simple, though, and I just place a flat pencil across the rafter and board. When the pencil lies flat across the rafter and the outer edge of the trim board (as you can see in the video), the board placement is correct.
Next, using my handmade jig to keep things in place, I can just nail the soffit trim board in place. After that, I’ll install rafters on the east and west sides to support my garden shed overhang and consider this structure’s frame complete.
Next up: It’s time to put the roof on my new farm garden shed! We’ll tackle this exciting step in my next video in this series.
All it takes is one good storm—or just one very windy day—to send tree branches earthward. Those fallen sticks and large limbs can really add up. That goes for any woody shrub trimmings you happen to generate while pruning as well. Before long, you can be left with a truly massive brush pile.
Although lots of people choose to burn their brush, you can extract a lot of value from that old pile of sticks. Here are six ways to put your brush pile to better use.
Biochar Basics
As a soil amendment, biochar can improve soil structure, moisture retention capabilities and overall nutrient availability to plants. And, as it happens, dried limbs and branches—especially those from softwoods—make great feedstock for making biochar.
Whether you dig your own burn pit or use a biochar kiln, any limbs from your brush pile that you intend to include for this specialized burning process (pyrolysis) had better be aged and bone-dry. Ideally, they should be about 3 inches in diameter or smaller, and they should break easily with a loud crack when you bend-test them.
Because it can take up to 100 pounds of brush to make just 10 to 20 pounds of biochar, your best bet is to save up limbs and sticks over several months’ time, sorting them by size as you go. Gardening with Biochar author Jeff Cox recommends making a couple of piles—one for branches between 2 and 3 inches in diameter and another for sticks less than 2 inches around.
Cover these piles with tarps to keep the rain out as you wait for the sorted wood to reach levels of 10 percent moisture or less. At that point, they’ll be ready for their transformation from plain-old yard waste to pyrolyzed prize.
Mushroom Magic
Provided some of the limbs in your brush pile are the right sizes and types of wood, you can use them to grow your own mushrooms. In general, hardwoods such as hickory, chestnut and oak are ideal. You’ll need at least one live, healthy, newly cut tree limb that’s 3 to 8 inches in diameter. You’ll also need to obtain mushroom spawn that’s suitable for the kind of hardwood you have on hand.
For instance, shiitake mushrooms will readily grow on alder, ash, beech, chestnut, hickory and oak, among others. And many types of oyster mushrooms do well on alder, beech, oak and hardwood maples.
Incidentally, any wood you plan to use should always be kept up off the ground. If tree limbs are permitted to make long-term contact with the soil, potentially competing fungi could begin to colonize the wood before you’ve had a chance to introduce your chosen mushroom spawn.
Typically, mushroom spawn is sold in the form of small, inoculated plugs or via bags of inoculated substrate such as hardwood sawdust. (Plug spawn can be slightly more expensive, but it’s a good choice for beginners.) Before you begin inoculating your cut tree limb, separate it into sections that are each about 3 to 4 feet long.
Next, drill a row of 1-inch-deep holes spaced 6 inches apart along the length of each of these limbs. Then, turn each limb and drill a second row of holes starting a couple of inches below those in the first rows. Repeat these steps until you have a staggered series of holes forming a diamond pattern along the length of each limb. (By staggering these holes, you reduce the risk of overcrowding once your mushrooms begin to grow. Harvesting them in this configuration is easier as well.)
Once your holes are drilled, insert the mushroom spawn plugs using a small mallet to tap them into place as needed. After the plugs are in place, seal each hole by brushing on some melted beeswax.
Place the inoculated limbs on a tarp or pallet in a cool, shady spot and water them once a week. It can take six months to a year or more before you see your first flush of mushrooms. Once the limbs begin to produce, however, you may get multiple harvests over many years.
If you don’t have just the right hardwood limbs, you might try growing red wine cap mushrooms instead. These will readily colonize a bed of chipped hard and soft woods. To start, choose a shady garden spot and water the soil well. Next, add a layer of fresh wood chips and water again. Sprinkle red wine cap spawn over the top of this layer and cover with about an inch of wood chips. Continue with this layering process until you’ve run out of spawn. Mulch with one more layer of wood chips, water again, and keep moist. Depending on the time of year and depth of your mushroom bed, you may start to see mushrooms in just a few weeks.
As a rule, early spring is best for most outdoor mushroom projects, but fall also works—if you still have several weeks before the first frost.
Susan Brackney
Hügelkultur Helper
Logs and branches that have been systematically arranged to form a mound have long been the basis for hügelkultur. Translating into English as “hill culture,” hügelkultur enables gardeners to literally rise above poor soil and can be especially useful if you have very heavy clay or rocky soil.
To convert that brush pile into a proper mound garden, start by eliminating any turf or weeds in an area that’s at least 3 feet by 6 feet. (Set the green plant matter you remove aside to be re-included later.)
Next, arrange large logs and branches to form a flat base upon which to build. Follow this with a large layer of smaller branches and sticks. Crisscrossing these can help them stay put. (Be sure to avoid using live limbs from aggressive rooters such as weeping willow or Japanese honeysuckle.)
The next layer includes plant waste such as nitrogen-rich grass clippings, vegetable scraps and the plants you pulled up earlier. (Again, don’t include super-rooting invasive weeds such as English ivy.) Top with a thick layer of aged compost and at least 4 inches of topsoil.
Now, you can plant directly into the mound and subsequently mulch to suppress weeds. The mound itself will hold moisture well while also providing slow-release nutrients to plants. Over time, the wood buried in the bottom of the hügelkultur garden will decompose to add a rich layer of humus.
If you plan to start a more structured raised bed, you can adapt this hügelkultur model accordingly. Within your raised bed’s walls, simply line the bottom with dead limbs and sticks before adding compost and topsoil. The woody debris will improve soil drainage and aeration while also promoting the growth of beneficial fungi and other microorganisms.
Susan Brackney
Mighty Mulch
You can use a gas- or electric-powered chipper/shredder to transform that untidy brush pile into more manageable mulch. That said, though, you shouldn’t spread those fresh wood chips indiscriminately. As just-shredded wood breaks down, it can reduce the nitrogen levels in your soil. What’s more, trees such as black walnut contain germination-inhibiting chemicals that can stymie the growth of plants nearby.
As a result, it’s best to avoid using this material to mulch your annual flower or veggie patches.
Still, fresh wood chips are very well-suited for suppressing weeds along garden paths and walkways. For best results, lay down large sections of plain cardboard first. (Remove any labels and packing tape before placement.) If you like, you can also pin the cardboard in place with metal landscaping anchors.
Next, top with 4 or 5 inches of your fresh wood chips. With rain and foot traffic, the woody material will become more tightly packed. Some weeds eventually may find their way into your paths, but pulling them out from the heavily mulched surface is a snap.
Compost Fix
Whether you already have a compost pile or wish to start one, the materials in your brush pile can come in handy. The right mix of carbon- and nitrogen-rich materials is essential for maintaining a healthy, active compost pile. (In general, you’re shooting for 25 to
30 parts carbon for every one part nitrogen.)
If your existing pile is smelly and slow to break down, you could have too much nitrogen and not enough carbon. Your compost could also be too wet. These conditions are ideal for cool-operating anaerobic bacteria, rather than their aerobic counterparts. To fix the problem and get your compost really cooking again, run small sticks and limbs through a chipper/shredder and mix these in well with your nitrogen-heavy compostables such as kitchen waste and grass clippings.
Just keep in mind that wood chips can contain a whopping 400 parts carbon to one part nitrogen. (As a frame of reference, the carbon-to-nitrogen ratio for most shredded paper is just over 100:1; that of dried leaves is approximately 60:1; and coffee grounds are 20:1.)
By mixing more “brown,” carbon-rich matter in with your “green,” nitrogen-heavy material, you can boost your carbon-to-nitrogen ratio and add much-needed bulk to the compost pile. This, in turn, will improve airflow and make conditions just right for heat-generating aerobic bacteria. As a result, your compost will break down much more quickly than it otherwise might. (It’ll also smell much better in the process!)
If you’re thinking about starting a compost pile or maybe a few additional piles, begin by lining the bottom of any piles-to-be with crisscrossed limbs and sticks from the brush pile. This will help facilitate drainage and airflow. Top with a layer of smaller twigs and dried leaves and then follow with your mixture of nitrogen-rich greens and carbon-rich browns.
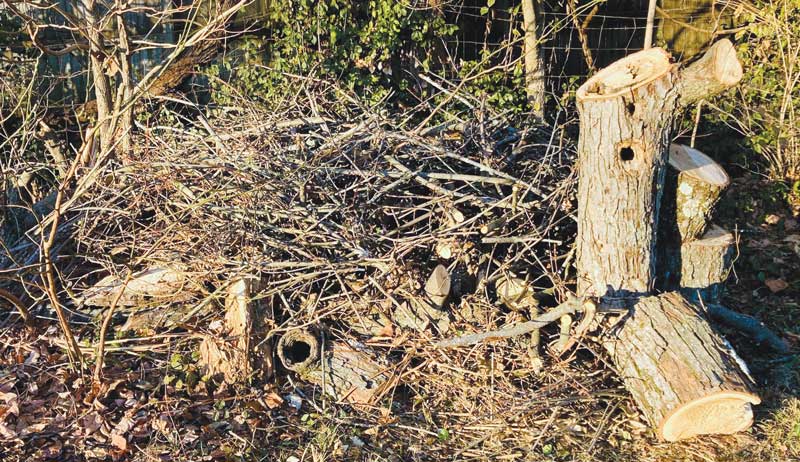
Natural Neighbors
By systematically arranging large limbs and smaller sticks into a structured wildlife habitat, you can support beneficial insects, mammals, and many kinds of birds. To start, remove turf and weeds from the area and cover with cardboard and a layer of dried leaves or other mulch material to suppress future plant growth.
Susan Brackney
Next, position a few large limbs in parallel about 1 to 2 feet apart and add a few more limbs perpendicularly across the top of the first set to form the base. (If you have one, you can use an old pallet as a base instead.) Starting with a solid, slightly elevated base like this facilitates airflow and will help nesting critters to stay dry.
To finish the wildlife habitat, neatly stack the remaining limbs and sticks across the base. Your finished habitat should measure four or five feet across. As animals begin to explore and use the shelter, you should notice your sticks being rearranged to suit their needs. Inhabited structures may take on an igloolike shape, with multiple entry and exit points.
As a finishing touch, you can plant native perennial flowers near the habitat. This acts as a screen and will further attract pollinators and other beneficial insects, too.
This article originally appeared in the Sept./Oct. 2023 issue of Hobby Farms magazine.
Root cellaring is the simplest form of food preservation. Storing produce in a root cellar can be a good deal if you have the right kind of vegetables and fruits and a humid, cold location. Root cellaring, also called cold storage, cool storage and underground storage, takes advantage of the natural coldness of late fall and winter and the insulating coolness below the ground to keep your harvest fresh for a couple of weeks or an entire winter.
Root cellaring is incredibly easy, but it isn’t foolproof. That is because the low temperatures aren’t powered by electricity, so they’ll vary, as will the shelf life of your produce. As a result, you’ll have to check the food regularly, adjusting the temperature and humidity, and remove any fruits and vegetables that are starting to spoil.
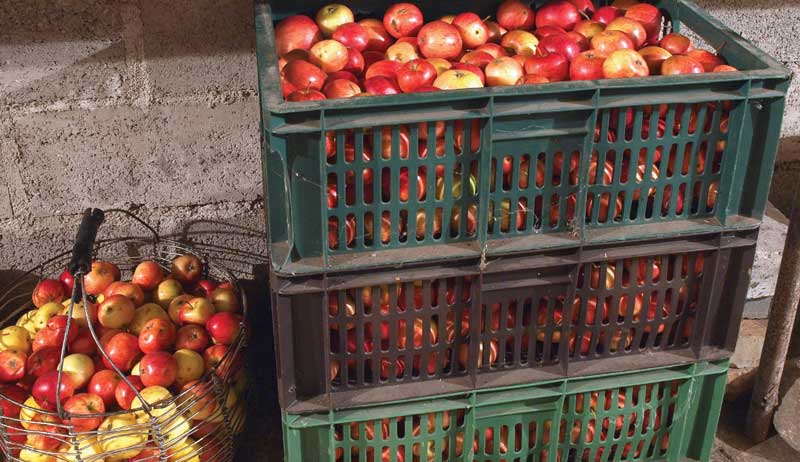
Store only top-quality produce without blemishes, bad spots or wounds. Any weakness can invite decay or disease, which can spread to other fruits and vegetables. And only store produce suited for long-term cold storage. Good choices for root cellaring are apples, cabbages, pears, firm cool-season root crops and hard-shelled squash—the crops that seem to last forever if forgotten in the back of the refrigerator.
Handle produce destined for storage with great care during and after harvesting to avoid bruises and damage. Don’t wash the fruits and vegetables, even if they are dirty. Instead, just rub the soil off with a soft cloth or glove or rinse it off gently under running water. Then let the water evaporate before storing. And if you harvest on a warm autumn day, let the food chill in the refrigerator before you put it into storage. Otherwise, it’ll take a long time to cool down and could spoil in the process.
How It Works
We have come to rely on our refrigerators for storing just about anything. It’s difficult to believe that just a few generations ago, your ancestors used their root cellar for a similar purpose. But why should you bother to use a root cellar in our technological age?
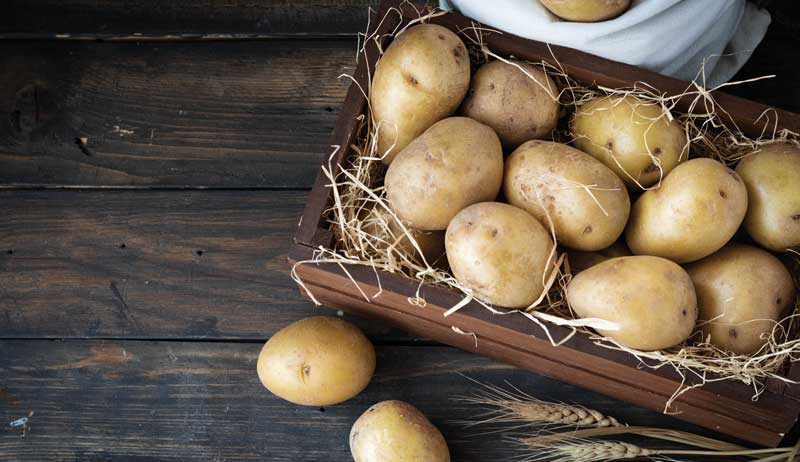
For one, your refrigerator probably is crowded with other things, and you simply don’t have enough space to store the fall harvest from a medium- or large-size garden. Secondly, the conditions in a root cellar can be even better than refrigeration for crops such as garlic, onions and potatoes.
A big part of what you can store in a root cellar depends on your storage conditions. You can keep produce in a barrel buried in the garden, in a foam ice chest in an unheated garage, or in boxes or bags in your basement. If you don’t have space or time to make an extra-cold and extra-humid area, you can keep many vegetables in your basement or an unheated room.
If the temperature stays about 50 degrees Fahrenheit, it’s great for pumpkins, sweet potatoes and winter squash and tolerable for eggplant, garlic, onions, potatoes, tomatillos and green tomatoes. You can make a storage area in any convenient place where the temperature is low, ideally, 32 to 40 degrees F, and the humidity is high, 80 percent or more.
Let’s look at these conditions more closely.
ekatherina/Adobe Stock
Temperature
Except for a few fruits and some vegetables, you need to keep your food as close to freezing as possible without letting any of it freeze. The proper range, as mentioned, is 32 to 40 degrees. Put your food in storage after temperatures drop outside so you can use those cold temperatures to cool your stored food. In a basement, open a window or vent when you need to lower the temperature, or you can insulate the space to keep warmer indoor air out.
If you’re storing produce in a covered trash can buried outside, you’ll need just enough soil over and around the container to keep it cold but not freezing. Foam chests are their own insulators.
Humidity
Most vegetables, except onions and winter squash, shrivel rapidly unless stored in a moist atmosphere where the humidity is between 80 and 95 percent. In a storage room, keep the humidity up by keeping the air quite moist or the food moist in rustproof cans, pails or barrels.
To keep the air in the storage room moist, spray water regularly right on the cement or dirt floor. Or sprinkle the floor with water from a watering can. (If you have got a dirt floor, think about building a wooden slat floor over it so that you won’t be walking around in wet dirt. Or lay down a layer of coarse, well-washed gravel 3 inches thick, and keep that moist.)
Be careful not to water so much that puddles collect. These could easily encourage the growth of molds and bacteria.
You’ll have to sprinkle each time the relative humidity of the air falls below 80 percent (a hygrometer will tell), which could be quite often. Large shallow pans filled with clean water and placed throughout the root cellar can also be used to increase humidity.
If you aren’t able to or don’t desire to go through the trouble of keeping the entire root cellar humid, store produce that is particularly likely to shrivel, such as root crops, in closed rust-proof containers layered in damp sand, burlap or sphagnum moss. Containers such as large crocks, metal cans, tight wooden boxes and barrels are all suitable for this purpose.
Ventilation
Good ventilation is essential for preventing the growth of airborne bacteria and molds that thrive in humid environments. It isn’t so important when you’re just storing a small amount of food in a buried barrel as it is when you are storing a large amount in a storage room. To ventilate, let in fresh, cold outside air, which also helps bring your storage room temperature down to 32 to 40 degrees.
Light
Store fruits and vegetables in a dark place. Food will decay faster if exposed to light.
Dmitriy Sladkov/Adobe Stock
Cellaring Supplies
Get together everything you’ll need for root cellaring so you can bring your produce right from the garden into storage without shifting it from container to container. This will save time and minimize handling, keeping the produce in better condition.
Fortunately, root cellaring doesn’t require any expensive or specialized equipment. All you need are the fruits and vegetables you want to store, containers to store them in and packing materials such as newspaper, hay or leaves to cushion and separate the produce in storage.
Make sure the storage container you choose is free of any substances that would affect the quality of the food you store. Contamination from diseased vegetables will spoil your produce, and the odor and scent of gasoline, cedar or any other strong-smelling substance can be absorbed by vegetables. Wash plastic and metal containers before you use them for storage, and make sure they are dry before you pack produce in them.
Here’s an opportunity to put your recycling creativity to work with the following containers.
Wooden Boxes
Originally designed to store and ship apples and other fruits, wooden boxes make ideal storage units for cold storage. Dry leaves, hay, straw, sphagnum moss or crumpled burlap can all be used to stuff them. When stacking wooden boxes for storage, place furring strips between the boxes and the floor and between individual boxes to permit good air circulation.
Cardboard Boxes
Probably the most readily available container option, cardboard boxes are perfectly suitable for storing produce in a root cellar if they’re clean.
Homemade Storage Bins
DIY bins are another good option. You can build bins right into storage areas so that there is no chance of water seeping in from the floor. Make the lowest bins 4 inches above the floor to allow air circulation. And make the storage containers removable so you can take them outdoors at the end of the storage season to wash them thoroughly and air them out.
Rustproof Containers
Plastic/metal trash cans, large pails and barrels are all fine as long as they are rustproof. Fill them with packing material and produce in layers, and finish with another 2-inch layer of additional packing at the top. These containers can also be used for pit storage if they’re waterproof.
Styrofoam Ice Chests
Styrofoam chests, with lids removed, make great containers. A crack or two will do no harm.
Mesh Bags/Orange Crates
These are excellent options for storing produce such as onions that require good air circulation.
Sites for Root Cellaring
From a built-in basement storage room to storing in the garden, a variety of root cellaring options exist to store food through the winter. A basement root cellar is lovely to have because it’s so convenient to use, but it can be expensive to build and may just cancel out any savings you had gained from storing your harvest instead of buying from the grocery store during the winter.
Garden
The easiest way to keep vegetables in cold storage is to leave them where they are growing during the late fall and early winter. This only works with extra hardy crops such as winter-keeper cultivars of beets, carrots, parsnips, rutabagas and turnips, as well as durable greens such as Brussels sprouts, evergreen scallions and parsley. And it requires well-drained soil that won’t encourage the roots to rot. If you have a cold frame, you can also grow arugula, Swiss chard, winter lettuce and other cool-season greens.
Cellar Steps
You can make a small but simple and inexpensive storage area by taking advantage of the steps that lead from your basement to the outside basement door. Install an inside door at the bottom of the steps to keep basement heat out. If you want to create an even larger storage area, build inward into the basement, but take care to insulate this extra interior wall space from the rest of the basement. As you go up the steps, temperatures in the stairwell will decrease, and a little experimenting will help you determine the best levels for the different crops you are storing. Check the humidity, and if it’s too dry put some pans of water at the warmest level to increase it.
Styrofoam Ice Chests
A foam ice chest is a perfect cooler for crops such as apples and green tomatoes. If you have an unheated place that doesn’t actually freeze, such as a garage or porch, these coolers can work well for short periods of time. Add the produce you want to store in the chests, a different one in each chest. (Don’t mix different types of produce.) Put the lid in place, and keep it out of the sun, which might heat up the chest. Produce kept this way will probably be good for several weeks.
Underground Storage
A fully or partially buried container makes a good place for storing produce. The earth protects from freezing temperatures as well as keeps the food cool and out of the light. But it doesn’t keep out rodents and other animals, so make sure the container is secure.
It’s also important to make some kind of drainage to prevent water from entering the container and spoiling the food.
Areas of the country that have moderate winters without extreme temperature changes are the best for this kind of cold storage. The earth acts as a good insulator, but there is no guarantee that it’ll hold out freezing temperatures that will freeze your food or high temperatures that can cause food to spoil. Two simple ways to store produce underground are in a wooden box or a sunken trash can.
Viesturs Kalvans/Adobe Stock
Buried Box
Make a wooden box 6 feet long, 3 feet wide and 2 feet deep. Standard 2-by-4 wooden boards work well. Use a 1-inch hardware cloth to tightly line the inside to keep out rodents. Make a neat wooden lid for the top.
At harvest time in late autumn, select beets, carrots, parsnips, potatoes, turnips and the like for storage. Rinse them free of soil, but be careful not to bruise the skin. (Let excess water evaporate before storing.) Make a pit to put the box in, preferably on sloping ground so excess water will drain away. Put the box inside and lay a layer of clean, sharp builder’s sand (washed sand) on the box bottom. Then place a layer of root vegetables on top of this, resisting the temptation to just dump vegetables into the pit. Cover this first layer of root crops with a layer of sand, then continue layering like this until you fill the box, finishing with a layer of sand.
Try to keep different vegetables separate from one another, and if snow is likely to make them difficult to find, mark their location. For insulation, close the lid and cover it with bales of straw, and then cover this with a plastic sheet to keep out rain and snow. In the summer, when all the food has been taken from the box, clean everything out and let in sunshine and fresh air.
Built-In Basement Storage
Centrally heated homes with concrete floor basements are generally too warm to be used for cold storage because most vegetables and fruits require temperatures between 32 and 40 degrees. However, with a little ingenuity and investment, part of almost any basement can be successfully converted into a convenient root cellar.
Prepare a room that is separated from the rest of the basement, is reasonably insulated and has a window or other means of allowing cold outside air in on occasion to cool the space. You could try a storage room, about 8-by-10 feet, which should be plenty large for a modern gardener’s storage purposes. You can store 60 bushels of produce in this size room.
If possible, locate the storage room in the northeast or northwest corner of your basement, away from the chimney and heating pipes. The northeast corner takes advantage of the two coldest walls of a house. The northwest corner is second best. You have the added advantage when building into a corner of only having to construct two interior walls to enclose your storage space.
Even this setup won’t give you total control over temperature. That depends largely on the outside weather conditions. In early fall and late spring, daytime temperatures may be higher than you want in the storage area. So close the windows to keep the warmth out. Open the windows whenever the storage room temperature is higher than 40 degrees and the outside temperature is lower. Close them when the room temperature drops to 32 degrees. Obviously, a thermometer is a necessity in a root cellar. Train yourself to check the temperatures outside and inside the root cellar frequently.
Cover the windows with opaque material to keep light out of the storage area. Wide wooden shutters fitted to the outside of the window frame will help if you need to open the windows during the daytime. Also, cover the windows with screening to keep out pests.
Keep the storage room clean to prevent problems with bacteria and molds. The walls, floor, and ceiling should be made of easy-to-clean materials, and bins and storage shelves should be removable for cleaning. Take them outside on a dry summer day and dry brush them or scrub them with soapy water. Be certain they’re completely dry before replacing them in the root cellar. Open the windows and the door and let the breeze blow through the entire room.
Root cellaring is the oldest and simplest method of food preservation. It doesn’t require electricity, expensive or specialized equipment, or take up room in your fridge and freezer. The best part is that you can use what you already have—your home, commonly found containers, produce from your garden—and easily preserve many of your harvests for delightful eating throughout the winter.
This article originally appeared in the Sept./Oct. 2023 issue of Hobby Farms magazine.